Forge Design Automation for Revit
Today, I am presenting a class on Design Automation for Revit or DA4R at the Forge DevCon preceding the German Autodesk University in Darmstadt.
I will present very similar material again tomorrow in German in the AU session on BIM360 News und Online Revit-Programmierung von BIM via Forge Design Automation API für RVT.
This is all based on last year's presentation SD125457 – Design Automation – Building Web Applications with Revit Data on Forge by Diane Christoforo, Sasha Crotty, Rahul Bhobe and Ryan Duell at Autodesk University last year in Las Vegas.
I consider that enough public exposure to allow me to share this information here with you as well:
- Disclaimer
- What is Forge Design Automation API for Revit?
- What are some examples of what the service can do?
- How do you use the service?
- Workflow: Uploading a Revit add-in
- Workflow: Running a client application
- Things to consider when using the service
- How can I create a Revit add-in which works with Design Automation API?
- Decide what your add-in will do
- Create an IExternalDBApplication
- Determine what inputs you need
- Use our bridge library to be notified when Design Automation is executing
- Create a failure handler
- Decide how to handle logging and errors specific to your add-in
- Plan how to access or create files
- Move any Internet operations to the client application
- Further Reading
It will also help me get my act together for the two presentations :-)
For your convenience, here are the AU 2017 slide deck and handout document in PDF format:
Please refer to the further reading material for a link to the session recording.
Disclaimer
Forge Design Automation API for Revit is an unreleased service which is currently in invitation-only beta. The information presented here will change.
Any statements regarding planned or future development efforts are not intended to be a promise or guarantee of future availability of products, services or features but merely reflect current plans and based on factors currently known. These planned and future development efforts may change without notice. Purchasing decisions should not be made based upon reliance on these statements.
Please note that you currently cannot make any practical use whatsoever of anything discussed below.
What is Forge Design Automation API for Revit?
The Forge Design Automation API for Revit lets you build web applications that create, read, and modify Revit models. We'll review the kinds of apps you will be able to build and their API architecture so that you can get ready to use Design Automation for Revit in your own applications.
Design Automation API for Revit is a Forge service that will allow developers to access the 'business logic' of Revit on the cloud. Like Design Automation API for AutoCAD, developers can create client applications which speak to the Revit engine via our REST API. Developers will be able to automate existing workflows or create new cloud workflows.
Because Design Automation API for Revit is a Forge service, you can take advantage of other Forge services to easily connect your applications together.
Today, you can use and read the existing documentation for Design Automation API for AutoCAD.
What are some examples of what the service can do?
There are many options falling under three major workflows: Create, Extract, and Modify.
Create:
- Convert from a third-party format to RVT/RFA
- Generate documentation from a specification
- Create families from a catalog
Extract:
- Put data into a format Revit doesn’t natively support
- Share model info with consultants who don’t have Revit
- Create daily model reports
Modify:
- Design option generation
- Automatically replace out-of-date content
- Fix common modeling mistakes
How do you use the service?
Like other Forge services, you’ll create a Forge client application which will call our REST API endpoints. You can use any language which can make REST calls. This client application will also do any 'front-end' work you need – displaying UI to an end-user, for example. Overall, the system is similar to Design Automation API for AutoCAD and the endpoints should be familiar to someone familiar with that service.
In addition to the client application, you will create one or more Revit add-ins to execute against the Revit engine. You will upload these to the Design Automation service and your client application will refer to them when invoking the service. (You can keep them private or public depending on what you want.) We’ll talk more about these add-ins in the next section.
Workflow: Uploading a Revit add-in
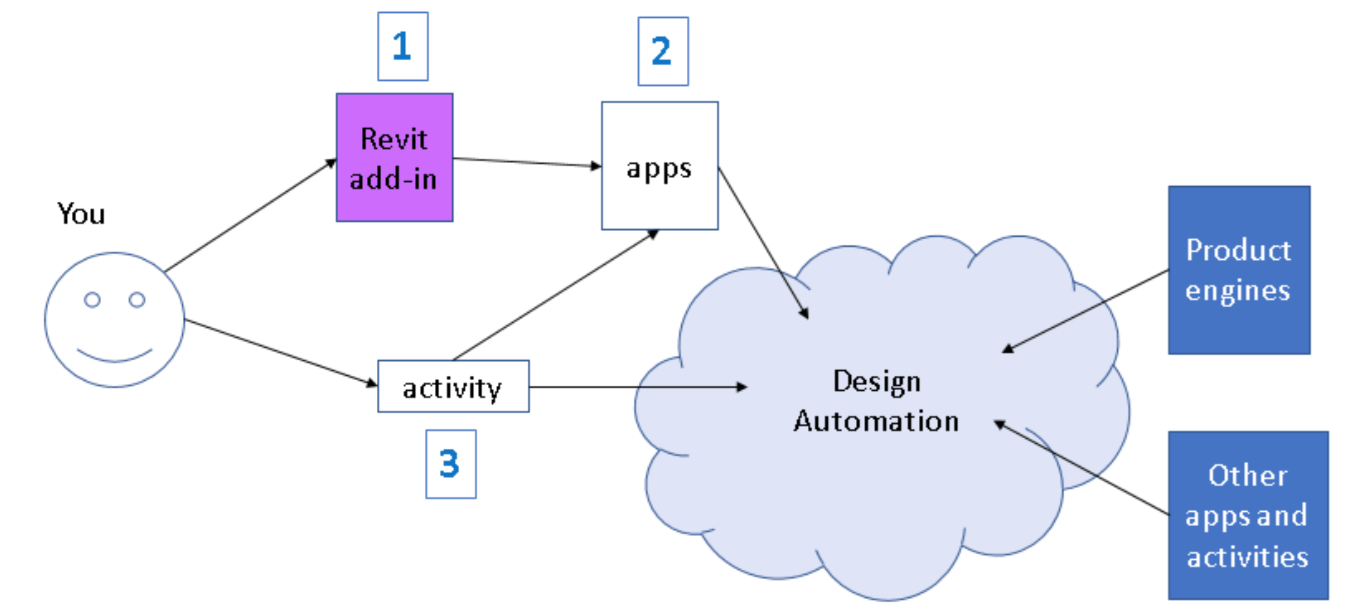
- You write the code for your Revit add-in.
- You define and upload an 'apps' object with the Design Automation API. Apps refers to one or more add-ins and can be used later by multiple applications. (It's your choice whether to make this public or private.)
- You define an 'activity' with the Design Automation API. An activity specifies one or more apps, a set of inputs and outputs, and a product engine to run against.
Workflow: Running a client application
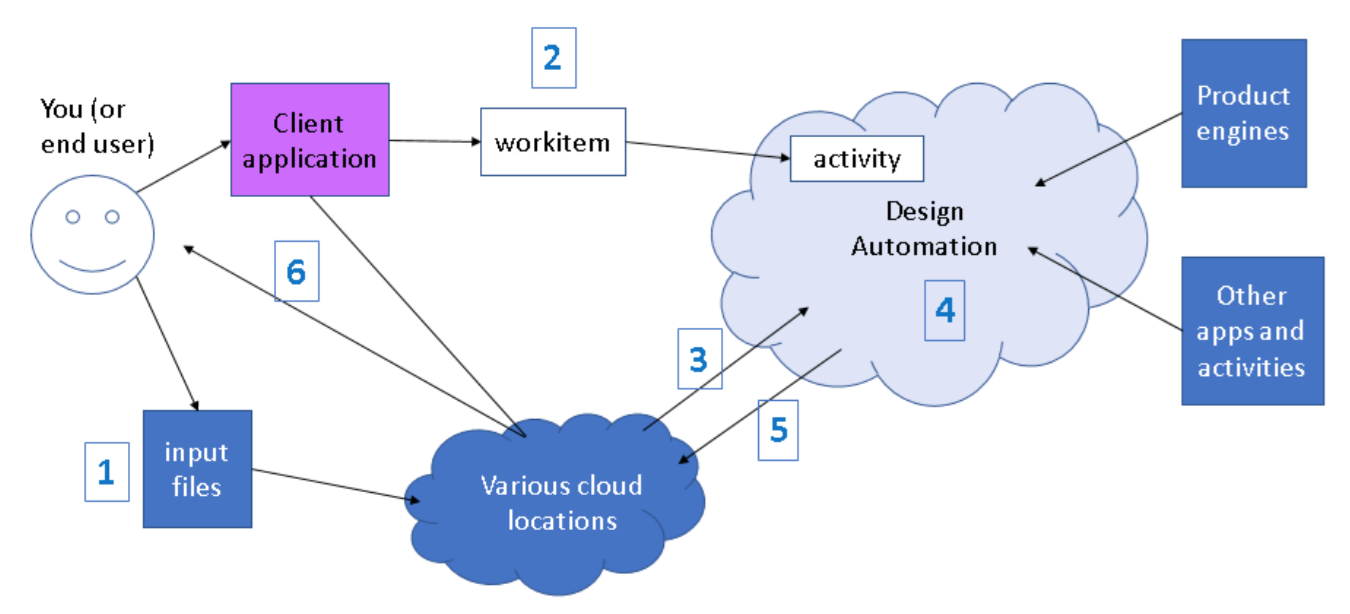
- You or your end user uploads their input files to a cloud location.
- The client application POSTs a 'workitem'. This is a specific invocation of an activity, indicating specific input files and an output location.
- The Design Automation service downloads the input files.
- The service runs your add-in against the Revit engine.
- The service uploads the output to the specified location.
- The client application retrieves the output, either for display to the end user or further processing.
Things to consider when using the service
There are a few important things to keep in mind as you plan for how to use the service.
- You will only have access to Revit’s 'business logic'. You won’t have access to Revit’s UI. In technical terms, this means you can call RevitAPI.dll functions but not RevitAPIUI.dll functions. (Or, you won’t have access to the Autodesk.Revit.UI namespace.) You can put whatever UI you want in your client application, but your Revit add-in shouldn’t display UI.
- There is no intermediate feedback. Your add-in will run to completion once it starts, so it’ll need to have all input up front. There is also no way to get partial results. You can check the status of a job but you’ll get all results at the end.
- There is no persistence between jobs. If a job is meant to be a follow-on to a previous job, you’ll need to send the second job with any info it needs to set up the proper state. Every job is run in a clean environment.
How can I create a Revit add-in which works with Design Automation API?
Your full client application may not be a Revit add-in specifically. It may be a website or a standalone application. But part of your system will be a Revit add-in. This add-in is what will be executed against Revit in the cloud when you invoke the Design Automation API.
Even though the Forge service isn’t public today, we can explain the steps to create a Design Automation-ready add-in now. You can use these steps to convert an existing add-in or to create a new one.
Decide what your add-in will do
When you send a job to Design Automation API, it will go into a queue. When it reaches the head of the queue, it will run to completion and then return. Everything the job needs to run must be available to it at start time. As such, add-ins should be able to do self-contained chunks of work.
This does not mean the add-in can only do simple tasks, just that all the inputs need to be present up front. For example, take an add-in which does nightly data extraction from a model. It might export all views to images, convert all schedules into the company’s format, create charts on what changes have happened in the model over the past day, and update cost estimates. You could structure this as one add-in or as four, depending on what you want to do and whether you think you might reuse the pieces elsewhere. One add-in means only having to open the model once. Four add-ins lets your client application send the work as four different jobs and you may get intermediate results faster.
Create an IExternalDBApplication
Most Revit add-ins are external commands (IExternalCommand) or external applications (IExternalApplication.) There is a third kind, the IExternalDBApplication, which is an add-in which can run without Revit’s UI logic. You will not have access to Revit’s UI logic as part of Design Automation API, so you will need to create an IExternalDBApplication.
Your add-in will have access to all the functionality in RevitAPI.dll but none of the functionality in RevitAPIUI.dll. You should avoid using other UI libraries as well. There is no way to click on dialogs or message boxes; the system will effectively hang if you try to present one.
If you have an existing app, splitting into UI and logic layers will allow you to run against both desktop Revit and Design Automation API. You can preserve your existing UI functionality within an IExternalApplication which communicates with your IExternalDBApplication.
Determine what inputs you need
'Inputs' to a Design Automation job can include simple parameters and files of any type. The framework will put any input files into the cloud machine’s working directory before running your add-in.
As mentioned, a Design Automation job must have all the information it needs to run at launch time. There is no ability to send more data or call back to the user in the middle of a job. This can present a problem if your add-in expects to do partial calculations and then ask the user for more input.
In this situation, you can either attempt to collect the input up front, or set up your client application so that it run several smaller jobs. Here are two examples:
- If your application warns a user when an operation is expected to take a long time, you might have a user setting indicating how long to wait before cancelling.
- If your application runs into errors while trying to generate geometry, you might return early, ask the user to make corrections, and re-submit the job.
Use our bridge library to be notified when Design Automation is executing
We will provide a small library with an event your add-in can subscribe to in order to be notified when the Design Automation service is ready to run your add-in. Your add-in should create an event handler and execute its functionality inside. (The add-in will be registered in Revit normally, but this provides an entry point for starting your code.)
Until the library is available, you can get a similar effect for testing purposes by subscribing to Revit’s ApplicationInitialized event. You should not do this if you are actually running your add-in against Design Automation, because we will do more system setup after the ApplicationInitialized event is raised. Additionally, the framework will use the success/failure parameter of the event to determine whether the job succeeded.
Create a failure handler
One side effect of there being no UI available is that you will need to handle Revit errors. We will ignore or take a default action for user-facing dialogs. We will also ignore warnings. However, we do not take any default actions for errors. You should either create an event handler for the FailuresProcessing event, or implement an IFailuresProcessor.
You must ensure that it handles all possible warnings, errors and other failures gracefully.
The Building Coder recently discussed this topic using the StairsAutomation SDK sample:
- About handling failures
- Sample failure processor module
FailureProcessor.cs - Swallowing StairsAutomation warnings
- Auto-Run an add-in for Design Automation
Decide how to handle logging and errors specific to your add-in
Design Automation API for Revit does not have any built-in logging functionality. You can add comments to the Revit journal via Application.WriteJournalComment(). You can also create a log file of your own and include it in your output zip package.
Plan how to access or create files
During your add-in’s execution, you will only have access to the working directory of the cloud machine. As such, any Revit models or other files you create will need to be saved to the working directory, or to a subfolder under the working directory. This also applies to any log files you create.
You can specify input files from cloud locations by providing a signed URL when running a Design Automation job. The framework will download the file or files to the working directory.
Move any Internet operations to the client application
Your Revit add-in will not have access to the network. Any cloud files you need will have to be specified as inputs. The Design Automation framework will take care of downloading any input files before running any Revit code. The service will also upload your output to the URL you specify.
If you need to communicate with an online database or something similar, your client application will need to do this before your after your add-in runs. You may need to temporarily store your data in an input or output file.
Further Reading
Here are links to the current Forge Design Automation API reference (for DWG), Revit API guides and past online AU classes for Design Automation:
Design Automation API Reference:
Revit API:
Past Autodesk University Classes:
- SD124720: The New and Expanded Forge Design Automation API
- SD125457: Design Automation: Building Web Applications with Revit Data on Forge
- Design Automation for Revit – DA4R
- Getting started – Step by Step
- Design automation terminology
- Handling failures in Revit app bundles
- References
Design Automation for Revit – DA4R
Design Automation lets you write your own applications for Revit, so that you can process and manipulate Revit models via Autodesk Forge.
Getting Started – Step by Step
Please follow these steps to run your first Revit job in Design Automation:
- Convert your Revit AddIn – Applications run on Design Automation are very similar to normal Revit addins.
- Create a Forge App and get authenticated – Design Automation runs on the Autodesk Forge platform, so you need an account and access to the pricvate DA4R beta.
- Create a nickname for your Forge App
- Publish your Design Automation app
- Publish your Design Automation activity
- Post your Design Automation workitem
Design Automation Terminology
Before we discuss any details, let's define some important terms:
- nickname – A way to map a Forge App
Client Idto a customized string. The nickname lets you create a friendly, easy-to-read, string that can be used in place of the long Forge AppClient Id. - alias – A label to a specific version of an
apporactivity. - app – A package of binaries and supporting files which make your Revit Addin application.
- activity – An action which can be executed in Design Automation. You create and post your own activities to run against particular
apps. - workitem – A request to execute an
activity. The relationship between an activity and workitem can be thought of as a 'function definition' and 'function call', respectively.
The naming rules for nickname, alias and id of app/activity limit the possible characters to the purely alphnumerical set of [a-zA-Z_0-9].
Handling Failures in Revit App Bundles
Before you convert your Revit add-in to DA4R, you must ensure that it handles all possible warnings, errors and other failures gracefully.
The Building Coder recently discussed this topic using the StairsAutomation SDK sample:
- About handling failures
- Sample failure processor module
FailureProcessor.cs - Swallowing StairsAutomation warnings
- Auto-Run an add-in for Design Automation
forge use cases - general categories
dashboard and data visualisation analysis + simulation saas integration batch editing of designs ar + vr configurators content catalogues photogrammetry