Wall Profile Command Update
I returned from my time off in July and am still taking it easy in August as well.
I dived in deep into the Revit API again to help resolve an issue with The Building Coder samples external command to retrieve wall profile curves.
Here are some other noteworthy items to keep company with my debugging and fixing report, including a creative workaround to rotate an element in chunks:
- CmdWallProfile update
- Access to the IUpdater original value
- Getting element dimensions from IFC files
- Creative workaround to rotate elevation marker in chunks
CmdWallProfile Update
Eden Oo, Modeler at Tiong Seng Construction Pte Ltd, raised an issue with The Building Coder samples to retrieve wall profile loops in his Revit API discussion forum thread on the get wall profile error:
Question: I got an error testing the CmdWallProfile external command:
Here is a sample model that you can use to reproduce it.
Answer: Thank you for your report and sample model.
I can reproduce a problem. However, initially, it is different from yours:
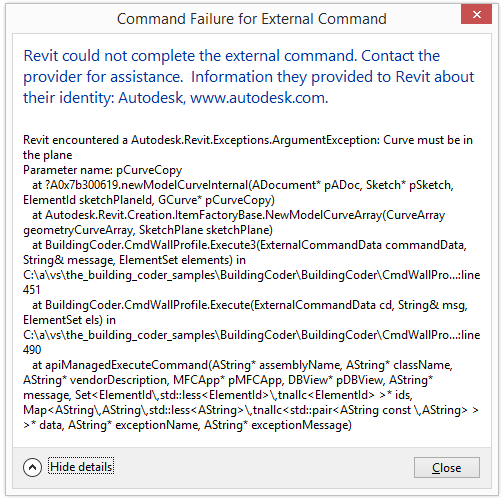
Here are the exception details:
Revit encountered a Autodesk.Revit.Exceptions.ArgumentException: Curve must be in the plane
Parameter name: pCurveCopy
   at ?A0x7b300619.newModelCurveInternal...
   at Autodesk.Revit.Creation.ItemFactoryBase.NewModelCurveArray...
   at BuildingCoder.CmdWallProfile.Execute3...
   at BuildingCoder.CmdWallProfile.Execute...
   at apiManagedExecuteCommand
I debugged CmdWallProfile, especially the method Execute3, and added some debug logging messages to it.
The offset distance is defined as 5.
The messages tell me the following to help understand the situation:
  wall orientation (1,0,0)
  face origin (5.06,24.16,0), face normal (1,0,0)
  plane origin (5.06,24.82,4.92), plane normal (1,0,0)
Pondering this, I replaced the plane definition using curveLoopOffset.GetPlane by a plane defined using the normal and face origin instead.
That solves the initial problem.
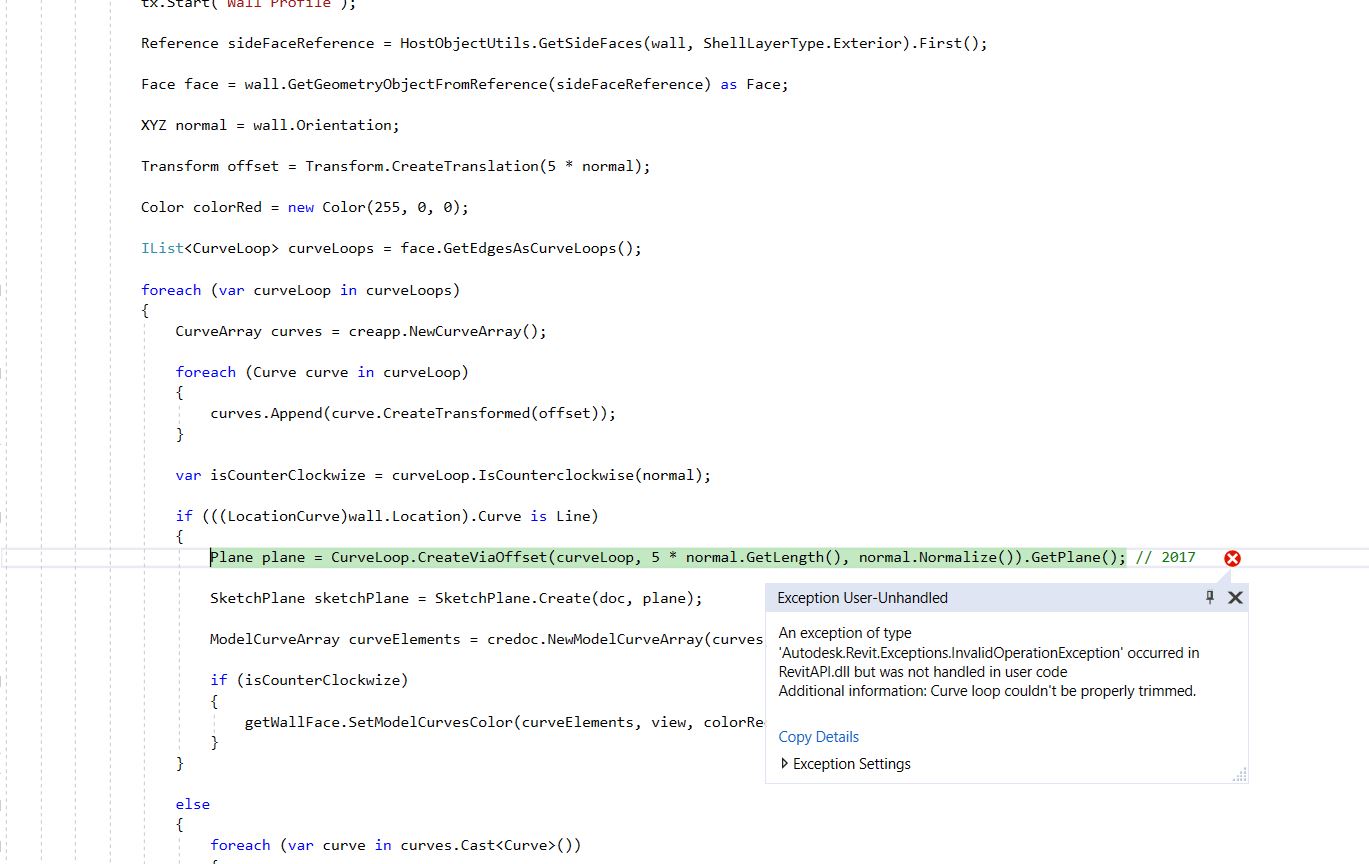
In the next wall face curve loop, however, I encounter a new issue:

Here are the new exception details:
Revit encountered a Autodesk.Revit.Exceptions.InvalidOperationException: Curve loop couldn't be properly trimmed.
   at Autodesk.Revit.DB.CurveLoop.CreateViaOffset...
   at BuildingCoder.CmdWallProfile.Execute3...
   at BuildingCoder.CmdWallProfile.Execute...
   at apiManagedExecuteCommand...
This looks like the issue you are facing too.
It is caused by the call to CurveLoop.CreateViaOffset in all the walls hosting windows and doors.
It may be due to some specific aspect of the door and window definition.
However, happily, that call can now be removed, since it is no longer needed.
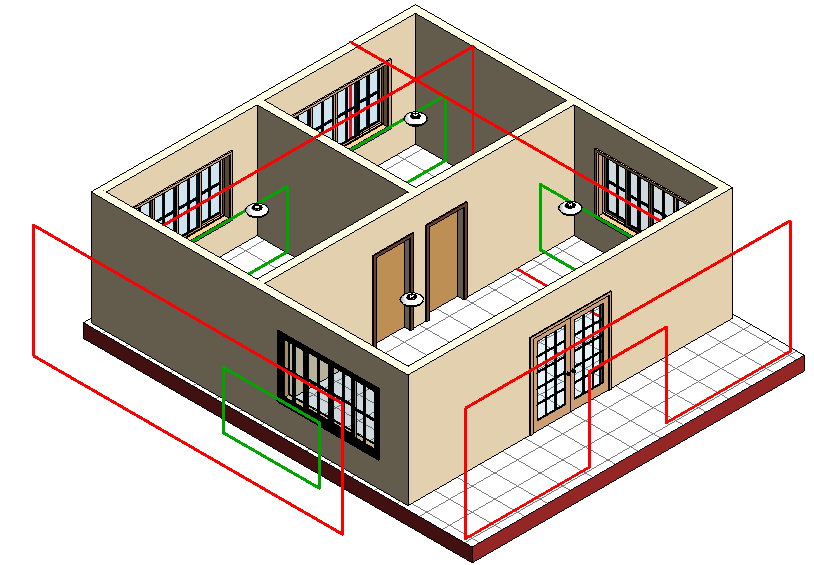
Once it is gone, I can retrieve all the inner and outer loops of all the walls successfully, as you can see in the screen snapshot at the top.
They are represented by model lines; the outer loops are displayed in red, and the inner ones in green.
The fixes are captured in The Building Coder samples release 2019.0.143.1.
All the modifications I applied can be examined in the diff between the previous and the current version.
Access to the IUpdater Original Value
Several people have asked in the past how to access the previous, old, original parameter value of an element before it has been modified and triggers a call to an IUpdater handler.
Now it came up again in
the Revit API discussion forum thread
on retrieving
the GetChangeTypeParameter old value:
Question: I added an IUpdater trigger for when a certain project parameter is changed.
This works fine, and I am able to hook into the moment the parameter is getting a new value.
The goal is to lock the parameter when it has a certain value (for example 400) and is then only allowed certain new values based on that old value.
For now, it seems I can only get the new value that the user put in when I get the data from GetChangeTypeParameter.
Is there any way to retrieve the parameter value prior to the user change that triggered the GetChangeTypeParameter event?
Answer: Don't believe so, as the change has occurred.
Is understandable, since the updater is responding to a change and as far as I know isn't recording at the same time the old parameter values.
I would probably create a backing value on the element via extensible storage (last valid change).
Then, after seeing current value is invalid, revert back to that value, or, if value is valid, then update backing value on extensible storage.
Getting Element Dimensions from IFC Files
A question from StackOverflow, on getting entity dimensions from IFC files:
Question: I am looking for a way to get dimensions of walls for example from an IFC file. I tried using Xbim and IfcOpenShell with no luck. How does Revit get dimensions for each entity like length, area and volume?
How can I achieve this?
Answer: Revit is a BIM software that creates and manages a building information model. Within Revit, most elements are parametrically defined. For instance, a wall's height is defined by its lower and upper levels and optional offsets up and down from those levels. Therefore, Revit automatically knows the wall's height from its parametrical definition. That answers the first part of your question.
To answer the second part of your question, I would say that you can achieve that by implementing your own BIM management software.
That sounds like rather a daunting task to me.
Maybe that is not exactly what you are after.
More details by Andy Ward: If you're using XBIM there's an example on finding the Area and Volume of spaces/rooms, which could serve as a good starting point.
It's worth noting there are multiple means of establishing these quantities from IFC which largely fall into two approaches:
1) You acquire the pre-calculated data from the semantic data. This is the approach the XBIM sample uses.
In this scenario Revit (or any other authoring tool) is assumed to have already made the dimensions/quantities available during export, following conventions in the IFC schema. i.e., IfcElementQuantity.
2) You calculate the quantities from the raw geometry. This is much more involved. You'd need to calculate the solid geometry from the Ifc Representation (which XBIM.Geometry can do), before doing the calculations to work out the dimensions. If your walls are 'regular' rectangular extruded solids that's pretty simple; but if they're not, it's going to be more complex. Depending on what you're doing you may be able to use bounding box representation to simplify calculating dimensions, but areas and volumes are going to be off.
Creative Workaround to Rotate Elevation Marker in Chunks
Graham Cook, CAD Developer at Premier BIM Ltd, implemented a nice little workaround to solve an issue rotating elevation markers, explained in the Revit API discussion forum thread on ElevationMarker does not rotate 180 deg:
I'm working on a room elevation add-in. Discovered that rotating elevation markers by 180 deg results in an extra 180 deg being added by the API. In fact, rotating the marker within the range greater than 160 and less than 200 deg will result in the angle being automatically adjusted by 180 deg. My workaround has been to catch angles in this range, halve it, and perform two rotations. All other angles rotate fine as demonstrated in the image.
We raised the issue with the Revit development team.
Graham adds:
Until the bug is fixed, I have found the best workaround is to rotate the elevation marker in chunks of 30 degrees until the required angle has been met. My original post suggested this problem was restricted to angles between 160-200 degrees, but I've found examples where the problem was evident on angles as low as 135.
XYZ p2 = new XYZ( placementPoint.X,
  placementPoint.Y, placementPoint.Z + 1 ) );

Line lineAsAxis = Line.CreateBound(
  placementPoint, p2 );

if( angle > 0 )
{
  double angle_remainder = angle;
  while( angle_remainder > 0 )
  {
    double rot_angle = 0;
    if( angle_remainder > 30 )
      rot_angle = 30;
    else
      rot_angle = angle_remainder;

    ElementTransformUtils.RotateElement(
      doc, elevMarker.Id, lineAsAxis,
      rot_angle * App.TO_RADIANS );

    angle_remainder = angle_remainder - rot_angle;
  }
}
Many thanks to Greg for raising this and sharing his workaround.