Revit Tools for MomenTUM Pedestrian Simulation
Occasionally, I have the delight of receiving messages entitled something like Giving something back to the Community.
This time, the pleasure was provided by Christian Thieme, master's degree student at the Chair of Computational Modeling and Simulation at TUM, the Technical University Munich, working on tools connecting Revit to the MomenTUM agent-based pedestrian simulation framework.
Many thanks, Christian, for sharing this!
In his own words:
- Giving something back to the community
- Project overview
- Export workflow
- Import and display results workflow
- Transformation from
XYZtoUV
Giving Something Back to the Community
I am a Master's degree student at TUM in Germany.
As part of a project, I developed a Revit Plugin that uses the Revit Analysis Visualization Framework AVF (category page) to display (arbitrary) analytical results.
In order to do so, your blog posts and the forum were a big help. And if it is of any help, I would like to share my solution to do so.
My general approach to compute and display was to extract geometrical information (e.g. the layout of a building). I exported this information in an xml format.
Then I processed the xml-data using a Java Project of the University Chair I was working in.
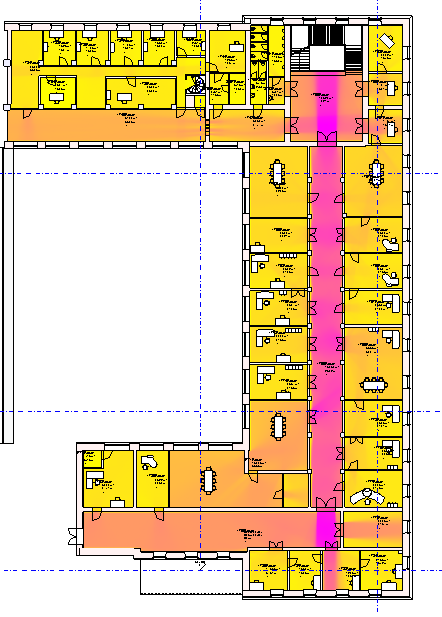
The Java projects generates a 2D array out of the input xml file, and computes a metric – in my case, a type of space syntax operation – Visibility Graph Analysis).
The result of the visibility graph analysis is a 2D array of values that is then fed in to my plugin.
You can find my Space Syntax Plugin within the Momentum GitHub repository.
The Revit Plugins are located in the momentum-tools subfolders.
- Export: MomenTumV2RevitLayouting add-in exports geometrical information from a Revit project to XML.
- Import: MomenTumV2SpaceSyntaxRevit reads the XML results and displays them using AVF.
I hope you find this interesting and worth sharing.
Project Overview
The project goal was to visualize an analytical result.
- Step 1: use the MomenTumV2RevitLayouting Revit add-in to export geometrical information from a Revit project to XML.
- Step 2: run the MomentumV2 Kernel the main Java project to produce another XML file with result data.
- Step 3: use the MomentumV2SpaceSyntaxRevit Revit add-in and open the result data xml file and visualise the results.
The MomentumV2SpaceSyntaxPlugin uses AVF to display the result in the active view.
There are some limitations to the work, as mentioned in the project readme.
The space syntax plugin also contains the transformation code from xyz to uv coordinates.
Export Workflow
Executing the plugin prompts the user to select one level or all levels of a project. The selected level(s) will be exported as xml.
Note: Walls and doors are exported as obstacles as type 'Wall'. Stairs can will either be shown as areas of either type 'Origin' or 'Destination'.
Detailed information on the add-in installation and workflow is provided in the MomenTumV2RevitLayouting how-to documentation.
Import and Display Results Workflow
The workflow assumes that you have successfully built the Revit layouting plugin and the Space Syntax plugin and integrated them into your Revit installation. Furthermore, you need to have built Momentum successfully and have a basic understanding of its usage (see momentum-documentation).
-
Use the Layouting Plugin to export geometry data of a level of a Revit project into a xml file. Make sure that you have properly set rooms in your Revit project before exporting (see layouting documentation).
-
Check if the resulting xml contains at least one area of type 'Origin' per scenario node. (If there is none, you have to create this area by hand yourself.)
-
Create a xml configuration file and insert a lattice, Space Syntax and an outputwriter configuration. (Hint: You can copy the spaceSyntaxExamples.xml and make sure to adapt the file paths and ids accordingly.)
-
Run your configuration with Momentum (see momentum-documentation) and check if the execution produced the xml output file defined in the Space Syntax output writer tag of the input configuration.
-
In Revit, in the same project as you exported the geometry, go to 'Add-Ins' tab and run the MomentumV2SpaceSyntax external command and select the Space Syntax result xml you just created with Momentum.
-
If you created the xml result using the Revit Layouting plugin, the Space Syntax plugin will automatically select the correct level to visualize the result from metadata in the result xml. Otherwise, a level picker will open.
Transformation from XYZ to UV
In my import and visualisation plugin, I managed to transform points from the global space (XYZ) to the local space of a face (UV representation of a bounding box).
In my understanding, this is quite unique, since I haven't found any other code snippet that does so.
Revit itself only supports the Face.Transform(UV) method that translates a UV coordinate into XYZ coordinate space.
I reversed that Method to translate XYZ coords to UV coords.
At first, I thought I could solve the reverse transformation by solving a linear equation with 2 unknown variables. But this wasn't a general solution. So, I finally found out that the transformation consists of a displacement vector and a rotation matrix.
/// <summary>
/// Create transformation matrix to transform points
/// from the global space (XYZ) to the local space of
/// a face (UV representation of a bounding box).
/// Revit itself only supports Face.Transform(UV) that
/// translates a UV coordinate into XYZ coordinate space.
/// I reversed that Method to translate XYZ coords to
/// UV coords. At first i thought i could solve the
/// reverse transformation by solving a linear equation
/// with 2 unknown variables. But this wasn't general.
/// I finally found out that the transformation
/// consists of a displacement vector and a rotation matrix.
/// </summary>
private static double[,]
  CalculateMatrixForGlobalToLocalCoordinateSystem(
    Face face )
{
  // face.Evaluate uses a rotation matrix and
  // a displacement vector to translate points

  XYZ originDisplacementVectorUV = face.Evaluate( UV.Zero );
  XYZ unitVectorUWithDisplacement = face.Evaluate( UV.BasisU );
  XYZ unitVectorVWithDisplacement = face.Evaluate( UV.BasisV );

  XYZ unitVectorU = unitVectorUWithDisplacement
    - originDisplacementVectorUV;

  XYZ unitVectorV = unitVectorVWithDisplacement
    - originDisplacementVectorUV;

  // The rotation matrix A is composed of
  // unitVectorU and unitVectorV transposed.
  // To get the rotation matrix that translates from
  // global space to local space, take the inverse of A.

  var a11i = unitVectorU.X;
  var a12i = unitVectorU.Y;
  var a21i = unitVectorV.X;
  var a22i = unitVectorV.Y;

  return new double[2, 2] {
    { a11i, a12i },
    { a21i, a22i }};
}