Roomedit3d Update for Connecting Desktop and Forge
As I already pointed out, it is really high time now for me to get started preparing for the upcoming presentations on connecting the desktop and the cloud.
Let's look at what I prepared for that in the past, in the recent almost-present for the Forge DevCon in June, and plans for the future:
- Past connecting desktop and cloud samples
- DevCon Forge sample for Freeing Your BIM Data
- Roomedit3dv3 starting point
- Augusto's node.js sample guidelines and naming conventions
- Forge Viewer access to Revit 2D views
Past Connecting Desktop and Cloud Samples
Here is an overview of the samples connecting desktop and cloud that I created in the past, in sequential order.
Each of these samples consists of a C# .NET Revit API desktop add-in and a web server component:
- RoomEditorApp and the roomeditdb CouchDB database and web server demonstrating real-time round-trip graphical editing of furniture family instance location and rotation plus textual editing of element properties in a simplified 2D SVG representation of the 3D BIM. This is my first and favourite sample, extremely simple, quite impressive functionality, shows all you need to know if you do it all yourself. Con: nowadays, CouchDB is not quite as hip and easily accessible as node.js.
- FireRatingCloud and the fireratingdb node.js web server driving a MongoDB database demonstrating real-time round-trip editing of Revit element shared parameter values. This is the simplest and hippest sample of all and a great starting point.
- Roomedit3dApp and the roomedit3d Forge Viewer extension demonstrating interactive movement of furniture family instances in the viewer and updating the Revit BIM in real time via a socket.io broadcast. This is the first sample demonstrating a real-time round-trip connection from the Forge viewer back to the Revit BIM.
DevCon Forge Sample for Freeing Your BIM Data
I created a stop-gap
version roomedit3dv2 of
the roomedit3d sample including Forge OAuth authentication
for my presentation on Freeing Your BIM Data at
the June 2016 Forge DevCon.
That is not currently maintained, however, and my plan is to replace it with the new roomedit3dv3 project.
Roomedit3dv3 Starting Point
Now that the Forge platform is stable and fully evolved, I want to rewrite the room editor to take proper advantage of it.
That is my project for the next week or two.
Question: What is the best starting point for a new Forge Viewer sample?
I would like the 3-legged OAuth so I can access models on A360.
I would like the viewer, and want to add an extension to it.
I used Philippe's view.and.data-boilerplate template for
the roomedit3d app, and that was perfect.
I based roomedit3dv2 on the Forge model.derivative.api-nodejs-sample, and that was a bit messy.
Right now, Augusto's forge-3leg.nodejs-template template provides a nice starting point for using the Forge OAuth.
Is there some other more suitable starting point that provides both OAuth and Viewer functionality right out of the box?
Answer by Augusto Goncalves: In order to access A360 files right out of the box, use the data.management-nodejs-integration.box to get started.
It is based on the template you mentioned and demonstrates a simple integration between the Forge Data Management API and the Box content management platform.
Just remove the 'box' files and parts.
Also, please follow the guidelines and naming conventions below when writing and publishing node.js samples.
Question: Great, thank you!
By the way, do you have a blog post describing the data.management-nodejs-integration.box sample in more detail?
What functionality does it implement?
- 3-legged oauth? (for a360 access?)
- 2-legged oauth? (for box access?)
- A360 file download and upload
- Box file download and upload
Anything else?
Those are six question marks... could you provide six yes/no answers to them, please?
Answer: Yes, I did indeed publish very short blog post on Box & Forge describing them.
Please read that first, then the following answers you request:
- 3-legged oauth? (for a360 access?) – yes, using the NPM package for the DM Data Management API.
- 2-legged oauth? (for box access?) – actually 3-legged too, using the BOX npm package.
- A360 file download and upload – yes, again using the NPM package.
- box file download and upload – yes, using box NPM package
Here are the integration .js file functions:
The .tree.js files implement the respective jsTree functions, cf. the server folder.
Augusto's Node.js Sample Guidelines and Naming Conventions
The goal is to make it really easy for anyone to run and reuse any node.js sample with minimum fuss:
Standardised Callback
Use the following callback to create apps on the Forge Dev Portal:
http://localhost:3000/api/forge/callback/oauth
Why? That way, the same client id and secret pair can be reused for all your samples (locally, at least), and a 3rd party developer testing different samples can reuse that id and secret pair as well.
Standardised Environment Variables
Use FORGE_CLIENT_ID and FORGE_CLIENT_SECRET as environment variables and prepare your script to run with npm run dev (see sample here). Your readme should have something like the following:
Mac OSX/Linux (Terminal):
npm install
export FORGE_CLIENT_ID=[YOUR CLIENT ID FROM DEVELOPER PORTAL]
export FORGE_CLIENT_SECRET=[YOUR CLIENT SECRET]
npm run dev
Windows (use Node.js command line from Start menu):
npm install
set FORGE_CLIENT_ID=[YOUR CLIENT ID FROM DEVELOPER PORTAL]
set FORGE_CLIENT_SECRET=[YOUR CLIENT SECRET]
npm run dev
Open the browser: http://localhost:3000.
Important: do not use npm start locally, this is intended for PRODUCTION only with HTTPS (SSL) secure cookies.
As you can see above, npm start should be reserved for production (e.g. deploy to heroku). This is basically to enforce cookie security (see sample here).
There are two other env variables that you need and that mostly do not need to appear in the readme, but do use these names anyway (it will help on rule #3):
FORGE_CALLBACK_URL– that’s the name we use on Dev Portal, cf. this config.js samplePORT– use 3000, as per common NodeJS practice, cf. sample here
Important: if you have a basic sample, there is no need to use different naming. If you really absolutely need an extra step, it’s ok, but add a note explaining why.
Deploy to Heroku
Do your best to implement a 'Deploy to Heroku' feature on your app. In summary, you just need an app.json file (consider
using this example)
and a button link. Here is a sample on how to do it on your README.md file:
### Deploy to Heroku To deploy this application to Heroku, the Callback URL must use your .herokuapp.com address. After clicking on the button below, at the Heroku Create New App page, set your Client ID & Secret and the correct callback URL. [](https://heroku.com/deploy) Watch [this video](https://www.youtube.com/watch?v=Oqa9O20Gj0c) on how deploy this sample to Heroku.
Heroku is the easiest way to someone with limited programming skills to test and see a sample in action, with their own data and billing to their account. This is important for decision making.
Many thanks to Augusto for putting together these very succinct and helpful guidelines!
Forge Viewer Access to Revit 2D Views
People keep asking about how to access different Revit views in the Forge viewer.
We already discussed access to the 3D views, which is kind of tricky.
Access to the 2D views is much more straightforward, though, as we can see in the StackOverflow question raised by Greg Bluntzer on Autodesk Viewer: Suggestions for 2D view of floor view:
Question: I have a Revit file and am able to convert it via the cloud to a SVF and view it in the 3D viewer. It works both as conversion of the .rvt file directly and as an export from the NavisWorks add-in exporter.
My question: I want the user of my app to also be able to see the floor 2D view as you can in Revit.
I have looked through all the manifest files and do not see a F2D for the floor view.
What do you suggest I use for the 2D view? Note that I will have many drawings to process and view so I would prefer not to have to export a DWG for each view then convert those. I am hoping there is a special setting I can pass to the converter that will create the 2D views.
(Note : I also want to be able to highlight and texture the rooms of this view dynamically. So I will need to be able to access the geometry like you can in the 3D viewer).
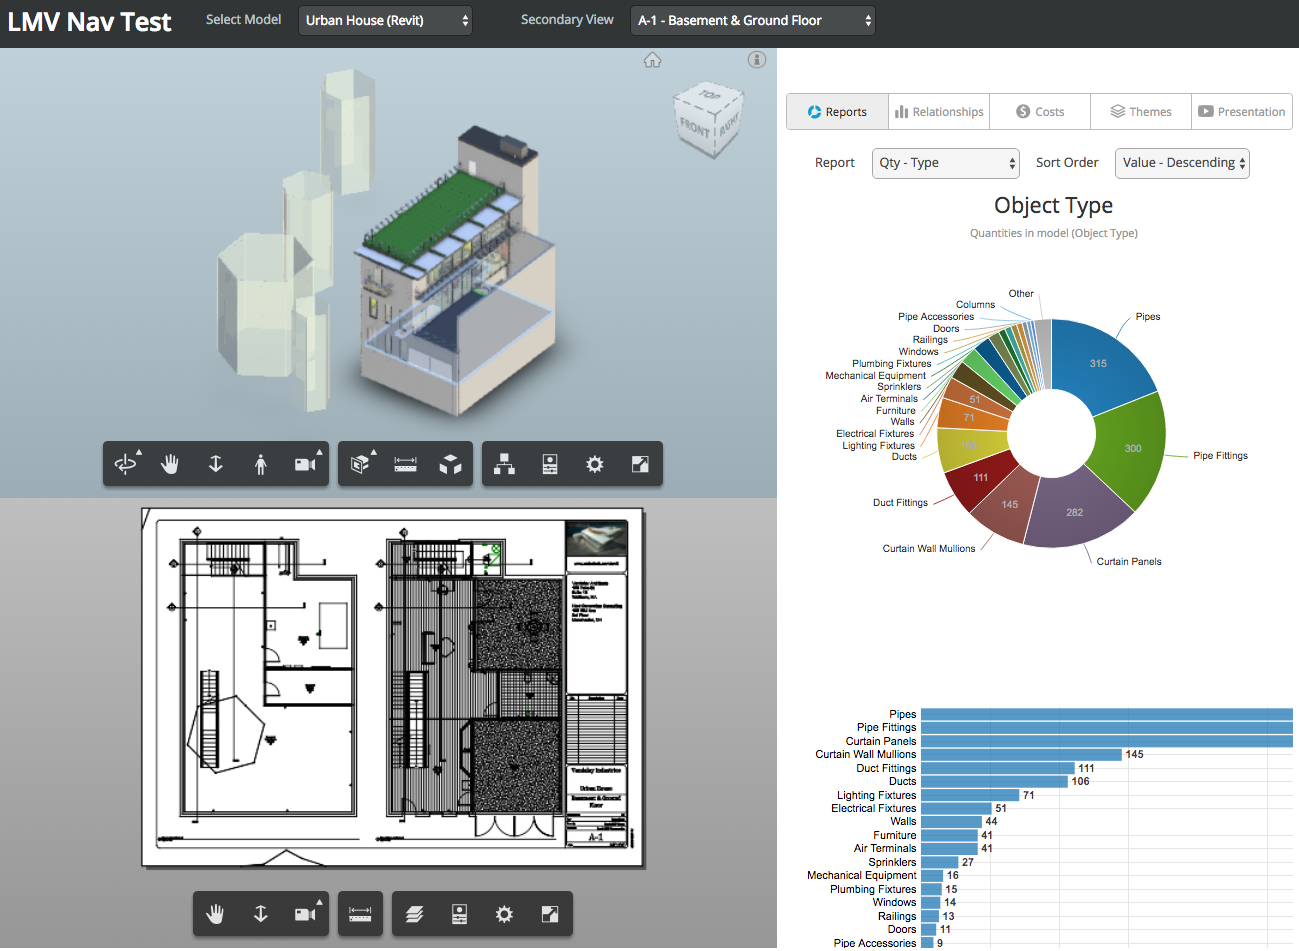
Answer: Afaik all 2D views defined in the Revit project file are automatically translated and included in the Forge output. Have you looked at the LmvNav sample, for instance, also known as LMV Nav Test?
It displays both 2D and 3D views.
Note the list of available 2D views in the Secondary View dropdown:
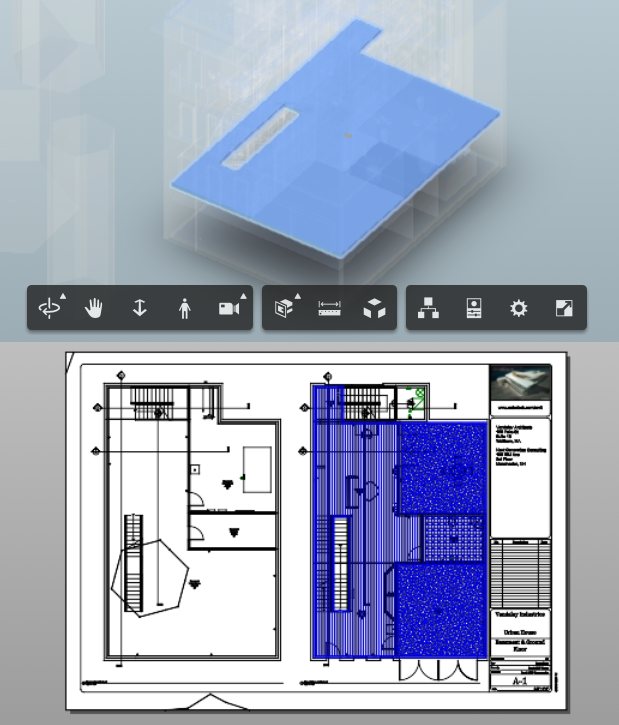
It even links the elements in the two views so that anything selected in one is highlighted in the other:
You could check from where it gets the 2D streams. The source is available from the LmvNavTest GitHub repository.
I think you select whether you want a 2D or a 3D stream when you supply it to the viewer.
Mikako adds: Here is a user interface tool for selecting views to publish from a Revit project on A360.