MacroManager, Materials and Getting Started
I am answering Revit API discussion forum threads and developer cases like crazy.
Instead, as usual at this time of the year, I should be focussing and putting higher priority on the exciting upcoming events.
I keep promising myself to do so and stop answering cases. Then I address just one more...
Here are some of the upcoming events and recent Revit API issues:
- Events – Forge Accelerators, DevDay, RTC and AU
- Accessing the MacroManager to Delete Document Macros
- Getting Started and Changing the Colour of a Wall
- Getting Started and Using the Visual Studio Revit Add-In Wizard Auto-Installer
Events – Forge Accelerators, DevDay, RTC and AU
Here are my main upcoming events:
- Oct. 19 – Forge and BIM, Porto University
- Oct. 20-22 – RTCEU Revit Technology Conference Europe, Porto
- Oct. 24-28 – Forge Accelerator, Munich
- Nov. 4 – Forge and BIM Workshop, Darmstadt University
- Nov. 14-17 – Autodesk university, Las vegas
- Dec. 5 – DevDay Europe, Munich
- Dec. 6-9 – Forge Accelerator, Munich
I'll present my projects and material for these as soon as I get around to preparing them.
Real soon now!
Accessing the MacroManager to Delete Document Macros
Next, I address the Revit API discussion forum thread on obtaining the MacroManager as well as Frederic's comment on What's New in the Revit 2014 API:
Question: I'm stuck with getting MacroManager object. There are much more class members listed in API reference then really available. What am I doing wrong?
Or is there any other way to delete all macros from document?
Jeremy says: I should think this can be done quite easily. Look at What's New in the Revit 2014 API and search for MacroManager API.
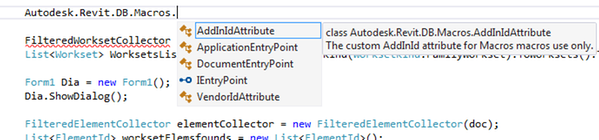
Revitalizer answers: Add RevitAPIMacros.dll to your VS project.
Response: Revitalizer, thank you very much! It's got to be that easy I knew it :-)
Actually, a reference to RevitAPIMacrosInterop.dll solved the problem at last (not to RevitAPIMacros.dll)!
Revitalizer answers: I cannot believe that RevitAPIMacrosInterop.dll solves the problem since it does not contain the MacroManager definition.
RevitAPIMacros.dll does:

Jeremy says: Look at The Building Coder samples new CmdDeleteMacros.cs module in release 2017.0.129.0.
Just as Revitalizer suggests, I was forced to add references to RevitAPIMacros.dll and RevitAPIUIMacros.dll in The Building Coder samples Visual Studio project specifically for this command.
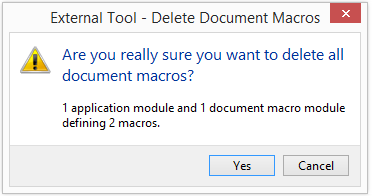
using Autodesk.Revit.Attributes;
using Autodesk.Revit.DB;
using Autodesk.Revit.DB.Macros;
using Autodesk.Revit.UI;
using Autodesk.Revit.UI.Macros;
using System.Linq;
using System.Diagnostics;

namespace BuildingCoder
{
  [Transaction( TransactionMode.ReadOnly )]
  class CmdDeleteMacros : IExternalCommand
  {
    public Result Execute(
      ExternalCommandData commandData,
      ref string message,
      ElementSet elements )
    {
      UIApplication uiapp = commandData.Application;
      UIDocument uidoc = uiapp.ActiveUIDocument;
      Document doc = uidoc.Document;

      UIMacroManager uiapp_mgr = UIMacroManager
        .GetMacroManager( uiapp );

      UIMacroManager uidoc_mgr = UIMacroManager
        .GetMacroManager( uidoc );

      int nModulesApp = uiapp_mgr.MacroManager.Count;
      int nModulesDoc = uidoc_mgr.MacroManager.Count;

      int nMacrosDoc = uidoc_mgr.MacroManager
        .Aggregate<MacroModule, int>( 0,
          ( n, m ) => n + m.Count<Macro>() );

      TaskDialog dlg = new TaskDialog( "Delete Document Macros" );

      dlg.MainInstruction = "Are you really sure you "
        + "want to delete all document macros?";

      dlg.MainContent = string.Format(
        "{0} application module{1} "
        + "and {2} document macro module{3} "
        + "defining {4} macro{5}.",
        nModulesApp, Util.PluralSuffix( nModulesApp ),
        nModulesDoc, Util.PluralSuffix( nModulesDoc ),
        nMacrosDoc, Util.PluralSuffix( nMacrosDoc ) );

      dlg.MainIcon = TaskDialogIcon.TaskDialogIconWarning;

      dlg.CommonButtons = TaskDialogCommonButtons.Yes
        | TaskDialogCommonButtons.Cancel;

      TaskDialogResult rslt = dlg.Show();

      if(TaskDialogResult.Yes == rslt )
      {
        MacroManager mgr = MacroManager.GetMacroManager( doc );
        MacroManagerIterator it = mgr.GetMacroManagerIterator();

        // Several possibilities to iterate macros:
        //for( it.Reset(); !it.IsDone(); it.MoveNext() ) { }
        //IEnumerator<MacroModule> e = mgr.GetEnumerator();

        int n = 0;
        foreach( MacroModule mod in mgr )
        {
          Debug.Print( "module " + mod.Name );
          foreach( Macro mac in mod )
          {
            Debug.Print( "macro " + mac.Name );
            mod.RemoveMacro( mac );
            ++n;
          }

          // Exception thrown: 'Autodesk.Revit.Exceptions
          // .InvalidOperationException' in RevitAPIMacros.dll
          // Cannot remove the UI module
          //mgr.RemoveModule( mod );
        }
        TaskDialog.Show( "Document Macros Deleted",
          string.Format(
            "{0} document macro{1} deleted.",
            n, Util.PluralSuffix( n ) ) );
      }
      return Result.Succeeded;
    }
  }
}
This command is destructive in spite of being read-only, so it first prompts you for confirmation before proceeding to delete all document macros:
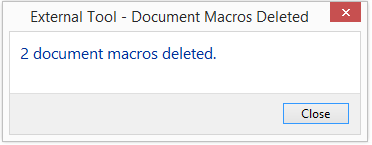
After doing its dirty deed, it confesses and reports in full:
Getting Started and Changing the Colour of a Wall
Next, let's look at Nalika's comment on displaying a webcam image on a building element face:
Question: I'm very new to Revit and very much grateful if you could help me in solving my problem.
Currently I'm trying to change the colour of a wall according to a certain value. For example: value 20 will make the wall red when I click on it and if I click on the wall again it will be green according to a new value. The values are stored in an array and currently have 4 values. I use the sample library project WorkThread and it uses the same SetupDisplayStyle function to set the display style. There I pick the colour from array values. However, the wall is coloured in 4th colour when I click on the wall for the 4th time, and the first three times the wall isn't coloured at all. Could you please tell me in which function/method should I change/iterate through in order to have different colours (defined from array values) every time I click on a wall.
Answer: If you are new to the Revit API, I would strongly suggest that you work through the Revit API getting started material first of all, especially the DevTV and My First Revit Plugin video tutorials.
If you want to dive in deeper, go through the ADN Revit API Training Labs after that.
Then start implementing your own add-ins.
The WorkThread and SetupDisplayStyle samples do not sound suitable for what you are trying to achieve.
By the way, what are you trying to achieve, and why?
Maybe you should look at the Revit SDK sample collection first? It might contain exactly what you are looking for.
One very flexible way to set colours on specific elements is by using view filters, and there is a nice sample demonstrating how to drive that programmatically as well: ElementFilter / ViewFilters.
Before looking at the Revit API at all, you definitely need some understanding of Revit from an end user point of view.
It provides a huge amount of complex functionality right out of the box.
If you start programming Revit with insufficient understanding of the basic Revit end user functionality and the optimal workflows and best practices to make use of it efficiently is doomed for disaster.
Take heed, have fun, and good luck!
Getting Started and Using the Visual Studio Revit Add-In Wizard Auto-Installer
While we are at it, we might as well also reproduce Juan E. Calvo Ferrándiz' comment on the wizard auto-installation:
Question: Thanks for this work! Is amazing.
The add-in wizard setting exports the .dll to the bin folder and the users/xxx/AppData... folder, right?
Then, it also creates two copies of the .addin manifest, one to the project folder and another one to the AppData... folder.
Revit loads the .dll and .addin from the AppData... folder?
Revit doesn't need the .pdb file? It's just additional information when troubleshooting the DLL, right?
Answer: Yes, exactly, correct on all points.
You, the developer, write the add-in manifest .addin, and the source code, in C# or whatever you like.
The compiler generates the output DLL assembly in the directory you specify, by default bin/Debug and bin/Release.
Your post-built events copy the add-in manifest and the DLL to the appropriate Revit add-ins folder.
The PDB file contains the program debug information and is not required except for debugging.
The mother of all information on installing a Revit add-in is provided by the Revit online help > Developers > Revit API Developers Guide > Introduction > Add-In Integration > Add-in Registration.