Room Editor Live and Unofficial Custom Ribbon Button
I spent a wonderful weekend and yesterday's Whit Monday holiday enjoying high summer in Swiss nature with no electricity and a Chäschessi, the Swiss variant of a Jacuzzi or hot tub. Today I am leaving for a ten-day camping vacation in nature in Sweden.
Here are two topics I would like to address before leaving that will hopefully keep you occupied and entertained during my absence:
Room Editor Live
I presented my room editor version two at the internal Autodesk technical summit in Toronto.
The presentation is obviously similar to the recently presented preview recording of the enhanced cloud-based round-trip simplified 2D BIM editor.
Here comes the live thing with an additional illuminating Q and A session at the end:
- Slide deck
- Half hour live recording
An hour before the presentation, I happened to discover and fix a bug related to the buttons defined by the external application.
I modify the text on one of them to implement a toggle button, and its index was off by one since I added a new button at the top.
The RoomEditorApp source code, Visual Studio solution and add-in manifest is updated in the RoomEditorApp GitHub repository and now sports the final release release 2015.0.2.20.
Adding a custom button to the Modify tab
In a completely different vein:
A Revit add-in can only add its commands to the Revit Add-Ins and Analyze ribbon tabs.
However, if you really need more flexibility, Frode Tørresdal of Norconsult Informasjonssystemer has a clever and interesting workaround to offer:
You can add a non-API custom button to any Revit ribbon tab you want using the .NET UI Automation library.
You can also add an event handler to catch a button click on it.
Revit will know nothing about it, however, and you cannot use the Revit API in the custom button click event handler.
You can however subscribe to the Idling event beforehand, send your Idling event handler a message from the button click event handler, use the Revit API in the Idling event handler, and unsubscribe from Idling again.
Here is a quick demo of ModifyTabButton, a Revit add-in demonstrating how to add a custom button to the Modify tab and trigger Revit API functionality from it:
Frode raised the question and provided the solution in the following discussion:
Question: I'm trying to add buttons to Revit's modify tab. I retrieve the Autodesk.Windows.RibbonTab with id="Modify" and add a Autodesk.Windows.RibbonPanel to this tab. This seems to work.
But how do I disable and hide my buttons? I do not want them to show when e.g. placing a wall. I only want them to show when no command is selected or a detail item is selected.
Also please let me know if there is a better way to add buttons to the Modify tab.
Answer: The Revit API officially does not support use of the Autodesk.Windows functionality, so you are on your own if you are making use of that.
As far as I can tell, the UIControlledApplication.CreateRibbonPanel method taking two string arguments allows you to create an own panel in any of the ribbon tabs. Why do you not use that?
To disable and hide your button, you can make us of an availability class, i.e. a class implementing the IExternalCommandAvailability interface and the PushButton.AvailabilityClassName property specifying its name:
That will allow you to toggle the visibility and availability of your class at will, just as you require.
Response: Thanks for the answer. I have found out how to do this using the Autodesk.Windows functionality, but I would rather use the official API. I tried to use the UIControlledApplication.CreateRibbonPanel method, but it does not find the Modify tab. I guess it's not supposed to, or am I using the method incorrectly?
Answer: Yes, you are perfectly correct. The Revit API officially only supports adding panels to the Add-Ins and Analyse tabs.
Sorry for misleading you there, and thank you for checking.
When you add your own custom Autodesk.Windows.RibbonPanel to the modify tab, are you still able to use the standard Revit API functionality to add buttons etc. to it?
If not, it will be hard to hook it up properly to your external command...
Response: I use the Autodesk.Windows.RibbonButton and the Autodesk.Windows.RibbonPanel classes. To check if a user click button I use this event handler:
  Autodesk.Windows.ComponentManager.UIElementActivated
    += new EventHandler<
      Autodesk.Windows.UIElementActivatedEventArgs>(
        OnUiElementActivated );
In the OnUIElementActivated method I check if one of my buttons is clicked and use another EventHandler like this:
  _controlledApp.Idling
    += new EventHandler<IdlingEventArgs>(
      OnButtonIdling );
Finally, in the Idling function, I execute my command and remove the idling event handler.
Answer: Oh, I see, you are not defining an external command at all.
You are just using .NET UI Automation to add a button that the Revit API knows nothing about and capture the click event on it and then passing that information in to your external application working with the Idling event.
That is very interesting.
One question: do you observe acceptable performance? I heard rumours that using UI Automation to interact with the Revit ribbon was intolerably slow. Apparently not, if you can make effective use of it.
One suggestion: I found that the Idling event has very significant drawbacks, mainly due to the fact that Revit provides no possibility to control the frequency of calls. Therefore, I found using an external event instead of Idling and triggering immediate external event execute a more effective approach. I now basically never recommend use of the Idling event at all, except for one-off call.
Ah, maybe in your case it is a single call that you are interested in?
Response: Yes, I just use one single call, so Idling is the proper solution.
I have not noticed any performance issues.
Answer: One little bit of feedback on your code: TransactionMode does not need to be specified for an external application. It only applies to external commands.
I implemented a new sample application ModifyTabButton making use of your code, but I do not see the custom panel when I load and run it.
Oh, I also added a line to break out of the loop once its purpose has been served.
In the debugger, everything seems to work fine, but nothing appears.
How does it look for you?
Response: Your example works for me. The buttons should only be visible in a 3D view. The only fault I have found is that I cannot see the image on the buttons. We use 16 x 16 ico files and they work fine.
I found out that _currentView could be null when I run both my own and yours application. There should be a test for this in the setModifyPanelVisible function.
The modify panel should only be visible in 3d views when an element is selected.
Answer: Aha, my button is 64 x 64, so I'll change that then.
Yes, the problem was that it requires 16 x 16 format to display at this point.
I looked in the debugger and saw _currentView being set correctly.
I also discovered that I have to be in a 3D view and I need to select an element, e.g. a wall.
It works now!
I refactored the code a bit to make it easy to add a third button as well, while we are at it.
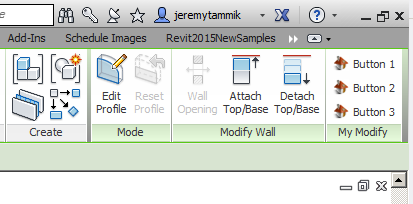
Here is the 'My Modify' panel and its three buttons displayed by the ModifyTabButton add-in in the Revit Modify ribbon tab when a wall is selected in a 3D view:
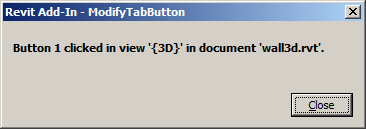
Clicking any one of the three buttons triggers the sequence of events and handlers described above and displays a message box like this:
Notes and ideas:
- No availability class
- No Revit API access here! ... in the UI Automation event handlers
- Make a note of elements selected? Identify type, at least?
Here is the totally trivial button click handler implementation:
#region Namespaces
using Autodesk.Revit.DB;
using Autodesk.Revit.UI;
#endregion // Namespaces

namespace ModifyTabButton
{
  class Command
  {
    const string _prompt =
      "Button {0} clicked in view '{1}' in document '{2}'.";

    public static void OnButton(
      int button_nr,
      View view )
    {
      Document doc = view.Document;

      string msg = string.Format(
        _prompt, button_nr, view.Name, doc.Title );

      TaskDialog.Show( App.Caption, msg );
    }
  }
}
Note that this is a custom command class, not an official Revit API external command.
Here is the full external application implementation doing all the interesting stuff:
#region Namespaces
// BitmapImage requires PresentationCore
// System.Windows.Controls requires PresentationFramework

using System;
using System.Collections.Generic;
using System.IO;
using System.Reflection;
using System.Windows.Media.Imaging;
using Autodesk.Revit.ApplicationServices;
using Autodesk.Revit.Attributes;
using Autodesk.Revit.DB;
using Autodesk.Revit.UI;
using Autodesk.Revit.UI.Events;

#endregion // Namespaces

namespace ModifyTabButton
{
  class App : IExternalApplication
  {
    public static string Caption = "ModifyTabButton";

    UIControlledApplication _controlledApp;
    View _currentView;

    /// <summary>
    /// The button that was clicked, 1, 2 or 3.
    /// </summary>
    int _button_nr;

    Autodesk.Windows.RibbonPanel _modifyPanel;
    Autodesk.Windows.RibbonButton _button1;
    Autodesk.Windows.RibbonButton _button2;
    Autodesk.Windows.RibbonButton _button3;

    /// <summary>
    /// Set the visibility of our custom panel
    /// and its buttons.
    /// </summary>
    void SetCustomPanelVisible( bool a )
    {
      _modifyPanel.IsVisible = a;
      _button1.IsVisible = a;
      _button2.IsVisible = a;
      _button3.IsVisible = a;
    }

    /// <summary>
    /// Retrieve an embedded resource image
    /// for the button icons.
    /// </summary>
    static BitmapSource GetEmbeddedImage( string name )
    {
      try
      {
        Assembly a = Assembly.GetExecutingAssembly();
        Stream s = a.GetManifestResourceStream( name );
        return BitmapFrame.Create( s );
      }
      catch
      {
        return null;
      }
    }

    /// <summary>
    /// Create a basic ribbon button with an
    /// identifying number and an image.
    /// </summary>
    static Autodesk.Windows.RibbonButton CreateButton(
      int nr,
      BitmapSource image )
    {
      string s = nr.ToString();

      Autodesk.Windows.RibbonButton b
        = new Autodesk.Windows.RibbonButton();

      b.Name = "_Button" + s;
      b.Id = "ID_MYBUTTON" + s;
      b.AllowInStatusBar = true;
      b.AllowInToolBar = true;
      b.GroupLocation = Autodesk.Private.Windows
        .RibbonItemGroupLocation.Middle;
      b.IsEnabled = true;
      b.IsToolTipEnabled = true;
      b.IsVisible = false;
      b.LargeImage = image;
      b.Image = image;
      b.ShowImage = true; //  true;
      b.ShowText = true;
      b.ShowToolTipOnDisabled = true;
      b.Text = "Button " + s;
      b.ToolTip = "Button " + s;
      b.MinHeight = 0;
      b.MinWidth = 0;
      b.Size = Autodesk.Windows.RibbonItemSize.Standard;
      b.ResizeStyle = Autodesk.Windows
        .RibbonItemResizeStyles.HideText;
      b.IsCheckable = true;
      b.Orientation = System.Windows.Controls
        .Orientation.Horizontal; // PresentationFramework
      b.KeyTip = "Button" + s;

      return b;
    }

    public Result OnStartup(
      UIControlledApplication a )
    {
      _controlledApp = a;

      // Locate and load embedded button images.

      BitmapSource image = GetEmbeddedImage(
        "ModifyTabButton.icon.cartoon_house_16.ico" );

      // Add modify panel

      Autodesk.Windows.RibbonControl ribbon
        = Autodesk.Windows.ComponentManager.Ribbon;

      foreach( Autodesk.Windows.RibbonTab tab
        in ribbon.Tabs )
      {
        if( tab.Id == "Modify" )
        {
          _modifyPanel = new Autodesk.Windows.RibbonPanel();
          _modifyPanel.IsVisible = false;

          Autodesk.Windows.RibbonPanelSource source
            = new Autodesk.Windows.RibbonPanelSource();

          source.Name = "mymod";
          source.Id = "mymod";
          source.Title = "My Modify";
          _modifyPanel.Source = source;
          _modifyPanel.FloatingOrientation
            = System.Windows.Controls.Orientation.Vertical;

          _button1 = CreateButton( 1, image );
          _button2 = CreateButton( 2, image );
          _button3 = CreateButton( 3, image );

          Autodesk.Windows.ComponentManager.UIElementActivated
            += new EventHandler<
              Autodesk.Windows.UIElementActivatedEventArgs>(
                OnUiElementActivated );

          Autodesk.Windows.RibbonRowPanel rowPanel
            = new Autodesk.Windows.RibbonRowPanel();

          rowPanel.Items.Add( _button1 );
          rowPanel.Items.Add( new Autodesk.Windows.RibbonRowBreak() );
          rowPanel.Items.Add( _button2 );
          rowPanel.Items.Add( new Autodesk.Windows.RibbonRowBreak() );
          rowPanel.Items.Add( _button3 );

          _modifyPanel.Source.Items.Add( rowPanel );

          tab.Panels.Add( _modifyPanel );

          tab.Panels.CollectionChanged
            += new System.Collections.Specialized
              .NotifyCollectionChangedEventHandler(
                OnCollectionChanged );

          a.ViewActivated
            += new EventHandler<ViewActivatedEventArgs>(
              OnViewActivated );

          break;
        }
      }
      return Result.Succeeded;
    }

    public Result OnShutdown(
      UIControlledApplication a )
    {
      Autodesk.Windows.ComponentManager
        .UIElementActivated -= OnUiElementActivated;

      a.ViewActivated -= OnViewActivated;

      return Result.Succeeded;
    }

    /// <summary>
    /// React to Revit view activation.
    /// </summary>
    private void OnViewActivated(
      object sender,
      ViewActivatedEventArgs e )
    {
      _currentView = e.CurrentActiveView;
    }

    /// <summary>
    /// React to ribbon panel changes, triggered by
    /// Revit element selection. We have no external
    /// command, hence no availability class, so we
    /// use this to hide and show our custom panel.
    /// We have absolutely no access to the
    /// Revit API in this method!
    /// </summary>
    private void OnCollectionChanged(
      object sender,
      System.Collections.Specialized
        .NotifyCollectionChangedEventArgs e )
    {
      if( e.NewItems != null )
      {
        bool visible = ( null != _currentView )
          && ( _currentView is View3D );

        SetCustomPanelVisible( visible );
      }
      if( e.OldItems != null )
      {
        SetCustomPanelVisible( false );
      }
    }

    /// <summary>
    /// React to UI element activation,
    /// e.g. button click. We have absolutely
    /// no access to the Revit PI in this method!
    /// </summary>
    void OnUiElementActivated(
      object sender,
      Autodesk.Windows.UIElementActivatedEventArgs e )
    {
      if( e.Item != null )
      {
        // We could just remember the button id here
        // and use one single Idling event handler
        // for both.

        if( e.Item.Id == "ID_MYBUTTON1"
          || e.Item.Id == "ID_MYBUTTON2"
          || e.Item.Id == "ID_MYBUTTON3" )
        {
          _button_nr = int.Parse(
            e.Item.Id.Substring( 11 ) );

          _controlledApp.Idling
            += new EventHandler<IdlingEventArgs>(
              OnButtonIdling );
        }
      }
    }

    /// <summary>
    /// Idling event handler for all buttons.
    /// This is where we have access to the Revit
    /// API again.
    /// </summary>
    void OnButtonIdling(
      object sender,
      IdlingEventArgs e )
    {
      UIApplication uiapp = sender as UIApplication;

      if( uiapp != null )
      {
        UIDocument uidoc = uiapp.ActiveUIDocument;
        Command.OnButton( _button_nr, uidoc.ActiveView );
      }

      _controlledApp.Idling -= OnButtonIdling;
    }
  }
}
The complete ModifyTabButton source code, Visual Studio solution and add-in manifest is provided in the ModifyTabButton GitHub repository.
Vacation Time
I'm off now.
Have fun with the Revit API, and enjoy summer!
Or winter, down under...
Bye bye!