Creating a Sloped Floor
Today, let's look at an interesting and overdue topic raised by the query on creating a sloped floor in the Revit API discussion forum, addressed with help from Jaap van der Weide and Joe Ye.
Before getting to that, let me quickly mention some other happy and important news:Revit 2015 is Coming Soon
The Autodesk 2015 software portfolio for the building and civil infrastructure industries has now been officially announced.
Here is a direct link to the Autodesk Building Design Suite 2015 backgrounder providing a full rundown of the Autodesk Building Design Suite 2015 enhancements.
I am really looking forward to all the exciting good new stuff coming along, especially in the Revit API!
Creating a Sloped Floor
Question: Is it possible to programmatically create a sloped floor?
Answer: The answer grew and grew... Here is an overview:
- Creating a sloped floor through the user interface
- Modifying floor slope programmatically – or not
- Creating a sloped floor programmatically: NewFloor
- Creating a sloped floor programmatically: NewSlab
- Download
Creating a Sloped Floor through the User Interface
As always, before diving into the Revit API possibilities, it is worthwhile looking at the functionality provided by the user interface.
A sloped floor can be created in three different ways in the UI:
- Slab shape editor
- Slope arrow
- Slope defining boundary edges
You are presumably asking about creating a floor with a uniform slope.
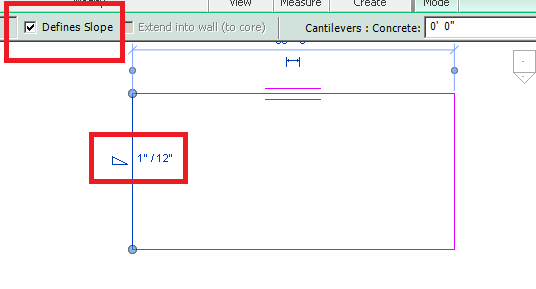
You can achieve that by editing the sketch of the floor and making one of the lines 'slope defining'.
This generates a floor with a single slope and with the correct thickness.
Another way, providing more control over the direction of the slope, is to sketch a 'slope arrow'.
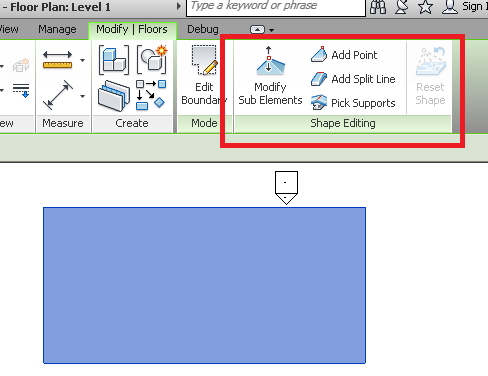
Yet another method is the 'shape edit' command that allows you to create facets in the floor, each with their own slope.
Note that these three methods are mutually exclusive.
Here are snapshots of each of these three pieces of functionality:
1. Shape editor tool:
2. Using a slope arrow:
3. Making a boundary edge slope defining:
Looking at the code provided in the original query, I suspect that one problem is that the lines are not in a horizontal plane.
No matter how you slope the floor, the fundamental sketch of its boundary is always based on a level, and hence horizontal.
Modifying Floor Slope Programmatically – or Not
The shape edit functionality is programmatically accessible through the SlabShapeEditor class. An instance of that class is provided by the property with the same name on the Floor and RoofBase classes. The SDK sample SlabShapeEditing shows an example of using it.
Unfortunately, the other slope editing methods seem not to be accessible to programmatically modify the slope of an existing floor, because the built-in parameter CURVE_IS_SLOPE_DEFINING is read-only.
Slope defining edges can be used successfully to define the shape of a footprint roof, via the FootPrintRoof.SlopeAngle property. It takes an edge and an angle as arguments, and sets a slope for the specified edge.
We set a 'slope defining' property on the roof of the simple little house created by the command Lab2_0_CreateLittleHouse of the ADN Revit API training material Xtra labs, mentioned occasionally in the past:
Here is an external command testing this for a floor slab. It attempts to change the floor slope using the built-in parameters CURVE_IS_SLOPE_DEFINING and ROOF_SLOPE. No cigar, I'm afraid:
  UIApplication uiapp = revit.Application;
  UIDocument uidoc = uiapp.ActiveUIDocument;
  Document doc = uidoc.Document;
  Selection sel = uidoc.Selection;

  Reference ref1 = sel.PickObject(
    ObjectType.Element, "Please pick a floor." );

  Floor f = doc.GetElement( ref1 ) as Floor;

  if( f == null )
    return Result.Failed;

  // Retrieve floor edge model line elements.

  ICollection<ElementId> deleted_ids;

  using( Transaction tx = new Transaction( doc ) )
  {
    tx.Start( "Temporarily Delete Floor" );

    deleted_ids = doc.Delete( f.Id );

    tx.RollBack();
  }

  // Grab the first floor edge model line.

  ModelLine ml = null;

  foreach( ElementId id in deleted_ids )
  {
    ml = doc.GetElement( id ) as ModelLine;

    if( null != ml )
    {
      break;
    }
  }

  if( null != ml )
  {
    using( Transaction tx = new Transaction( doc ) )
    {
      tx.Start( "Change Slope Angle" );

      // This parameter is read only. Therefore,
      // the change does not work and we cannot
      // change the floor slope angle after the
      // floor is created.

      ml.get_Parameter(
        BuiltInParameter.CURVE_IS_SLOPE_DEFINING )
          .Set( 1 );

      ml.get_Parameter(
        BuiltInParameter.ROOF_SLOPE )
          .Set( 1.2 );

      tx.Commit();
    }
  }
  return Result.Succeeded;
Creating a Sloped Floor Programmatically: NewFloor
Looking at the API slab creation functionality, we have two methods at our disposal, NewFloor and NewSlab.
The NewFloor methods provides three overloads taking the following lists of arguments:
- CurveArray, Boolean: Creates a floor within the project with the given horizontal profile using the default floor style.
- CurveArray, FloorType, Level, Boolean: Creates a floor within the project with the given horizontal profile and floor style on the specified level.
- CurveArray, FloorType, Level, Boolean, XYZ: Creates a floor within the project with the given horizontal profile and floor style on the specified level with the specified normal vector.
The third overload includes a normal vector. Optimistically, one might hope that it would enable the creation of a sloped floor. Unfortunately, that is not the case. It is not used to specify a slope vector, but to define the which side of the floor is considered upper and lower. It can only take one of the two values (0,0,1) or (0,0,-1).
A sample using the NewFloor method to create a normal horizontal floor is provided in the discussion forum thread on can't create face.
Creating a Sloped Floor Programmatically: NewSlab
The NewSlab method provides only one overload taking the following arguments:
- CurveArray profile
- Level level
- Line slopedArrow
- double slope
- bool isStructural
A uniformly sloped slab can be created programmatically by setting the slope argument to the NewSlab method, as mentioned in the discussion on creating a non-rectangular slab.
Here is the entire code of an external command Execute method showing an example of creating a sloped floor using the NewSlab method:
  UIApplication uiapp = revit.Application;
  UIDocument uidoc = uiapp.ActiveUIDocument;
  Document doc = uidoc.Document;

  using( Transaction tx = new Transaction( doc ) )
  {
    tx.Start( "Create Sloped Slab" );

    double width = 19.685039400;
    double length = 59.055118200;
    double height = 9.84251968503937;

    XYZ[] pts = new XYZ[] {
      new XYZ( 0.0, 0.0, height ),
      new XYZ( width, 0.0, height ),
      new XYZ( width, length, height ),
      new XYZ( 0, length, height )
    };

    CurveArray profile
      = uiapp.Application.Create.NewCurveArray();

    Line line = null;

    int n = pts.GetLength( 0 );

    XYZ q = pts[n - 1];

    foreach( XYZ p in pts )
    {
      line = Line.CreateBound( q, p );
      profile.Append( line );
      q = p;
    }

    Level level
      = new FilteredElementCollector( doc )
        .OfClass( typeof( Level ) )
        .Where<Element>(
          e => e.Name.Equals( "CreateSlopedSlab" ) )
          .FirstOrDefault<Element>() as Level;

    if( null == level )
    {
      level = doc.Create.NewLevel( height );
      level.Name = "Sloped Slab";
    }

    Floor floor = doc.Create.NewSlab(
      profile, level, line, 0.5, true );

    tx.Commit();
  }
  return Result.Succeeded;
This command creates the following slab with a slope of 0.5. Note that in this context, slope really does mean slope, not angle.
The generated slab is located on its own new level named "Sloped Slab". Note the nice and succinct filtered element collector query used to check whether it already exists, aided and abetted by a LINQ Where clause. If not found, it is created.
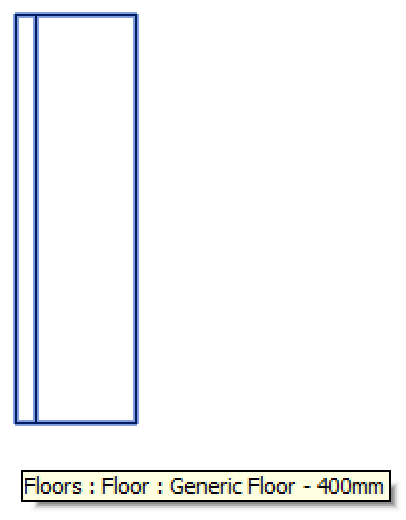
Due to the arrangement of the levels, after executing the command in a new empty default architectural model, the slab is not visible on Level 1. It is partially visible and partially cut off in Level 2:
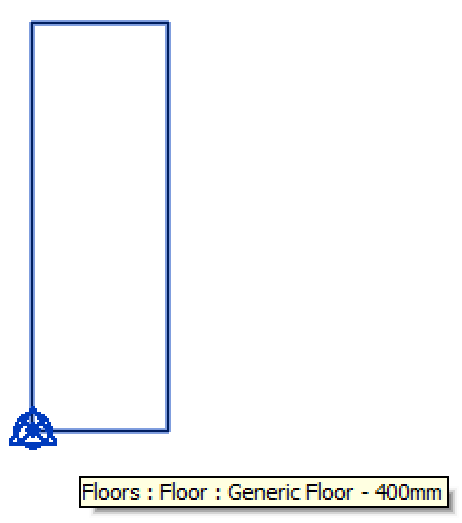
It is displayed completely in the Site view:
The elevation view shows the different levels and the slab slope of 0.5:
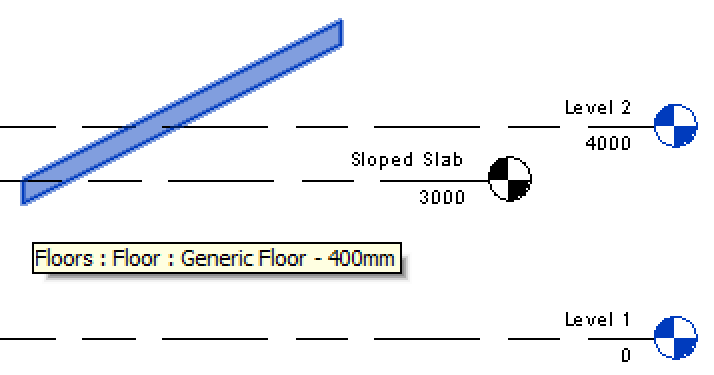
As you see, just like the man said: the floor definition profile is horizontal, and the slope is applied to that afterwards.
Download
In the end, I implemented a new external command CmdCreateSlopedSlab in The Building Coder samples to host this sample code.
You can grab it from The Building Coder samples GitHub repository.
The version discussed above is release 2014.0.108.0.
Good Answers
Before wrapping up for the week, let me share this neat joke I just received from my brother Marcus, about a student who obtained 0% on an exam:
Why not 100%?
Q1. In which battle did Napoleon die?
– A. In his last battle.
Q2. Where was the Declaration of Independence signed?
– A. At the bottom of the page.
Q3. River Ravi flows in which state?
– A. Liquid.
Q4. What is the main reason for divorce?
– A. Marriage.
Q5. What is the main reason for failure?
– A. Exams.
Q6. What can you never eat for breakfast?
– A. Lunch & dinner.
Q7. What looks like half an apple?
– A. The other half.
Q8. If you throw a red stone into the blue sea what it will become?
– A. It will become wet.
Q9. How can a man go eight days without sleeping ?
– A. He can sleep at night.
Q10. How can you lift an elephant with one hand?
– A. You will never find an elephant that has only one hand...
Q11. If you had three apples and four oranges in one hand and four apples and three oranges in the other, what would you have?
– A. Very large hands.
Q12. If it took eight men ten hours to build a wall, how long would it take four men to build it?
– A. No time at all, the wall is already built.
Q13. How can you drop a raw egg onto a concrete floor without cracking it?
– A. Any way you like, because concrete floors are very hard to crack.