My Cloud-Based 2D Editor Implementation Status
Continuing the research and development for my cloud-based round-trip 2D Revit model editing project, here are some issues I tackled since my last report:
- Updated project description and status
- CouchDB SVG editor implementation
- Home page: list all models and select one
Updated Project Description
I originally thought I would be implementing three cooperating components: the Revit add-in, a cloud-based data repository, and a browser-based JavaScript SVG viewer and editor client for the mobile devices.
After struggles with and resolution of the same origin policy, I discover that I need to use server-side scripting instead, which moves all the JavaScript and SVG handling to the cloud-based data repository component as well.
I updated my proposal accordingly as follows:
Cloud-based Round-trip 2D Revit Model Editing on any Mobile Device using Server-side Scripting, CouchDB and SVG
I demonstrate round-trip editing a 2D rendering of a Revit model on any mobile device with no need for installation of any additional software whatsoever beyond a browser.
How can this be achieved?
A Revit add-in exports polygon renderings of room boundaries and other elements such as furniture and equipment to a cloud-based repository implemented using a CouchDB NoSQL database.
On the mobile device, the repository is queried and the data is rendered in a standard browser using server-side generated JavaScript and SVG.
The rendering supports graphical editing, specifically translation and rotation of the furniture and equipment.
Modified transformations are saved back to the cloud database.
The Revit add-in picks up these changes and updates the Revit model in real-time.
All of the components used except Revit are completely open source.
This round-trip editing workflow is based on the following main components:
- A Revit add-in that determines room boundary and furniture and equipment family instance polygons for a simplified 2D plan view rendering.
- A cloud-based database repository managing the models, levels, rooms, furniture, equipment meta- and polygon data.
- A server hosted JavaScript SVG editor running in the browser on any device, rendering the model and supporting simple geometric modification of the model.
The presentation outline, the final proof of the pudding, looks like this:
- Show a Revit model.
- Export the model to a cloud-based data repository.
- Query and display the repository contents as a 2D rendering on a mobile device.
- Edit the model in the browser on the mobile device, updating the data repository.
- Watch the BIM in Revit auto-update.
I have now completed the implementation of all these steps with the single minute exception of the prefix 'auto'.
In other words, I currently have two commands in my Revit add-in:
- CmdUpload uploads the room and equipment boundary data to the cloud repository, either from a manually selected set of rooms, or all rooms in the model.
- CmdUpdate retrieves the changes applied to furniture and equipment on the mobile device. This is currently a command triggered by the user.
The next step for me will be adding the 'auto' to the update, i.e. the implementation of an external event that subscribes to changes in the cloud database caused by the user editing the furniture and equipment transforms on the mobile device and automatically applies real-time updates to the BIM.
Before I get to that, though, I have a huge backlog of information to share about all that has already been achieved, and how.
Without further ado, here is a little two-minute film demonstrating the current functionality to give you the idea:
CouchDB SVG Editor Implementation
I described the room editor database structure consisting of the model, level and room hierarchy.
Furniture and equipment instances are placed within the room and refer to separate symbol objects that store their geometry.
Two of the main tasks listed in my last to-do list were:
- Implement the rendering and editing of the 2D plan view in SVG on the mobile device.
- Reflect the modifications made back to the cloud-based CouchDB data repository.
Let's look at how I achieved that.
First, I must admit that I struggled quite a bit and burnt a significant amount of night oil on this. Maybe it would have been more efficient to do some reading up on basics before starting. Instead, I found various tutorials that did "almost" what I wanted that I tried to reproduce and tweak. Each and every one finally turned into a dead end, and I was thrown back to square one, or sometimes square 1.15 or so.
One impressive little sample application that really did help was Opto3, a small CouchDB application entirely hosted within CouchDB. It uses JQuery Mobile to serve a single-page mobile application that presents a four-panel drill-down approach to find an optometrist in a desired US location.

All the information stems from one single CSV file of US optometrician addresses. Here is its description, GitHub project repository and CodeProject article that also provides a useful list of additional references.
As said, I can use Kanso to maintain and install the database, push the views and upload my documents in JSON format to the local CouchDB database 'roomedit' using commands such as these:
$ kanso install

$ kanso push http://localhost:5984/roomedit

$ kanso upload mydata.json http://localhost:5984/roomedit
I ended up implementing my totally own version of a CouchDB application, unlike anything I saw in any of the samples.
Basically, I only use a couple of CouchDB views and a rather heavy-weight index.html file that renders them for various contexts, guiding the user through the model and room selection process and finally displaying the SVG editor page.
The selection logic is simple:
- Home page: list all models and prompt to select one of them.
- Model selected: list all levels in model and prompt to select one of them.
- Level selected: list all rooms on the level and prompt to select one of them.
- Room selected: display the room boundary and the furniture and equipment instances graphically and enable editing their location and rotation.
The first three steps were not so hard once I understood about CouchDB views and discovered how to render them in index.htm.
Integrating the SVG editor posed some really tough problems, but ended up being really simple as well.
For a while I was unsure whether I would be able to use the Raphaël JavaScript SVG library as is, or whether it needed to be packaged as a Kanso package. As it turned out, that was not necessary. Until I discovered that the hard way, though, I tried to avoid the use of any non-Kanso libraries at all, and struggled with SVG editing issues instead.
So let's start by looking at the simplest step first, how to list all models and prompt the user to select one of them.
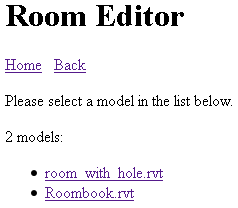
Home Page: List all Models and Select One
The initial home page of my application is very simple. It looks like this, listing the available models and prompting the user to select one of them:
I represent each Revit model as a separate CouchDB document. All the data it carries is inherited from the DbObj base class, which specifies its type "model", description and name. I populate the two latter with information from the Revit ProjectInfo singleton object, and I use the Revit UniqueId as the CouchDB document identifier as well.
The resulting CouchDB JSON representation of my sample model looks like this (copy to an editor or view the HTML source to see the truncated lines in full):
{
  "_id": "bf0552b6-b7f7-4331-96d5-b19843262895-00015084",
  "_rev": "14-4e1c947c3d3e354117a1f016f2e23f63",
  "type": "model",
  "description": "ProjectInfo Project Information <86148 Project Information>",
  "name": "room_with_hole.rvt"
}
CouchDB implements and extremely scalable architecture and can host millions of documents.
Views are used to efficiently extract the ones required. A view can implement a map and a reduce function. The map function identifies the documents of interest and maps them to a key-value pair. The optional reduce function can be applied to reduce the results by accumulation or other means. I have no use for reduce in my application.
To list all available models, I use an utterly trivial view function that does not even create real key-value pairs. All I need is to extract all model documents and list the model document information itself, so I just emit all model documents as keys directly:
exports.models = {
  map: function (doc) {
    if( 'model' == doc.type ) {
      emit(doc, null);
    }
  }
};
To render the results of the view into my HTML target file, I define the following scaffolding:
  <h1>Room Editor</h1>

  <div id="content"></div>

  <ul id="navigatorlist"></ul>
In the JavaScript section, I require the Kanso db and jquery packages:
  var db = require('db').current();
  var $ = require('jquery');
The db package provides access to the current CouchDB database, and jquery is a Kanso wrapper for the standard jquery library.
Oh, and what is Kanso itself? Kanso is a framework enabling me to maintain my CouchDB views and other bits and pieces in standard file system files on the hard disk and upload them easily to the CouchDB database.
With that in place, the following JavaScript code queries the 'models' view and populates the HTML placeholder tags:
// display a menu of all available models

db.getView('room_loops', 'models',
  function (err, data) {
    if (err) {
      return alert(err);
    }
    var n = data.rows.length;
    for (var i = 0; i < n; ++i) {
      var doc = data.rows[i].key;
      var s = url + '?modelid=' + doc._id;
      $('<li/>').append($('<a>')
        .attr('href',s)
        .text(doc.name))
      .appendTo('#navigatorlist');
    }
    var p = $('<p/>').appendTo('#content');
    p.append( $('<a/>').text('Home').attr('href',url) );
    p.append( document.createTextNode( three_spaces ) );
    p.append( $('<a/>').text('Back').attr('href',url) );

    $('<p/>')
      .text( 'Please select a model in the list below.' )
      .appendTo('#content');

    var prompt = n.toString() + ' model'
      + pluralSuffix( n ) + dotOrColon( n );

    $('<p/>').text( prompt ).appendTo('#content');
  }
);
As you can see, the db.getView method is provided with three arguments: the database name, the view name, and a call-back function.
Understanding how the call-back function works was another big stumbling block for me.
In this simple case, all is clear, of course.
We submit the query to get the view and return immediately.
CouchDB processes the request and invokes the call-back function when completed.
The call-back function processes the resulting data rows, extracting the model document data from the key provided with each row and populating the HTML scaffolding accordingly.
Again, here is the final result with two models listed, just as you can see in the video above:
Well, I am spending much too much time documenting this for you, and really need to get on with the implementation and my real day work, so I will call it wraps for today now.
Cloud and Mobile
2D Mobile Revit Model Editing Update
By Jeremy Tammik.
Continuing the research and development for my cloud-based round-trip 2D Revit model editing project, I updated the project description to emphasise more strongly that I am using pure client-side scripting to display and edit my graphical data, so there is nothing to implement or install at all on the mobile device, beyond testing that my server-side scripts really do their job.
The presentation outline looks like this:
- Show a Revit model.
- Export the model to a cloud-based data repository.
- Query and display the repository contents as a 2D rendering on a mobile device.
- Edit the model in the browser on the mobile device, updating the data repository.
- Watch the BIM in Revit auto-update.
I have completed the implementation of all these steps with the single minute exception of the prefix 'auto'.
In other words, I currently have two commands in my Revit add-in:
- CmdUpload uploads the room and equipment boundary data to the cloud repository, either from a manually selected set of rooms, or all rooms in the model.
- CmdUpdate retrieves the changes applied to furniture and equipment on the mobile device. This is currently a command triggered by the user.
Here is a little two-minute film demonstrating the current functionality to give you the idea: