UIView, Windows Coordinates, ReferenceIntersector and My Own Tooltip
Here is my well-meant contribution to making this the most exciting Wednesday of your entire week.
For the first time in history, the Revit 2013 UIView class provides a possibility to convert back and forth between Revit model coordinates and Windows device screen points.
I imagined making use of that right away when I read about the UIView class, and mentioned it when discussing UIView and Windows device coordinates.
I am still a bit surprised that I have not yet received any questions about these exciting possibilities. Well, anyway, that gives me a chance to finally dive into this exploration free of preconceptions.
Another Revit 2013 topic that I wanted to talk about for a long time is the new ReferenceIntersector class. My previous attempts at publishing anything on it were thwarted by running into some unintended features which have meanwhile been attended to.
Now I can combine both of these topics into a single nice example, presenting my very own tooltips displaying any information I like based on the cursor location in the Revit BIM.
Does that sound cool, or what?
To give you an idea of what I am talking about, here is a two-minute video depicting a sample run demonstrating the final result, with the normal Revit tooltips and my own specialised ones displayed side by side.
To run the demo, I open up the basic architectural sample project, switch away from the perspective view, since add-ins are disabled there, select Level 2, turn on my own tooltips, hover around different elements to compare the Revit tooltip with my own one, and turn off my tooltips again:
Table of Contents
To display a useful tooltip, the user needs to be free to play around in the model.
Simultaneously, my add-in needs to be able to access the Windows cursor location, determine the corresponding Revit model coordinates from it, and query the Revit BIM to determine the information I would like to display.
This calls for an Idling event handler, adding a third topic to the two already mentioned above.
We thus end up with the following list, including hints on the respective approaches, solutions, and helper methods:
- Top-level form and Idling event management: ModelessForm_IdlingEvent.
- Helper methods: GetActiveUiView, GetView3d, ElementDescription.
- Idling event handler:
- Access Windows cursor location: System.Windows.Forms.Cursor.Position.
- Determine Revit model coordinates: UIView.
- Query Revit BIM for information: ReferenceIntersector.
- Display tooltip: JtTooltipForm.
- Entire implementation.
- Toggle tooltip on and off commands.
- Conclusion and download.
Before closing, I also mention Saikat's new posts on multi-image naming conventions and text file TaskDialog command links, DesignScript availability on Autodesk Labs, and a nice video of my friend Falk on the Schafberg.
Top-level Form and Idling Event Management
As you hopefully know by now, the implementation to handle the Idling event needs to be really clean and clear and is a little bit tricky.
I strongly suggest basing anything you do on the ModelessForm_IdlingEvent SDK sample.
If you implemented your Idling event handler in any other way in the past, it might be a good idea revisiting it now and comparing notes with that sample.
I based my WinTooltip external application on it, anyway.
It handles all the modeless form interaction in the external application implementation.
In my case, the modeless form is either a Visual Studio designer generated JtTooltipForm or a hand-built JtTooltipForm2.
The external application is instantiated as a singleton instance, and provides public access to that instance so that external commands can access it and use its functionality to show and hide the modeless form.
It implements an internal CloseForm method, public methods ShowForm and HideForm, called by the external commands, and the standard interface methods OnStartup and OnShutdown, like this:
  /// <summary>
  /// Singleton external application class instance.
  /// </summary>
  internal static App _app = null;

  /// <summary>
  /// Provide access to singleton class instance.
  /// </summary>
  public static App Instance
  {
    get { return _app; }
  }

  /// <summary>
  /// The tooltip form to display.
  /// </summary>
  internal static JtTooltipForm2 _form = null;

  /// <summary>
  /// Dispose and null out form.
  /// Return true if it was previously not disposed.
  /// </summary>
  static bool CloseForm()
  {
    bool rc = _form != null;

    if( rc )
    {
      if( !_form.IsDisposed )
      {
        _form.Dispose();
      }
      _form = null;
    }
    return rc;
  }

  /// <summary>
  /// Create and show the form,
  /// unless it already exists.
  /// </summary>
  /// <remarks>
  /// The external command invokes
  /// this on end-user request.
  /// </remarks>
  public void ShowForm( UIApplication uiapp )
  {
    // If we do not have a form yet, create and show it

    if( _form == null || _form.IsDisposed )
    {
      // Instantiate JtTooltipForm to use
      // the designer generated form.

      _form = new JtTooltipForm2();

      _form.Show();

      // If we have a form, we need Idling too

      uiapp.Idling += IdlingHandler;
    }
  }

  /// <summary>
  /// Hide the form.
  /// </summary>
  /// <remarks>
  /// The external command invokes
  /// this on end-user request.
  /// </remarks>
  public void HideForm( UIApplication uiapp )
  {
    if( CloseForm() )
    {
      // If the form was showing, we had subscribed

      uiapp.Idling -= IdlingHandler;
    }
  }

  public Result OnStartup( UIControlledApplication a )
  {
    _app = this;
    _form = null;

    return Result.Succeeded;
  }

  public Result OnShutdown( UIControlledApplication a )
  {
    if( CloseForm() )
    {
      a.Idling -= IdlingHandler;
    }
    return Result.Succeeded;
  }
Helper Methods
Apart from the top-level management, the Idling event handler does all the rest of the work.
Before we get to the event handler itself, I'll present the three helper methods it uses:
- GetActiveUiView: retrieve the active UIView.
- GetView3d: retrieve the 3D view named "{3D}".
- ElementDescription: return a descriptive text for a given Revit element.
We can get the active document view directly, but need some additional coding to determine the associated UIView, for example like this:
/// <summary>
/// Return currently active UIView or null.
/// </summary>
static UIView GetActiveUiView(
  UIDocument uidoc )
{
  Document doc = uidoc.Document;
  View view = doc.ActiveView;
  IList<UIView> uiviews = uidoc.GetOpenUIViews();
  UIView uiview = null;

  foreach( UIView uv in uiviews )
  {
    if( uv.ViewId.Equals( view.Id ) )
    {
      uiview = uv;
      break;
    }
  }
  return uiview;
}
The ReferenceIntersector constructor requires a 3D view argument in which the ray tracing takes place. In this sample, I assume that a suitable 3D view named "{3D}" is available and retrieve that using one single line of filtered element and LINQ driven code:
/// <summary>
/// Return the 3D view named "{3D}".
/// </summary>
View3D GetView3d( Document doc )
{
  return new FilteredElementCollector( doc )
    .OfClass( typeof( View3D ) )
    .Cast<View3D>()
    .FirstOrDefault<View3D>(
      v => v.Name.Equals( "{3D}" ) );
}
You can obviously modify this in any way you like and set up a suitable 3D view to suit your specific view setting, sectioning and filtering needs.
The location dependent BIM information displayed in the tooltip can be determined completely freely. In my case, I simply detect what element the cursor is hovering over and use the ElementDescription method to put together a descriptive text for it:
/// <summary>
/// Return a string describing the given element:
/// .NET type name,
/// category name,
/// family and symbol name for a family instance,
/// element id and element name.
/// </summary>
static string ElementDescription(
  Element e )
{
  if( null == e )
  {
    return "<null>";
  }

  // For a wall, the element name equals the
  // wall type name, which is equivalent to the
  // family name ...

  FamilyInstance fi = e as FamilyInstance;

  string typeName = e.GetType().Name;

  string categoryName = ( null == e.Category )
    ? string.Empty
    : e.Category.Name + " ";

  string familyName = ( null == fi )
    ? string.Empty
    : fi.Symbol.Family.Name + " ";

  string symbolName = ( null == fi
    || e.Name.Equals( fi.Symbol.Name ) )
      ? string.Empty
      : fi.Symbol.Name + " ";

  return string.Format( "{0} {1}{2}{3}<{4} {5}>",
    typeName, categoryName, familyName,
    symbolName, e.Id.IntegerValue, e.Name );
}
This is somewhat similar to and yet does not exactly match the information displayed by the standard Revit tooltip and other parts of the user interface, as you might have noticed in the video recording.
Idling Event Handler
The Idling event handler implements the following steps, which we first discuss one by one before presenting the entire code in context:
- Access Windows cursor location: System.Windows.Forms.Cursor.Position.
- Determine Revit model coordinates: UIView.
- Query Revit BIM for information: ReferenceIntersector.
- Display tooltip: JtTooltipForm.
- Entire implementation.
Access Windows Cursor Location
Converting from the cursor position retrieved in Windows device coordinates to Revit model coordinates is possible by calculating the relative position in the UIView.
Here is an illustration assuming a screen resolution of 1600 x 1200 with a Revit view located at the rectangle 800,150 to 1500,650, displaying a plan view of part of the Revit model, with model coordinates ranging from 10,40,0 to 220,120,0. The current cursor location is represented by the green spot:
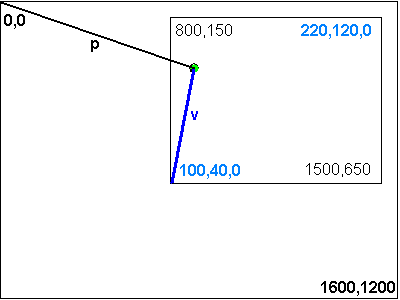
The Windows device coordinate origin 0,0 is at the upper left, and Y values increase downwards, whereas the Revit model coordinate Y values increase upwards.
You can easily query the cursor position in device coordinates on the Windows screen from .NET framework at any time using the System.Windows.Forms.Cursor.Position property:
Point p = System.Windows.Forms.Cursor.Position;
Determine Revit Model Coordinates
The cursor location is obviously returned in Windows device coordinates, stored in the point (or vector) variable 'p'.
The aim is to determine the location indicated by this point in Revit model coordinates, for example by determining the vector v from the lower left corner of the Revit view to that location.
We can easily determine the relative position of p between the two corners of the UIView in Windows device coordinates by subtracting the lower left hand corner and dividing by the total width and height to obtain the relative width and height location values dx and dy like this:
  UIView uiview = GetActiveUiView( uidoc );

  Rectangle rect = uiview.GetWindowRectangle();

  Point p = System.Windows.Forms.Cursor.Position;

  double dx = (double) ( p.X - rect.Left )
    / ( rect.Right - rect.Left );

  double dy = (double) ( p.Y - rect.Bottom )
    / ( rect.Top - rect.Bottom );
From the UIView, we can also determine model coordinates of the view corners. They are stored in a and b, respectively.
Now it is easy to calculate the cursor point 'q' in model coordinates from the two relative values like this:
  IList<XYZ> corners = uiview.GetZoomCorners();
  XYZ a = corners[0];
  XYZ b = corners[1];
  XYZ v = b - a;

  XYZ q = a
    + dx * v.X * XYZ.BasisX
    + dy * v.Y * XYZ.BasisY;
Query Revit BIM for Information using ReferenceIntersector Ray Casting
Once we have the model space cursor location 'q', we can calculate a point beyond the model extents (hopefully) from which one can picture the user looking into the model.
The first element intersected by a ray cast from that point in the view direction should be the one we are interested in displaying information about.
Initially, the sample run was a bit boring, because the only element encountered when looking from straight above was always the roof.
I tweaked that to make the example more interesting, not by modifying the model itself – I use the standard architectural basic sample project rac_basic_sample_project.rvt – but by adding a filter to remove all roof category elements from the reference intersector results instead. The exact elements of interest and information to display are entirely up to you and your needs to determine, of course.
The ray casting requires a 3D view to operate in. In this case, I simply pick the one named "{3D}" returned by the GetView3d helper method. You can set up your own view with specific graphics properties, section cuts, and only certain elements visible, if that better suits your requirements.
Here is the code determining the view, view direction and ray origin, setting up the intersector, determining the target element, and defining the tooltip text to display in the variable 's':
  View3D view3d = GetView3d( doc );

  XYZ viewdir = view.ViewDirection;

  XYZ origin = q + 1000 * viewdir;

  // Find all elements:

  //ReferenceIntersector ri
  //  = new ReferenceIntersector( view3d );

  // Find all elements except roofs:

  ElementFilter f = new ElementCategoryFilter(
    BuiltInCategory.OST_Roofs, true );

  ReferenceIntersector ri
    = new ReferenceIntersector( f,
      FindReferenceTarget.Element, view3d );

  ReferenceWithContext rc
    = ri.FindNearest( origin, -viewdir );

  string s = "Element not found";

  if( null != rc )
  {
    Reference r = rc.GetReference();

    Element e = doc.GetElement( r );

    s = ElementDescription( e );
  }
Display Tooltip and the JtTooltipForm class
I originally used the Visual Studio designer to create a simple tooltip form named JtTooltipForm for me, then tweaked that auto-generated code to create one named JtTooltipForm2 myself programmatically from scratch.
Besides the constructor setting up the form and the Label object to display the tooltip text, it also manages an offset from the cursor position at which to display itself, provides a method to set the tooltip text, and overrides the OnShown and OnVisibleChanged methods to react appropriately to position changes:
/// <summary>
/// A tooltip window designed to move
/// around with the cursor position.
/// </summary>
class JtTooltipForm2 : Form
{
  /// <summary>
  /// The offset from the mouse pointer
  /// at which to show the form.
  /// </summary>
  public Point Offset { get; set; }

  /// <summary>
  /// Tooltip text.
  /// </summary>
  Label _label;

  /// <summary>
  /// Set the tooltip text.
  /// </summary>
  public void SetText( string s )
  {
    _label.Text = s;
  }

  /// <summary>
  /// Move the window to an offset of mouse pointer.
  /// </summary>
  protected override void OnShown( EventArgs e )
  {
    base.OnShown( e );

    Location = new Point(
      MousePosition.X + Offset.X,
      MousePosition.Y + Offset.Y );
  }

  /// <summary>
  /// Move the window to an offset of mouse pointer.
  /// </summary>
  protected override void OnVisibleChanged(
    EventArgs e )
  {
    base.OnVisibleChanged( e );

    if( Visible )
    {
      Location = new Point(
        MousePosition.X + Offset.X,
        MousePosition.Y + Offset.Y );
    }
  }

  public JtTooltipForm2()
  {
    Size = new Size( 200, 20 );

    _label = new Label();

    SuspendLayout();

    _label.AutoSize = false; // the label will not change its height automatically, only width, so switch off AutoSize to wrap text
    _label.CausesValidation = false;
    _label.Dock = DockStyle.Fill;
    _label.Location = new Point( 0, 0 );
    _label.Size = new Size( 35, 13 );
    _label.Parent = this;

    AutoScaleDimensions = new SizeF( 6F, 13F );
    AutoScaleMode = AutoScaleMode.Font;
    BackColor = SystemColors.Info;
    ClientSize = new Size( 200, 12 );
    Controls.Add( _label );
    FormBorderStyle = FormBorderStyle.None;
    Name = "JtTooltipForm";
    Opacity = 0.8D;
    ShowInTaskbar = false;
    TopMost = true;
    TransparencyKey = Color.White;

    ResumeLayout( false );
    PerformLayout();

    Offset = new Point( 10, 0 );
  }
}
You may note that I switched off the AutoSize property. Setting it to true enables the label to automatically expand, and that just means getting wider to fit the text length. The label will not change its height automatically, only width.
A neat trick to wrap text before putting it into the label that I spotted and did not make use of employs a regular expression to do the job:
  WrappedMessage := RegExReplace(
    LongMessage, "(.{50}\s)", "$1`n" );
Controlling the text and position from the Idling event handler is a trivial two-liner:
  // Move tooltip to current cursor
  // location and set tooltip text.

  _form.Location = p + new Size( _form.Offset );
  _form.SetText( s );
Entire Idling Event Handler Implementation
For better readability, here is the entire Idling event handler implementation in all its glory.
It even includes one slight improvement that is not demonstrated by the ModelessForm_IdlingEvent SDK sample implementation:
If the Revit project is closed while the Idling event is still subscribed to, the UI document may be null. One needs to add a check for that situation as well in the Idling handler, in case the hander relies on an open document.
/// <summary>
/// Idling event handler.
/// </summary>
/// <remarks>
/// We keep the handler very simple. First check
/// if we still have the form. If not, unsubscribe
/// from Idling, for we no longer need it and it
/// makes Revit speedier. If the form is around,
/// check if it has a request ready and process
/// it accordingly.
/// </remarks>
public void IdlingHandler(
  object sender,
  IdlingEventArgs args )
{
  UIApplication uiapp = sender as UIApplication;
  UIDocument uidoc = uiapp.ActiveUIDocument;

  if( null == uidoc || _form.IsDisposed )
  {
    uiapp.Idling -= IdlingHandler;
  }
  else // form still exists
  {
    Document doc = uidoc.Document;
    View view = doc.ActiveView;

    UIView uiview = GetActiveUiView( uidoc );

    Rectangle rect = uiview.GetWindowRectangle();

    Point p = System.Windows.Forms.Cursor.Position;

    double dx = (double) ( p.X - rect.Left )
      / ( rect.Right - rect.Left );

    double dy = (double) ( p.Y - rect.Bottom )
      / ( rect.Top - rect.Bottom );

    IList<XYZ> corners = uiview.GetZoomCorners();
    XYZ a = corners[0];
    XYZ b = corners[1];
    XYZ v = b - a;

    XYZ q = a
      + dx * v.X * XYZ.BasisX
      + dy * v.Y * XYZ.BasisY;

    // If the current view happens to be a 3D view,
    // we could simply use it right away. In
    // general we have to find a different one to
    // run the ReferenceIntersector in.

    View3D view3d = GetView3d( doc );

    XYZ viewdir = view.ViewDirection;

    XYZ origin = q + 1000 * viewdir;

    // Find all elements:

    //ReferenceIntersector ri
    //  = new ReferenceIntersector( view3d );

    // Find all elements except roofs:

    ElementFilter f = new ElementCategoryFilter(
      BuiltInCategory.OST_Roofs, true );

    ReferenceIntersector ri
      = new ReferenceIntersector( f,
        FindReferenceTarget.Element, view3d );

    ReferenceWithContext rc
      = ri.FindNearest( origin, -viewdir );

    string s = "Element not found";

    if( null != rc )
    {
      Reference r = rc.GetReference();

      Element e = doc.GetElement( r );

      s = ElementDescription( e );
    }

    // Move tooltip to current cursor
    // location and set tooltip text.

    _form.Location = p + new Size( _form.Offset );
    _form.SetText( s );
  }
}
Toggle Tooltip On and Off Commands
To simplify the usage and cooperation with other add-ins, I implemented two trivial read-only external commands calling the external application ShowForm and HideForm methods to toggle my personal tooltips on and off:
[Transaction( TransactionMode.ReadOnly )]
public class CmdTooltipOn : IExternalCommand
{
  public Result Execute(
    ExternalCommandData commandData,
    ref string message,
    ElementSet elements )
  {
    App.Instance.ShowForm(
      commandData.Application );

    return Result.Succeeded;
  }
}

[Transaction( TransactionMode.ReadOnly )]
public class CmdTooltipOff : IExternalCommand
{
  public Result Execute(
    ExternalCommandData commandData,
    ref string message,
    ElementSet elements )
  {
    App.Instance.HideForm(
      commandData.Application );

    return Result.Succeeded;
  }
}
Conclusion and Download
I hope you find this as useful as I imagine it might become, and look forward to your feedback.
By the way, I will be talking about this sample and the possibilities it demonstrates along with many other topics in my Autodesk University presentation CP4107 on the new Revit 2013 UI API functionality, probably making this the most exciting one of my three AU sessions.
Here is a current snapshot of the entire source code, Visual Studio solution and add-in manifest of the WinTooltip sample application, together the rest of my CP4107 sample material. The latter is based on my DevCamp Revit 2013 UI API samples.
Here are a couple of other items of interest before I wrap up, related to the Revit API, technology and purely human interst.
DWG and Image Export Naming Convention
Saikat Bhattacharya points out that the naming convention for exporting multiple images follows the one used for DWG export: [FileName]-[ViewType]-[ViewName].[image format].
Displaying a Text File from a TaskDialog Command Link
I recently mentioned the order of TaskDialog command links.
Now Saikat Bhattacharya picked up a related issue, on how to define a TaskDialog command link to open up a text file in the local system.
URLs and local system HTML links work fine out of the box. A text file, however, needs special processing. One way to launch it is by using the Process.Start method in the .NET System.Diagnostics namespace. Saikat provides the source.
DesignScript
A very exciting new technology is now publicly available on Autodesk Labs: DesignScript:
- A powerful scripting language for exploratory programming.
- Managing and distinguishing between a generative description of a design (as a script) and the resulting generated model.
- A language to help designers build and analyze complex geometric models that would be difficult to model with interactive techniques.
- Integrated into a host geometry application (currently AutoCAD).
The designer no longer directly models the resulting design: instead she develops a script whose execution generates the model. This enables a completely different kind of design model to be created. The design process is also different. An apparently minor edit to the script can have a profound effect on the generated model, enabling the exploration of a vast array of alternatives, with much less effort than manual interactive modeling. Here is a five-minute video explanation of Design Computation by Robert Aish for Autodesk University last year:
Kean Walmsley provides a very nice explanation and description of the DesignScript sample he implemented for it together with Robert in 2008 for the Design Computation Symposium and AU mainstage presentation.
Now you can try it for yourself. Unfortunately, DesignScript is not yet available for Revit...
Falk on Schafberg
For something completely unrelated to any technology at all, here is a nice little video of my friend Falk recently when we hiked over the Wildhauser Schafberg (sheep mountain) together, clearly illustrating some basic and sympathetic human and ovine commonalities :-)