Use of NewTakeOffFitting on a Pipe
I presented an example of using the NewTakeOffFitting method on a duct a while back. The original question, however, was actually related to inserting a break into a pipe. That turned out to be a bit more tricky. This was also discovered by Kailash Kute, who posted a whole series of comments on the topic. I will herewith reiterate my first answer to him and post the code that I had working to see whether that will help us move forward with this.
Question: How can I create a new takeoff fitting at the midpoint of a pipe, thus breaking the pipe into two parts?
Answer: The solution is similar to creating a takeoff fitting on a duct.
If you wish the coupling to break the pipe, it has to be a tee of some kind, i.e. a pipe tap or spud. This requires a working "Pipe Spud" family. The discussion on pipe taps in the Autodesk Revit MEP discussion forum provides such a sample pipe spud family which you can save locally and test on a project. This is the recommended family type and category to use for now for a pipe outlet part.
For an example on using it manually, you can look at this video showing how to load the fitting into a project and use it when drawing a pipe.
Basically, you do the following:
- Load the family into a project
- Select Pipe from the ribbon
- Select Edit Type
- Change the preferred type to Tap
- Set the pipe spud as the default tap
- Click Apply/OK
Now when you draw a branch pipe off of the main, the spud will be placed at the intersection.
I rewrote the code demonstrating how to use the NewTakeOffFitting method on a duct to operate on a pipe instead:
/// <summary>
/// Revit external command to demonstrate
/// NewTakeOffFitting method for pipes.
///
/// Create two pipes in a new document
/// and call NewTakeOffFitting to add
/// a takeoff to connect them.
/// </summary>
[Transaction( TransactionMode.Manual )]
[Regeneration( RegenerationOption.Manual )]
public class Command : IExternalCommand
{
  public Result Execute(
    ExternalCommandData commandData,
    ref string message,
    ElementSet elements )
  {
    Result result = Result.Failed;

    UIApplication uiapp = commandData.Application;
    Document doc = uiapp.ActiveUIDocument.Document;

    Transaction t = null;

    Autodesk.Revit.Creation.Document creDoc
      = doc.Create;

    try
    {
      // determine pipe type to use:

      FilteredElementCollector collector
        = new FilteredElementCollector( doc );

      collector.OfCategory(
        BuiltInCategory.OST_PipeCurves );

      collector.OfClass( typeof(
        ElementType ) );

      PipeType pipeType
        = collector.FirstElement() as PipeType;

      if( null == pipeType )
      {
        Message.ShowError( "No pipe types found." );
      }
      else
      {
        t = new Transaction( doc, Message.Caption );

        t.Start();

        // create pipe1 along X axis
        // from (0,0,0) to (6,0,0):

        XYZ start = XYZ.Zero;
        XYZ end = start + 6 * XYZ.BasisX;
        XYZ mid = 0.5 * ( start + end );

        Pipe pipe1 = creDoc.NewPipe(
          start, end, pipeType );

        // create pipe2 parallel to Y
        // axis from (1,2,0) to (1,4,0):

        start = mid + 2 * XYZ.BasisY;
        end = start + 2 * XYZ.BasisY;

        Pipe pipe2 = creDoc.NewPipe(
          start, end, pipeType );

        // pick closest connector on pipe2:

        Connector pipe2_start = null;

        // just picking the first one is unreliable!
        // the order of connector returned by the
        // connector manager may change!
        // always use a location (or even more
        // information if 2 connectors are at
        // the same location) to get the right
        // connector!

        double dist = double.MaxValue;

        foreach( Connector c in
          pipe2.ConnectorManager.Connectors )
        {
          XYZ p = c.Origin;
          double d = p.DistanceTo( mid );

          if( d < dist )
          {
            dist = d;
            pipe2_start = c;
          }
          break;
        }

        // create takeoff from pipe1 to pipe2:

        FamilyInstance takeoff
          = creDoc.NewTakeoffFitting(
            pipe2_start, pipe1 );

        t.Commit();

        result = Result.Succeeded;
      }
    }
    catch( Exception ex )
    {
      if( null != t )
      {
        t.RollBack();
      }
      message = ex.Message;
    }
    return result;
  }
}
Everything said about the arguments to the NewTakeoffFitting method and the order of connectors returned by the connector manager in the case of ducts applies here as well, of course.
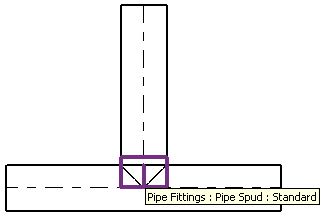
The command (which is simply named Command) in the attached project creates the following model when run in a project where the tap (not tee) and the pipe spud have been selected as the default pipe branch fittings:
Here is CreateTakeoffPipe.zip containing the entire source code and Visual Studio solution implementing this command.