Use of NewTakeOffFitting on a Duct
Here is a simple question on how to create a new MEP takeoff on a duct using the NewTakeOffFitting method:
Question: I have a duct in my Revit MEP model and I want to create a takeoff fitting at its midpoint. I see that the method NewTakeOffFitting takes two arguments, a connector and an MEP curve, and returns a new family instance. My question is:
How can I create the connector and curve? Can you show me some code on how to do so and use this method? Thanks!
Answer: To begin with, the AutoRoute and AvoidObstruction Revit SDK samples show you how to handle the programmatic creation of pipes, ducts and fittings.
I also analysed the creation and positioning of cable tray fittings in some depth.
None of these samples explicitly demonstrate the use of the NewTakeOffFitting method, however.
The Document.NewTakeoffFitting method adds a new family instance representing a takeoff fitting into the model, using one connector and one MEP curve:
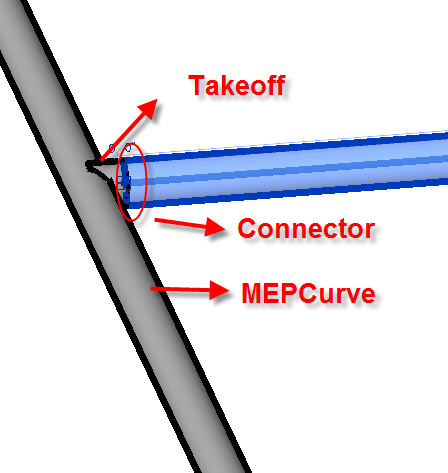
The MEP curve is the base pipe or duct, and the connector belongs to the element that is to be attached to it.
I created a little sample application CreateTakeoff to demonstrate its use in real life. It was interesting to do so, because I did have to struggle with one or two issues, such as what duct elements to use and how to position them.
Here is the mainline of the external command Execute method implementing this:
public Result Execute(
  ExternalCommandData commandData,
  ref string message,
  ElementSet elements )
{
  Result result = Result.Failed;

  UIApplication uiapp = commandData.Application;
  Document doc = uiapp.ActiveUIDocument.Document;

  Transaction t = null;

  Autodesk.Revit.Creation.Document creDoc
    = doc.Create;

  try
  {
    // determine duct type to use:

    FilteredElementCollector collector
      = new FilteredElementCollector( doc );

    collector.OfCategory(
      BuiltInCategory.OST_DuctCurves );

    collector.OfClass( typeof(
      ElementType ) );

    DuctType ductType
      = collector.FirstElement() as DuctType;

    if( null == ductType )
    {
      ErrorMsg( "No duct types found." );
    }
    else
    {
      t = new Transaction( doc, _caption );

      t.Start();

      // create duct1 along X axis
      // from (0,0,0) to (6,0,0):

      XYZ start = XYZ.Zero;
      XYZ end = start + 6 * XYZ.BasisX;
      XYZ mid = 0.5 * ( start + end );

      Duct duct1 = creDoc.NewDuct(
        start, end, ductType );

      // create duct2 parallel to Y
      // axis from (1,2,0) to (1,4,0):

      start = mid + 2 * XYZ.BasisY;
      end = start + 2 * XYZ.BasisY;

      Duct duct2 = creDoc.NewDuct(
        start, end, ductType );

      // pick closest connector on duct2:

      Connector duct2_start = null;

      // just picking the first one is unreliable!
      // the order of connector returned by the
      // connector manager may change!
      // always use a location (or even more
      // information if 2 connectors are at
      // the same location) to get the right
      // connector!

      double dist = double.MaxValue;

      foreach( Connector c in
        duct2.ConnectorManager.Connectors )
      {
        XYZ p = c.Origin;
        double d = p.DistanceTo( mid );

        if( d < dist )
        {
          dist = d;
          duct2_start = c;
        }
        break;
      }

      // create takeoff from duct1 to duct2:

      FamilyInstance takeoff
        = creDoc.NewTakeoffFitting(
          duct2_start, duct1 );

      t.Commit();

      result = Result.Succeeded;
    }
  }
  catch( Exception ex )
  {
    if( null != t )
    {
      t.RollBack();
    }
    message = ex.Message;
  }
  return result;
}
One important thing to note here is that you cannot rely on the order of the connectors returned by the connector manager, since it may change. Therefore, you cannot simply pick the first connector, for instance, but have to rely on some other criteria such as the location. In the code above, I checked the distance of the second duct's connectors to the midpoint of the first duct and selected the closest one.
Instead, I loop through all the connectors of duct2 and select the one with a minimum distance to the midpoint of the first duct. Since I am searching for the minimum distance, I initialise the variable 'dist' to the maximal possible value and then loop through all connectors, always picking the new one if its distance to the midpoint is smaller than the previous value.
Alternatively, I could probably position the second duct so that its connector is very close to the midpoint and then use XYZ.IsAlmostEqualTo.
Here is the result of running this command in a new Revit MEP project:
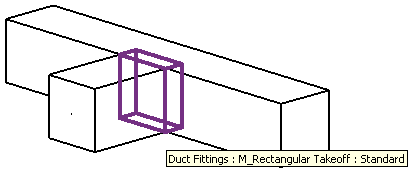
Out of interest, I tried running it in Revit Architecture as well, but the very first call to create a new duct element fails and reports that this functionality is only available in Revit MEP.
Here is CreateTakeoff.zip containing the entire source code and Visual Studio solution implementing this add-in.