Library Paths
Here is a question posted by Edgar on how to modify the application options library paths:
Question: I'm having trouble updating the Revit options for library paths. I'm not sure what I'm missing to update back to the database.
Answer: Since the library paths managed by the LibraryPaths property on the Autodesk.Revit.Options.Application class is a StringStringMap, this question is mostly on how to extract, add and modify data in such a collection.
A StringStringMap is simply a dictionary mapping a set of keys to a corresponding set of values. In this case, both the key and the value data type is string.
To begin with, here is a little utility method to list the contents of a StringStringMap and print out an explanatory header beforehand:
void PrintMap( StringStringMap map, string description )
{
  Debug.Print( "\n{0}:\n", description );

  StringStringMapIterator it = map.ForwardIterator();

  while( it.MoveNext() )
  {
    Debug.Print( "{0} -> {1}", it.Key, it.Current );
  }
}
We use a forward iterator to iterate over the contents, consisting of key-value pairs. The keys and values are printed out one by one. Their data is read from the iterator Key and Current properties, respectively.
To add a new key and value pair to the string map, you can use the Insert method. Modification of an existing value can be accomplished using set_Item.
I implemented a new Building Coder sample external command CmdLibraryPaths to test and demonstrate this. Here is the code of its Execute method:
Application app = commandData.Application;

StringStringMap map = app.Options.LibraryPaths;

PrintMap( map, "Initial application options library paths" );

string key = "ImperialTestCreate";
string value = @"C:\Documents and Settings\All Users\Application Data\Autodesk\RAC 2010\Imperial Library\Detail Components";

map.Insert( key, value );

PrintMap( map, "After adding 'ImperialTestCreate' key" );

map.set_Item( key, @"C:\Temp" );

PrintMap( map, "After modifying 'ImperialTestCreate' key" );

return CmdResult.Succeeded;
Launching this command will produce the following output in the Visual Studio debug output window:
Initial application options library paths:

Metric Library -> C:\Program Files\Autodesk Revit Architecture 2010\Program\Metric Library
Metric Detail Library -> C:\Program Files\Autodesk Revit Architecture 2010\Program\Metric Library\Detail Components

After adding 'ImperialTestCreate' key:

ImperialTestCreate -> C:\Documents and Settings\All Users\Application Data\Autodesk\RAC 2010\Imperial Library\Detail Components
Metric Library -> C:\Program Files\Autodesk Revit Architecture 2010\Program\Metric Library
Metric Detail Library -> C:\Program Files\Autodesk Revit Architecture 2010\Program\Metric Library\Detail Components

After modifying 'ImperialTestCreate' key:

ImperialTestCreate -> C:\Temp
Metric Library -> C:\Program Files\Autodesk Revit Architecture 2010\Program\Metric Library
Metric Detail Library -> C:\Program Files\Autodesk Revit Architecture 2010\Program\Metric Library\Detail Components
Truncated lines can be seen in full by copy and pasting into an editor.
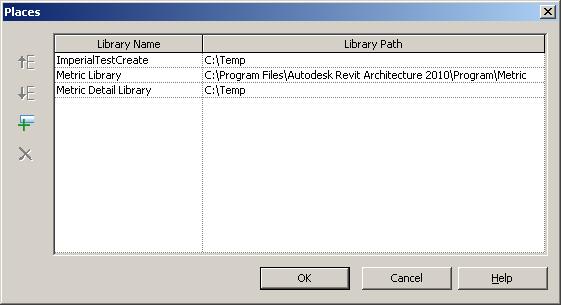
Once I got this far, I started trying to see the results of my changes in the Revit user interface. The library paths are displayed by clicking on the big R button, the main menu button on the upper left of the Revit application window, and then selecting Options > File Locations > Places...
To my surprise, I saw no changes. I first thought that we added and modified a new key 'ImperialTestCreate' which is ignored by Revit. So I added a modification to one of the pre-existing Revit keys, and set the value of 'Metric Detail Library' to 'C:\Temp' as well. I still saw no changes.
It then dawned upon me that the statement 'map = app.Options.LibraryPaths' copies the current application options library paths into my own private StringStringMap instance stored in my local variable 'map'. All the changes I made are in my own local copy. To have any effect in Revit, I need to write back the changes into the Revit application object data, for instance using a statement such as 'app.Options.LibraryPaths = map'. After doing so, both the updated existing key as well as the new one added by me is displayed as expected in the user interface:
The updated code of the Execute method now looks like this:
Application app = commandData.Application;

StringStringMap map = app.Options.LibraryPaths;

PrintMap( map, "Initial application options library paths" );

string key = "ImperialTestCreate";
string value = @"C:\Documents and Settings\All Users\Application Data\Autodesk\RAC 2010\Imperial Library\Detail Components";

map.Insert( key, value );

PrintMap( map, "After adding 'ImperialTestCreate' key" );

map.set_Item( key, @"C:\Temp" );

PrintMap( map, "After modifying 'ImperialTestCreate' key" );

map.set_Item( "Metric Detail Library", @"C:\Temp" );

PrintMap( map, "After modifying 'Metric Detail Library' key" );

app.Options.LibraryPaths = map;

return CmdResult.Succeeded;
Here is version 1.1.0.45 of the complete Building Coder sample source code and Visual Studio solution including the new command.
Response: This works perfectly, thank you for the thorough explanation. Also, Thank you for the goodies!