I continued working on my CompHound component tracker and now successfully integrated the viewer, just in time to wrap up before leaving for two weeks vacation starting next Monday.
I finally gave up resisting the pernicious acronym LMV, short for large model viewer.
It has always been used as an unofficial internal code name for the Autodesk View and Data API viewer.
No other abbreviation had any success yet, and many colleagues are using LMV, so I'll join the ranks.
Before starting to work on viewer stuff, I fiddled with setting up two columns in the CompHound user interface for the selected component occurrence data and the viewer, but did not complete that yet.
I also consolidated and cleaned up of the three readme files, so that now the web server and C# client ones both point clearly straight to the landing page.
The viewer component uses OAuth 2 authorisation, so it consists of two parts:
On the client side of things, a separate little JavaScript object helps access the authorisation tokens provided by the server.
I will therefore discuss the following three implementation files:
The latter two are public and pulled in by the user interface defined in public/datatable2.html.
I implemented the authorisation server and new REST API routes for it based on Jim Awe's simple AuthTokenServer using Node.js.
Its functionality is provided by the LmvAuthorisationService defined in ./lmvauth/AuthTokenServer.js:
// AuthTokenServer.js
// by Jim Awe

var https = require("https");

// Call the Autodesk authentication API to get a token
// based on our client_id and client_secret.
// When we get a response, forward that response on to
// the browser-based app that called us needing the token.

function getAuthCode(mainResponse, baseUrl,
                     clientId, clientSecret)
{
  var dataString =
    "client_id=" + clientId
    + "&client_secret=" + clientSecret
    + "&grant_type=client_credentials";

  var headers = {
    "Content-Type": "application/x-www-form-urlencoded"
  };

  var options = {
    host: baseUrl,
    port: 443,
    path: "/authentication/v1/authenticate",
    method: "POST",
    headers: headers,

    // only for dev!
    rejectUnauthorized: false,
    requestCert: true,
    agent: false
  };

  var req = https.request(options, function(res) {
    res.setEncoding("utf8");
    var responseString = "";

    res.on("data", function (data) {
      responseString += data;
    });

    res.on("end", function() {
      console.log(responseString);
      mainResponse.setHeader('Content-Type', 'application/json');
      mainResponse.setHeader('Access-Control-Allow-Origin', '*');
      mainResponse.send(responseString); // forward response on to the original call from the browser app
    });
  });

  req.write(dataString);
  req.end();
}

// Define entry points for the URLs the browser based
// app will send to us to get the token.  Send one
// appropriate for the given environment.  If you only
// have keys for the PRODUCTION environment, then just
// replace those below, otherwise you can replace them
// all and easily switch environments from your browser
// app.

LmvAuthorisationService = {

  auth : function(req, res) {
    console.log("AuthTokenServer: getting PRODUCTION token...");
    // ***** PUT YOUR PRODUCTION KEYS HERE *****
    getAuthCode(res, "developer.api.autodesk.com",
      process.env.COMPHOUND_CONSUMERKEY,
      process.env.COMPHOUND_CONSUMERSECRET);
  },

  authstg : function(req, res) {
    console.log("AuthTokenServer: getting STAGING token...");
    // ***** PUT YOUR STAGING KEYS HERE *****
    getAuthCode(res, "developer-stg.api.autodesk.com",
      process.env.COMPHOUND_CONSUMERKEY,
      process.env.COMPHOUND_CONSUMERSECRET);
  },

  authdev : function(req, res) {
    // need endpoint and keys for DEV
    console.log("AuthTokenServer: getting DEV token...");
    // ***** PUT YOUR DEV KEYS HERE *****
    getAuthCode(res, "developer-dev.api.autodesk.com",
      process.env.COMPHOUND_CONSUMERKEY,
      process.env.COMPHOUND_CONSUMERSECRET);
  },

  authtest : function(req, res) {
    res.send("LmvAuthorisationService: I'm alive!");
  }

}

module.exports = LmvAuthorisationService;
This functionality is made available via the last four public REST API routes defined in routes.js:
module.exports = function(app) {
  var InstanceService = require('./controller/instances_v1');
  app.get('/api/v1/instances', InstanceService.findAll);
  app.get('/api/v1/instances/:id', InstanceService.findById);
  app.post('/api/v1/instances', InstanceService.add);
  app.put('/api/v1/instances/:id', InstanceService.update4);
  app.delete('/api/v1/instances/:id', InstanceService.delete);
  app.get('/api/v1/instances/project/:pid', InstanceService.findAllForProject);

  var LmvAuthorisationService = require('./lmvauth/AuthTokenServer');
  app.get('/api/v1/auth', LmvAuthorisationService.auth);
  app.get('/api/v1/auth-stg', LmvAuthorisationService.authstg);
  app.get('/api/v1/auth-dev', LmvAuthorisationService.authdev);
  app.get('/api/v1/auth-test', LmvAuthorisationService.authtest);
}
To avoid publishing my View and Data API consumer key and secret, I store them on my local system in environment variables named
COMPHOUND_CONSUMERKEY and
COMPHOUND_CONSUMERSECRET.
$ set | grep COMPH
COMPHOUND_CONSUMERKEY=pLdXXXXXXXXIfXXXXXXXXXXhzXXXXUeZ
COMPHOUND_CONSUMERSECRET=ReXXXXXXXXXXXXur
I added the following assertion right up front in server.js to ensure that nobody can forget to set them:
// Ensure that the View and Data API consumer
// key and secret environment variables are set.

if( !process.env.COMPHOUND_CONSUMERKEY
  || !process.env.COMPHOUND_CONSUMERSECRET ) {
  var msg = 'Please set the CompHound View and Data API '
    + 'consumer key and secret environment variables '
    + 'COMPHOUND_CONSUMERKEY and COMPHOUND_CONSUMERSECRET '
    + 'before starting the server.';
  console.log( msg );
  throw new Error( msg );
}
After redeploying the new version to Heroku, it crashed.
Checking the log files reveals the problem:
2015-09-30T18:57:10.941716+00:00 heroku[web.1]: State changed from up to down
2015-09-30T18:57:14.297264+00:00 heroku[web.1]: Stopping all processes with SIGTERM
2015-09-30T18:57:15.875941+00:00 heroku[web.1]: Process exited with status 143
2015-09-30T21:46:33.743366+00:00 heroku[api]: Deploy abd323f by jeremy.tammik@eur.autodesk.com
2015-09-30T21:46:33.743366+00:00 heroku[api]: Release v24 created by jeremy.tammik@eur.autodesk.com
2015-09-30T21:46:33.812780+00:00 heroku[slug-compiler]: Slug compilation started
2015-09-30T21:46:33.812797+00:00 heroku[slug-compiler]: Slug compilation finished
2015-09-30T21:47:12.357950+00:00 heroku[web.1]: Unidling
2015-09-30T21:47:12.358473+00:00 heroku[web.1]: State changed from down to starting
2015-09-30T21:47:20.524667+00:00 heroku[web.1]: Starting process with command `node server.js`
2015-09-30T21:47:22.405906+00:00 app[web.1]: Please set the CompHound View and Data API consumer key and secret environment variables COMPHOUND_CONSUMERKEY and COMPHOUND_CONSUMERSECRET before starting the server.
2015-09-30T21:47:22.407178+00:00 app[web.1]: /app/server.js:22
2015-09-30T21:47:22.406864+00:00 app[web.1]:
2015-09-30T21:47:22.407461+00:00 app[web.1]:   throw new Error( msg );
2015-09-30T21:47:22.407467+00:00 app[web.1]:         ^
2015-09-30T21:47:22.410027+00:00 app[web.1]: Error: Please set the CompHound View and Data API consumer key and secret environment variables COMPHOUND_CONSUMERKEY and COMPHOUND_CONSUMERSECRET before starting the server.
2015-09-30T21:47:22.410030+00:00 app[web.1]:     at Object.<anonymous> (/app/server.js:22:9)
I forgot to set the environment variables on the Heroku server instance :-)
Apparently, my assertion works well.
How clever of me to build in a reminder – for myself :-)
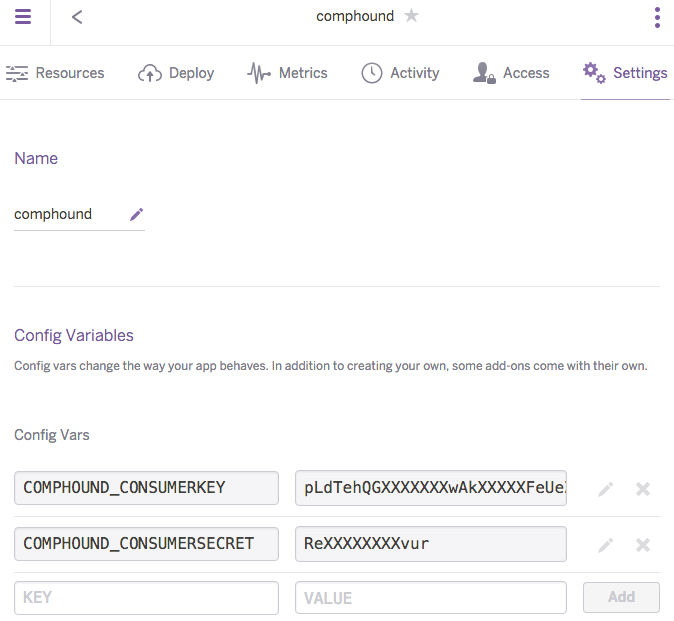
Accordingly, I added the two configuration variables to Heroku:
Once that was done, all was well.
You can try out the authorisation token generation live by invoking
this link to the /api/v1/auth route.
Jim's simple AuthTokenServer also includes a client-side helper module, MyAuthToken.js, to access and provide the authorisation tokens generated on the server side and make them available to the JavaScript client.
I used his code to implement my own version in /public/js/lmvauthtoken.js, defining a JavaScript object LmvAuthToken:
// lmvauthtoken.js
//
// Object to encapsulate retrieval of an authorization
// code for the viewing service.  After declaring a
// global instance, you can repeatedly call value()
// whenever you need the token to pass to an API call.
// It will keep track of the expiration of the token
// and referesh it when necessary.
//
// NOTE: there is another way to accomplish this by just
// calling the API function with a token without worrying
// about whether it has expired, and then if it returns
// 'Invalid Token', then get a new token and retry.
// This is possible with jQuery, but only works with the
// .success()/.error() constructs and not with .done(),
// .fail() (at least not without a lot of convoluted extra
// work).  For now, I am happier doing it this way, but am
// open to suggestions on best practices.
//
// Jim Awe
// Autodesk, Inc.

// CONS LmvAuthToken():
// locally running token service (Token Service is started
// with Node.js command: 'node AuthTokenServer.js'). If you
// deploy AuthTokenServer.js, this obj constructor needs to
// change URL accordingly.

function LmvAuthToken(env)
{
  // Determine URL from window.location.
  //Later: no need at all, just use the API route.
  // http://stackoverflow.com/questions/1034621/get-current-url-in-web-browser
  //var currentLocation = window.location;

  var url = '/api/v1/';

  if (env === 'PROD') { url += 'auth'; }
  else if (env === 'STG') { url += 'auth-stg'; }
  else if (env === 'DEV') { url += 'auth-dev'; }
  else {
    alert('DEVELOPER ERROR: No valid environment set for LmvAuthToken()');
  }

  console.log('LmvAuthToken url ' + url );

  this.tokenService = url;
  this.token = '';
  this.expires_in = 0;
  this.timestamp = 0;
}

// FUNC value():
// return the value of the token

LmvAuthToken.prototype.value = function()
{
  // if we've never retrieved it, do it the first time
  if (this.token === '') {
    console.log('AUTH TOKEN: Getting for first time...');
    this.get();
  }
  else {
    // get current timestamp and see if we've expired yet
    var curTimestamp = Math.round(new Date() / 1000); // time in seconds
    var secsElapsed = curTimestamp - this.timestamp;

    if (secsElapsed > (this.expires_in - 10)) {
      // if we are within 10 secs of expiring, get new token
      console.log('AUTH TOKEN: expired, refreshing...');
      this.get();
    }
    else {
      var secsLeft = this.expires_in - secsElapsed;
      console.log('AUTH TOKEN: still valid (' + secsLeft + ' secs)');
    }
  }
  return this.token;
};

// FUNC get():
// get the token from the Authentication service and
// cache it, along with the expiration time

LmvAuthToken.prototype.get = function()
{
  var retVal = '';
  var expires_in = 0;

  var jqxhr = $.ajax({
    url: this.tokenService,
    type: 'GET',
    async: false,
    success: function(ajax_data) {
      console.log('AUTH TOKEN: ' + ajax_data.access_token);
      retVal = ajax_data.access_token; // NOTE: this only works because we've made the ajax call Synchronous (and 'this' is not valid in this scope!)
      expires_in = ajax_data.expires_in;
    },
    error: function(jqXHR, textStatus) {
      alert('AUTH TOKEN: Failed to get new auth token!');
    }
  });

  this.token = retVal;
  this.expires_in = expires_in;
  this.timestamp = Math.round(new Date() / 1000); // get time in seconds when we retrieved this token
};
In the HTML file, the viewer requires nothing but a div tag with an id attribute, e.g., viewer, in our case.
The div is populated by public/js/lmviewer.js as follows, also showing how to access the auth token provided by the LmvAuthToken object:
// Change the token and urn (translated file location) before running.

//var token = 'TB4KC708xPeHYKxDBerbc850MOsS';

var lmvAuthToken = new LmvAuthToken('PROD');

var urn_little_house = 'dXJuOmFkc2sub2JqZWN0czpvcy5v...';
var urn_rst_advanced_sample_project = 'dXJuOmFkc2sub...';
var urn = urn_rst_advanced_sample_project;

function getToken() {
  //return token;
  return lmvAuthToken.value();
}

function lmv_loadDocument(viewer, documentId) {
  // Find the first 3d geometry and load that.
  Autodesk.Viewing.Document.load(documentId, function(doc) {
    var geometryItems = Autodesk.Viewing.Document.getSubItemsWithProperties(
      doc.getRootItem(),
      { 'type' : 'geometry', 'role' : '3d' },
      true);

    if (geometryItems.length > 0) {
      viewer.load(doc.getViewablePath(geometryItems[0]));
    }
  },
  function(errorMsg) { // onErrorCallback
    alert('Load Error: ' + errorMsg);
  });
}

function lmv_initialize() {
  var options = {
    'document' : 'urn:' + urn,
    'env':'AutodeskProduction',
    'getAccessToken': getToken,
    'refreshToken': getToken };

  var viewerElement = document.getElementById('viewer');
  var viewer = new Autodesk.Viewing.Viewer3D(viewerElement, {});

  Autodesk.Viewing.Initializer(options,function() {
    viewer.initialize();
    lmv_loadDocument(viewer, options.document);
  });
}
The model URN is currently hard-coded, for testing purposes, to the rst_advanced_sample_project.rvt sample model that I also used to populate the database.
Later, we will use the urn
data added to each component occurrence database record.
All the source code is available from the CompHound organisation repositories. The current versions discussed above are the web server CompHoundWeb 0.0.28 and the C# REST API client CompHoundRvt 2016.0.0.5.
I just redeployed it to Heroku again. As always, the links to Try it out Live are up and running, so feel free to play.
Please be aware that the user interface presented by the main entry
point comphound.herokuapp.com/datatable2 is
rather messed up right now, because I have not yet implemented proper positioning for the LMV div tag.
I can remove some items from the to-do list, only to add other new ones: