I discussed some manual testing of the REST API and the PUT, POST and Delete HTTP action implementations.
I also promised some live testing from a C# .NET desktop app.
In this case, it means adding documents to the fireratingdb node.js mongo web server via the REST API.
We'll take a look at that today:
The C# .NET desktop app needs to access the mongo database and the node.js web server driving it to programmatically add new documents via the REST API.
We'll start off with the server running locally on the Windows system.
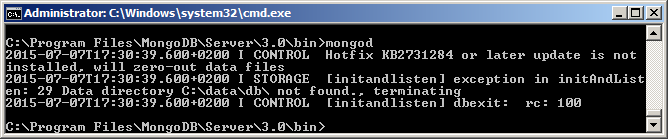
That requires a mongo installation on my Windows system.
Easily said and done; I simply grabbed mongodb-win32-x86_64-2008plus-ssl-3.0.4-signed.msi from mongodb.org and clicked it to install and start up the mongo database daemon.
In my case, that installed the daemon mongod.exe and interactive command line console mongo.exe in C:\Program Files\MongoDB\Server\3.0\bin and all is well.
I can simply enter that directory and start them up on the command line:
Oops.
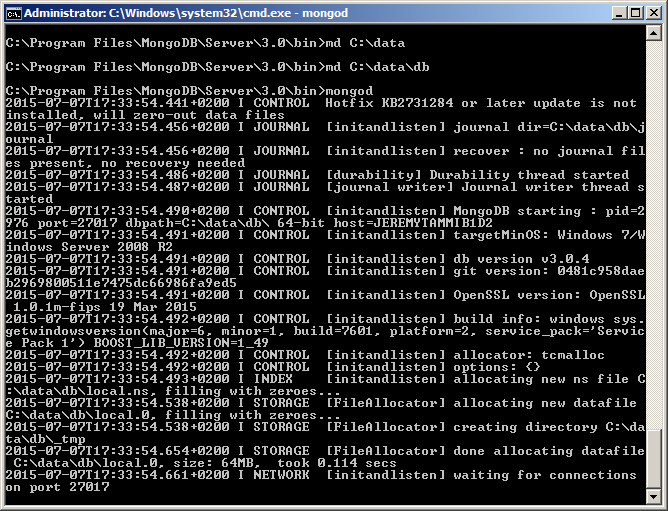
Well, not quite yet... I do have to set up a data directory, e.g. C:\data\db\.
Once that is done, I can successfully start the daemon:
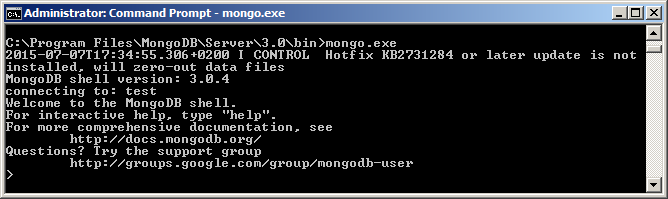
With the daemon is up and running, I can launch the console and start interacting with the database:
Actually, all I want to do is start my node web server, which happily runs happily on Windows as well, completely unmodified:

Now the web server is up and running locally, I can GET the current list of project via the REST API by typing the appropriate URL in the browser address bar:
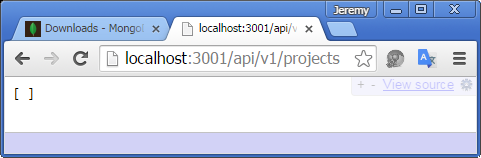
No projects defined, yet.
Let's define one, then.
I struggled a bit to make my first successful REST API request from the desktop C# .NET app.
The code that ended up doing the trick looks like this:
  /// <summary>
  /// POST JSON data to the specified mongoDB collection.
  /// </summary>
  string PostJsonData(
    string collection_name,
    string json )
  {
    string uri = Util.RestApiUri + "/" + collection_name;

    HttpWebRequest request = HttpWebRequest.Create(
      uri ) as HttpWebRequest;

    request.ContentType = "application/json; charset=utf-8";
    request.Accept = "application/json, text/javascript, */*";
    request.Method = "POST";

    using( StreamWriter writer = new StreamWriter(
      request.GetRequestStream() ) )
    {
      writer.Write( json );
    }

    WebResponse response = request.GetResponse();
    Stream stream = response.GetResponseStream();
    string jsonResponse = string.Empty;

    using( StreamReader reader = new StreamReader(
      stream ) )
    {
      while( !reader.EndOfStream )
      {
        jsonResponse += reader.ReadLine();
      }
    }
    return jsonResponse;
  }
It takes the mongoDB collection name and the JSON data specifying the document to add to the collection.
I call it with the collection name project and the appropriate JSON data, just like in the
manual testing using curl.
I was loath to use too many ready-built components and thought I could easily implement my own JSON formatting by hand.
I can indeed, and I can also make lots of silly mistakes in the process.
To discover the mistakes I was making, I ended up implementing the formatting code twice over, once using the .NET JavaScriptSerializer helper class, and then again using my own hand-written format string.
The JavaScriptSerializer.Serialize method takes a class and formats it into a JSON string representing the same data as a JavaScript dictionary object.
I implemented the following .NET class to represent my project data:
  /// <summary>
  /// Data holder to use JavaScriptSerializer.
  /// </summary>
  public class ProjectData
  {
    public string projectinfo_uid { get; set; }
    public string versionguid { get; set; }
    public int numberofsaves { get; set; }
    public string title { get; set; }
    public string centralserverpath { get; set; }
    public string path { get; set; }
    public string computername { get; set; }
  }
I can populate that and serialize it to JSON like this:
  ProjectData project_data = new ProjectData()
  {
    projectinfo_uid = doc.ProjectInformation.UniqueId,
    versionguid = doc_version.VersionGUID.ToString(),
    numberofsaves = doc_version.NumberOfSaves,
    title = doc.Title,
    centralserverpath = central_server_path,
    path = path,
    computername = System.Environment.MachineName
  };

  return new JavaScriptSerializer().Serialize(
    project_data );
The same result is obtained without using external libraries or any other helpers by this hand-written code:
  /// <summary>
  /// Retrieve the project identification information
  /// to store in the external database and return it
  /// as a dictionary in a JSON formatted string.
  /// </summary>
  string GetProjectDataJson( Document doc )
  {
    string path = doc.PathName.Replace( '\\', '/' );

    BasicFileInfo file_info = BasicFileInfo.Extract( path );
    DocumentVersion doc_version = file_info.GetDocumentVersion();
    ModelPath model_path = doc.GetWorksharingCentralModelPath();

    string central_server_path = null!= model_path
      ? model_path.CentralServerPath
      : string.Empty;

    // Do my own hand-written JSON formatting.

    return string.Format(
      "{7} \"projectinfo_uid\": \"{0}\","
      + "\"versionguid\": \"{1}\","
      + "\"numberofsaves\": {2},"
      + "\"title\": \"{3}\","
      + "\"centralserverpath\": \"{4}\","
      + "\"path\": \"{5}\","
      + "\"computername\": \"{6}\" {8}",
      doc.ProjectInformation.UniqueId,
      doc_version.VersionGUID,
      doc_version.NumberOfSaves,
      doc.Title,
      central_server_path,
      path,
      System.Environment.MachineName,
      '{', '}' );
  }
Two of the hurdles I ran into were escaping the backslash characters and printing the curly braces.
Using the methods listed above, these two lines of code successfully add a new project document to the mongo database:
  string json = GetProjectDataJson( doc );

  string jsonResponse = PostJsonData( "projects", json );
For example, the string passed in for one sample project looks like this:
{ "projectinfo_uid": "8764c510-57b7-44c3-bddf-266d86c26380-0000c160",
  "versionguid": "194b64e6-8132-4497-ae66-74904f7a7710",
  "numberofsaves": 2,
  "title": "little_house_2016.rvt",
  "centralserverpath": "",
  "path": "Z:/a/rvt/little_house_2016.rvt",
  "computername": "JEREMYTAMMIB1D2" }
PostJsonData packages that into the HTTP POST request to the fireratingdb server and returns the result, consisting of basically the same data, with the mongo version number and id added:
{ "__v":0,
  "projectinfo_uid":"8764c510-57b7-44c3-bddf-266d86c26380-0000c160",
  "versionguid":"194b64e6-8132-4497-ae66-74904f7a7710",
  "numberofsaves":2,
  "title":"little_house_2016.rvt",
  "centralserverpath":"",
  "path":"Z:/a/rvt/little_house_2016.rvt",
  "computername":"JEREMYTAMMIB1D2",
  "_id":"559c16306d56ee040f3f800f"}
Now, when I GET the current list of project via the REST API by typing the appropriate URL in the browser address bar, the new project is listed:
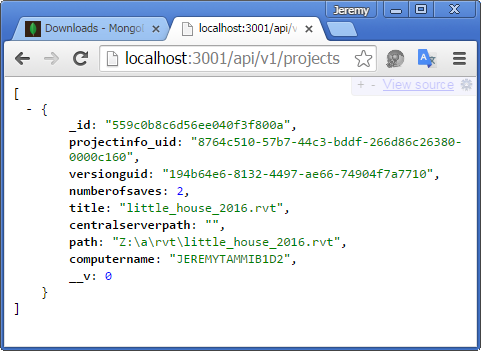
By the way, for the sake of clarity, I renamed the node.js mongo db web server from firerating to fireratingdb.
This version of the node.js server code is captured as release 0.0.6 in the fireratingdb GitHub repository, in case you would like to try it out yourself.
Much more importantly, the Revit add-in hosting the C# .NET code discussed above is provided in release 2016.0.0.1 in the FireRatingCloud GitHub repository.
The next step will be to extract the mongo id from the newly created project document and add all the door instances in the project to the database as well.
Oh, and we obviously also need to check whether a project has already been stored in the database. If so, we should reuse the existing document for it instead of creating a new one.