Splitting a Duct in More Depth
We recently shared a brief note on using the BreakCurve API for splitting a pipe.
In a comment on that, Matt Taylor pointed out a much more comprehensive discussion in the Revit API discussion forum thread asking is there any API available to split a duct programmatically?.
That is not just an example, but an entire tutorial, so I think it is very useful to share here as well for all to enjoy:
Question: I need to split a duct programmatically ? Is there any API available to do so?
Answer: I explained how this can be achieved using the BreakCurve method in my comments
on duct splitting
Response: I tried using the BreakCurve method for splitting a duct, but it throws an exception at the time of execution.
Can you please guide me on how to pass the third parameter, XYZ ptBreak?

Answer: Well, I think the error says it all! The point isn't on the duct curve.
Here's a simple example that breaks a duct 2 feet along its length.
<Transaction(TransactionMode.Manual)>
<Regeneration(RegenerationOption.Manual)>
<Journaling(JournalingMode.UsingCommandData)>
Public Class TransactionCommand
  Implements UI.IExternalCommand
  Public Function Execute(
    ByVal commandData As UI.ExternalCommandData,
    ByRef message As String, ByVal elements As DB.ElementSet) _
      As UI.Result Implements UI.IExternalCommand.Execute

    Dim app As ApplicationServices.Application = commandData.Application.Application
    Dim doc As DB.Document = commandData.Application.ActiveUIDocument.Document
    Dim docUi As UI.UIDocument = commandData.Application.ActiveUIDocument

    Execute = UI.Result.Failed
    Using transaction As New DB.Transaction(doc, "Break Duct")
      transaction.Start()
      Dim duct As DB.Mechanical.Duct = TryCast(doc.GetElement(
        New DB.ElementId(1789723)), DB.Mechanical.Duct)
      Dim curve As DB.Curve = TryCast(duct.Location, DB.LocationCurve).Curve
      Dim pt0 As DB.XYZ = curve.GetEndPoint(0)
      Dim pt1 As DB.XYZ = curve.GetEndPoint(1)
      Dim vector As DB.XYZ = pt1.Subtract(pt0).Normalize
      Dim breakPt As DB.XYZ = pt0.Add(vector.Multiply(2.0))
      Dim newDuctId As DB.ElementId = DB.Mechanical.MechanicalUtils.BreakCurve(
        doc, duct.Id, breakPt)
      transaction.Commit()
      ' change our result to successful
      Execute = UI.Result.Succeeded
    End Using
    Return Execute
  End Function
End Class
Response: It worked pleasantly. Smiley Happy
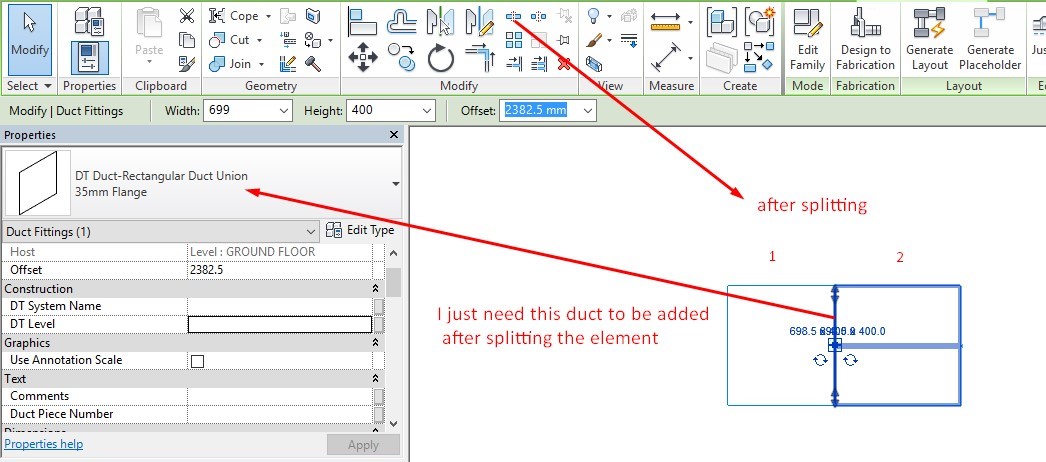
Normally, if I split a duct in the UI, it adds a family instance, e.g., a fitting, between the two separated elements.
BreakCurve just breaks the element into two parts at the specified length, which is really good, but I also need a specific family instance to be added between the two elements, just like in the UI.
Answer: Well, you probably need to break the duct in two places.
You have the elementIds of the two ducts after one break; you just need to use one of those in your second break.
The second break would have to be enclosed in a second transaction.
Once you have the third elementId, you can get its duct element and use duct.ChangeTypeId to change the type should you desire it.
Response: My requirement is different.
This is what the BreakCurve method generates:

Can I add a fitting between the two duct elements that will act as a separation point?
Here are screenshots showing the situation before and after splitting an element via the UI and API:
Before:

After, when splitting manually via UI:
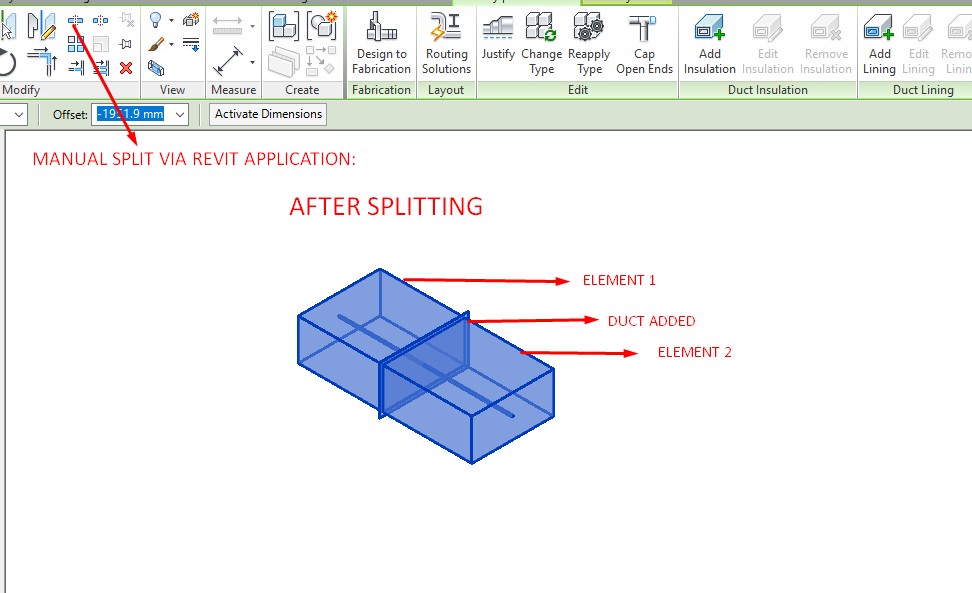
Here, you can see 3 elements. Two are child elements created by splitting the parent element. The third one is the fitting that separates the two.
This is the fitting that was added:

After, when splitting using the BreakCurve API:
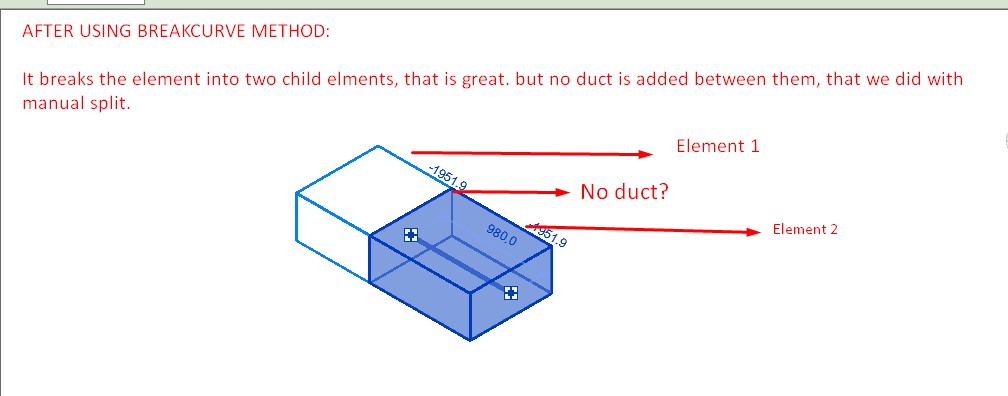
So, here the fitting needs to be added between the two duct elements, just like it was using the manual split command.
Answer: Riiiiiiiight. You need to add a union fitting. That is a duct fitting, and a family instance.
When in doubt about the wording, you can describe the elements using the Revit descriptions or the RevitLookup (API) names. That reduces the potential for confusion.
I originally used two transactions, but it appears a regen will do the trick:
<Transaction(TransactionMode.Manual)>
<Regeneration(RegenerationOption.Manual)>
<Journaling(JournalingMode.UsingCommandData)>
Public Class TransactionCommand
  Implements UI.IExternalCommand
  Public Function Execute(
    ByVal commandData As UI.ExternalCommandData, ByRef message As String,
    ByVal elements As DB.ElementSet) _
      As UI.Result Implements UI.IExternalCommand.Execute

    Dim app As ApplicationServices.Application = commandData.Application.Application
    Dim doc As DB.Document = commandData.Application.ActiveUIDocument.Document
    Dim docUi As UI.UIDocument = commandData.Application.ActiveUIDocument

    Execute = UI.Result.Failed
    Dim newDuctId As DB.ElementId = Nothing
    Dim ductOrig As DB.Mechanical.Duct = Nothing
    Dim duct2 As DB.Mechanical.Duct = Nothing
    Dim breakPt As DB.XYZ = Nothing
    Using transaction As New DB.Transaction(doc, "Break Duct + Add Fitting")
      transaction.Start()
      ductOrig = TryCast(doc.GetElement(New DB.ElementId(1789660)), DB.Mechanical.Duct)
      Dim curve As DB.Curve = TryCast(ductOrig.Location, DB.LocationCurve).Curve
      Dim pt0 As DB.XYZ = curve.GetEndPoint(0)
      Dim pt1 As DB.XYZ = curve.GetEndPoint(1)
      Dim vector As DB.XYZ = pt1.Subtract(pt0).Normalize
      breakPt = pt0.Add(vector.Multiply(2.0))
      newDuctId = DB.Mechanical.MechanicalUtils.BreakCurve(doc, ductOrig.Id, breakPt)
      duct2 = TryCast(doc.GetElement(newDuctId), DB.Mechanical.Duct)
      doc.Regenerate()
      Dim connectorOrig As DB.Connector = ductOrig.ConnectorManager.Lookup(0)
      Dim connector1 As DB.Connector = duct2.ConnectorManager.Lookup(1)
      Dim familySymbol As DB.FamilySymbol = TryCast(doc.GetElement(
        New DB.ElementId(755396)), DB.FamilySymbol)
      Dim famInstance As DB.FamilyInstance = doc.Create.NewFamilyInstance(
        breakPt, familySymbol, DB.Structure.StructuralType.NonStructural)
      Dim fitting As DB.MEPModel = famInstance.MEPModel
      Dim fittingConnector0 As DB.Connector = fitting.ConnectorManager.Lookup(0)
      Dim fittingConnector1 As DB.Connector = fitting.ConnectorManager.Lookup(1)

      connectorOrig.ConnectTo(fittingConnector1)
      connector1.ConnectTo(fittingConnector0)
      transaction.Commit()
      ' change our result to successful
      Return UI.Result.Succeeded
    End Using
    Return Execute
  End Function
End Class
Response: It works great.
Yet, I have another issue. This method only works well if we are not modifying the element's orientation.
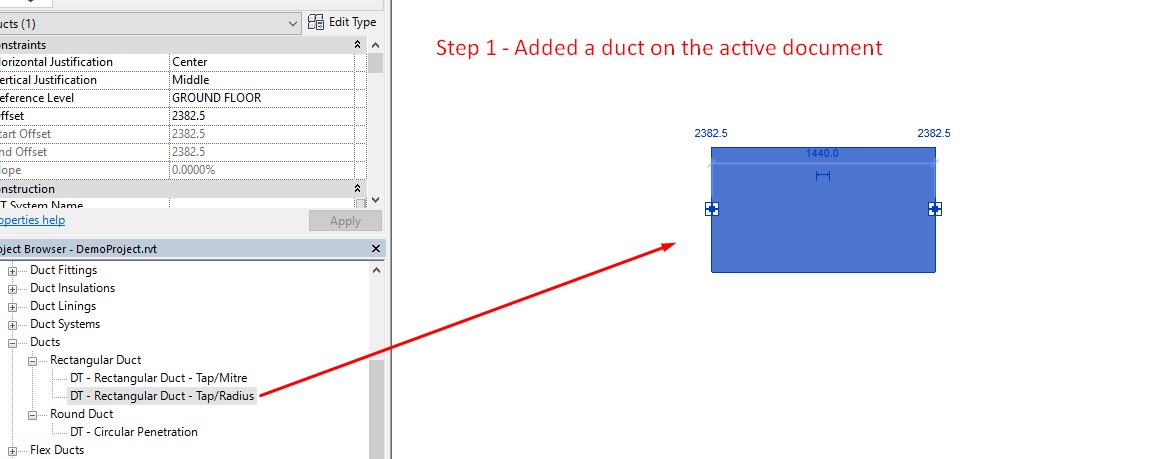
I tested this on a duct. I first added a duct and implemented the method just after placing an instance of that duct and it worked great.
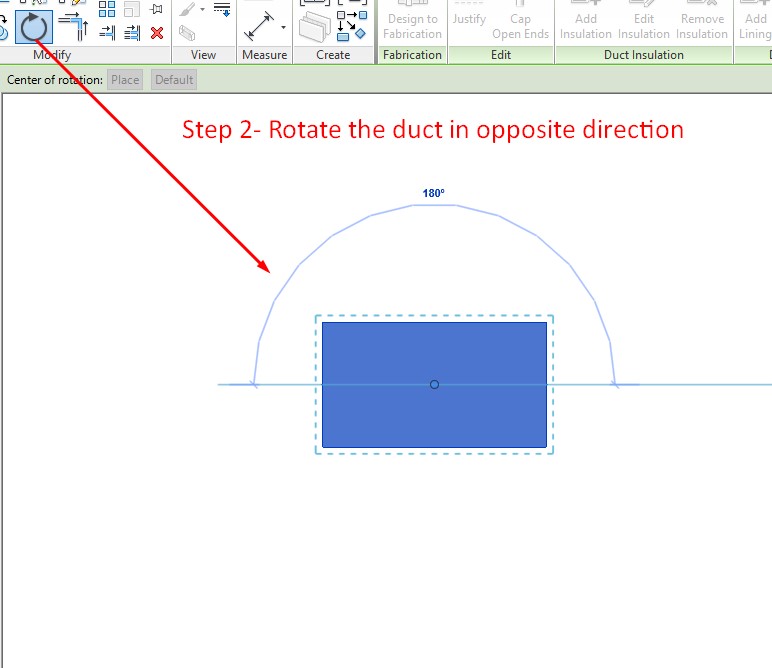
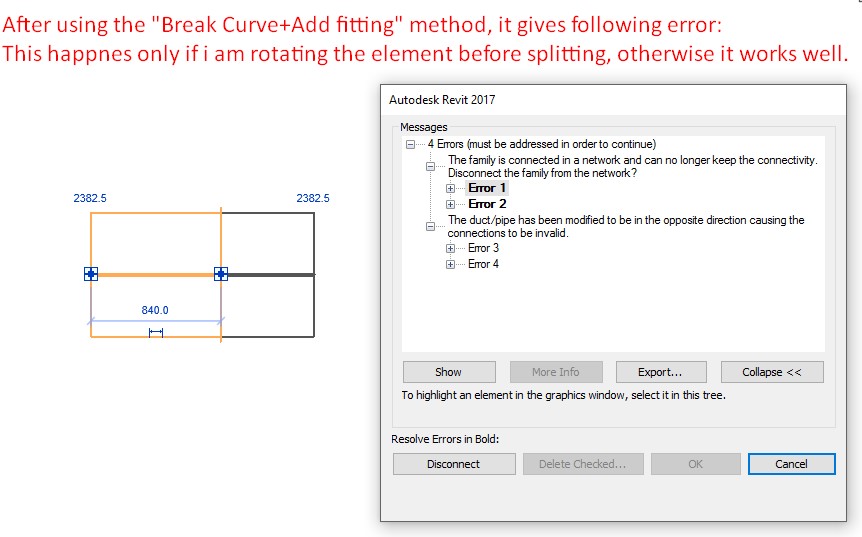
But, If I rotate the element to its opposite direction and then implementing that methods throws multiple errors.
Do you have any idea how to resolve these?
Here are the instructions to reproduce the issue:
Answer: The family instance needs rotating in the same orientation as the duct curve.
I'm sure there are plenty of examples of how to rotate family instances on this forum. Report back with how you get on!
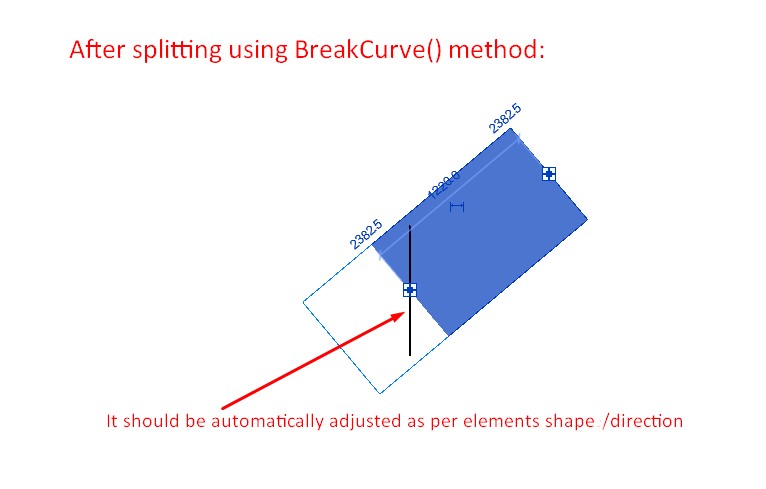
Response: I searched but haven't found much on how to adjust (rotate) the duct fitting as per the element direction and shape.
I tried the rotate method, but that just rotates the new instance (duct fitting) to a 180-degree angle. So, this only works for a 180-degree rotated element.
Answer: You can find an example showing how to achieve what you ask by @aksaks in his GitHub repository
Response: I checked the link. It provides lots of methods.
Not sure which one to choose. I tried implementing a few of them but there are many undefined and unknown classes.
Can you please show me a precise way to get the resolution ?
Answer: There is in fact no need for the rotation.
You can place the duct fitting with the right direction.
  Dim famInstance As DB.FamilyInstance _
  = doc.Create.NewFamilyInstance(
    breakPt, FamilySymbol, vector, null,
    DB.Structure.StructuralType.NonStructural)
Of course, it can't hurt to learn how to rotate an element.
Response: Thank you so much. It worked pleasantly
Very many thanks to Matt and Fair59 for their kind support and great patience helping out in such detail and depth!