Adjusting Wall Location Curve and Visual Presentation
An exciting discussion on applying minimal adjustments to the model, and yet another research result on the effectivity of visual presentation:
Adjusting versus Recreating Wall Location Curve
Harald Schmidt pointed out an interesting and important aspect of the old discussion of how to edit wall length in his Revit API discussion forum thread, on adjusting Wall.LocationCurve.Curve results in unexpected behaviour, and once again Frank @Fair59 Aarssen came to the rescue with the final solution:
Question: My add-in adjusts walls lines slightly; it moves and rotates them a bit, and also slightly adjusts their length.
Using wall.Location.Move and wall.Location.Rotate enables adjusting the location and rotation of the walls, but not their length.
So, we decided to follow the approach suggested 10 years ago by The Building Coder to [ to edit wall length by creating a completely new wall location line from scratch like this:
  // get the current wall location
  LocationCurve wallLocation = myWall.Location
    as LocationCurve;

  // get the points
  XYZ pt1 = wallLocation.Curve.get_EndPoint( 0 );
  XYZ pt2 = wallLocation.Curve.get_EndPoint( 1 );

  // change one point, e.g. move 1000 mm on X axis

  pt2 = pt2.Add( new XYZ( 0.01 ), 0, 0 ) );

  // create a new LineBound
  Line newWallLine = app.Create.NewLineBound(
    pt1, pt2 );

  // update the wall curve
  wallLocation.Curve = newWallLine;
This works fine for single walls, but fails in many cases where the wall has hosted elements like windows, and even in complex scenarios with multiple walls.
Note: the movement is always less than a very few millimetres!
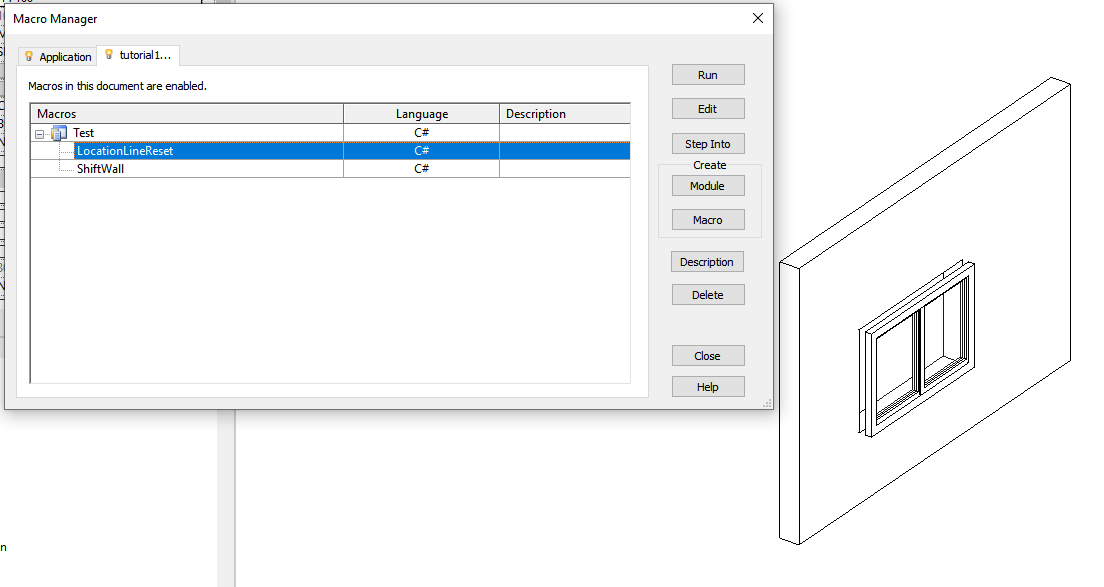
To show you what I mean, I wrote a short macro embedded in the RVT attached.
The macro LocationLineReset just moves the wall inside the RVT by approx. 3 mm using the method suggested by The Building Coder:

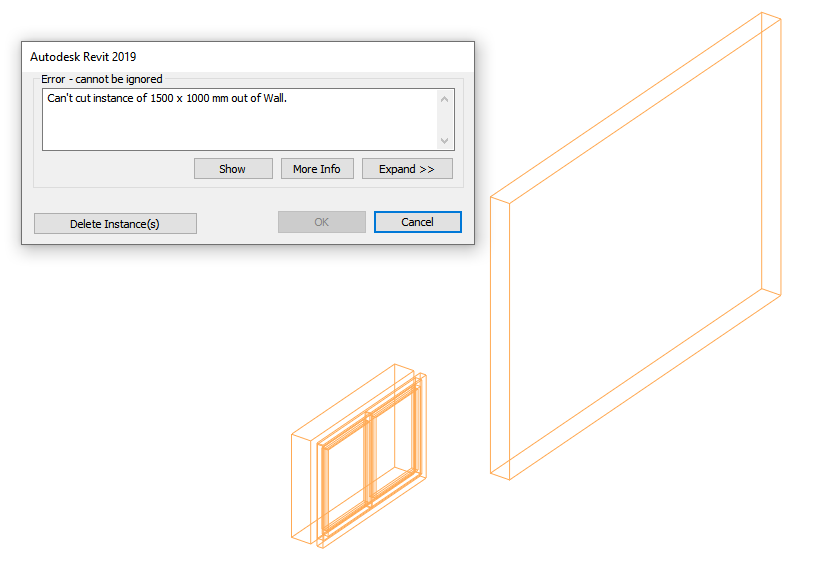
The result is the following:

This seems like an unexpected behaviour. The window is now located outside the wall, although the wall has moved only about 3 mm. Is this a bug?
If I use the second macro ShiftWall, which just calls wall.LocationCurve.Move to create an equivalent translation comparable to the former macro, the result is fine.
Is there any method to adjust the length of the wall except resetting the wall.LocationCurve.Curve by creating a new curve using Line.CreateBound? That would solve our issue as well.
Answer: Thank you for your interesting observation and careful analysis.
I looked at your macros and can reproduce what you say.
Besides the macro you list, LocationLineReset, there is another one that slightly moves the existing location line instead of creating a new one, ShiftWall.
That latter macro completes successfully:
  public void LocationLineReset()
  {
    doc = this.Application.ActiveUIDocument.Document;
    Wall wall = doc.GetElement( new ElementId( 305891 ) ) as Wall;
    TransactionStatus status;
    using( Transaction trans = new Transaction( doc, "bla" ) )
    {
      trans.Start();
      LocationCurve locationCurve = wall.Location as LocationCurve;
      Line wallLine = locationCurve.Curve as Line;

      XYZ startPoint = wallLine.GetEndPoint( 0 );
      XYZ endPoint = wallLine.GetEndPoint( 1 );

      XYZ minimalMoveVector = new XYZ( 0.01 /* =~ 3mm*/, 0.01, 0.0 );
      startPoint += minimalMoveVector;
      endPoint += minimalMoveVector;

      locationCurve.Curve = Line.CreateBound( startPoint, endPoint );
      status = trans.Commit();
    }

    if( status != TransactionStatus.Committed )
      MessageBox.Show( "Commit failed" );
  }

  public void ShiftWall()
  {
    doc = this.Application.ActiveUIDocument.Document;
    Wall wall = doc.GetElement( new ElementId( 305891 ) ) as Wall;
    TransactionStatus status;
    bool bSuccess = false;
    using( Transaction trans = new Transaction( doc, "bla" ) )
    {
      trans.Start();

      XYZ minimalMoveVector = new XYZ( 0.01 /* =~ 3mm*/, 0.01, 0.0 );
      bSuccess = wall.Location.Move( minimalMoveVector );

      status = trans.Commit();
    }

    if( status == TransactionStatus.Committed && bSuccess )
      MessageBox.Show( "Shift succeeded" );
  }
I would assume that during the process of resetting the wall location line from scratch, the window position gets completely lost.
When you simply perform a small adjustment to the existing location line, the window position is retained and adjusted accordingly.
Therefore, I would suggest using the latter approach whenever possible.
You could even make use of the latter approach in several steps, adjust first one and then the other location line endpoint.
That should enable you to handle all required situations.
You can modify just one of the line endpoints without changing the other one, and you can also change both endpoints at the same time by moving them by different translation vectors...
... or so I thought, until this very moment.
Now I looked at the Revit API documentation of the Line and Curve member methods, expecting to point out the SetEndPoint methods to you, only to discover they do not exist.
Oh dear.
In that case, you really do have to create a new curve from scratch, and the problem you describe arises.
The only other way I could think of to try to modify an existing curve's length is to change its start and end parameters.
In theory, this can be achieved by calling MakeBound. However, all my attempts to use that method to modify the wall length had no result. Here is the final attempt:
  public void ShortenWall()
  {
    Document doc = this.Application.ActiveUIDocument.Document;
    Wall wall = doc.GetElement( new ElementId( 305891 ) ) as Wall;
    TransactionStatus status;
    using( Transaction trans = new Transaction( doc ) )
    {
      trans.Start( "Shorten Wall" );

      LocationCurve lc = wall.Location as LocationCurve;
      Line ll = lc.Curve as Line;

      double pstart = ll.GetEndParameter( 0 );
      double pend = ll.GetEndParameter( 1 );
      double pdelta = 0.05 * (pend - pstart);

      lc.Curve.MakeBound( pstart + pdelta, pend - pdelta ); // no observable change to wall

      (wall.Location as LocationCurve).Curve.MakeUnbound();

      (wall.Location as LocationCurve).Curve.MakeBound( // no observable change to wall
        pstart + pdelta, pend - pdelta );

      status = trans.Commit();
    }

    if( status == TransactionStatus.Committed )
      MessageBox.Show( "Shorten Wall succeeded" );
  }
At this point, Fair59 comes to the rescue and adds:
You can adjust the curve of a wall with hosted elements, if the "curve definition" stays the same, i.e. just changing the start- and end parameters.
  LocationCurve lc = wall.Location as LocationCurve;
  Curve ll = lc.Curve;

  double pstart = ll.GetEndParameter( 0 );
  double pend = ll.GetEndParameter( 1 );
  double pdelta = 0.001 * (pend - pstart);

  ll.MakeUnbound();
  ll.MakeBound( pstart + pdelta, pend - pdelta );

  lc.Curve = ll;
Response: Thank you both for solving the issue!
Just a minor question: can we expect that the wall line parameter scales the position of the start/end point uniformly to feet? E.g., if we want to adjust the length of the wall by 0.1 feet, can we always do the following:
  double pstart = ll.GetEndParameter( 0 );
  double pend = ll.GetEndParameter( 1 );

  ll.MakeUnbound();
  ll.MakeBound( pstart, pend + 0.1 ); // move end point by 0.1 feet
  lc.Curve = ll;
In my example it did, but I am not sure if this is an invariant we can rely on?
Answer: See the remarks in the online documentation of the GetEndParameter method:
Returns the raw parameter value at the start or end of this curve.
The start and end value of the parameter can be any value (as it is determined by the system based on the inputs). For curves with regular curvature like lines and arcs, the raw parameter can be used to measure along the curve in Revit's default units (feet). Raw parameters are also the only way to evaluate points along unbound curves.
Many thanks to Harald for raising this important issue and for Fair59 for his help in solving it.
Multimedia Communication versus Bullet Points
Moving onto a more generic non-Revit-API topic, how many times have we heard of death by PowerPoint and bullet list slide decks?
Still, they persist.
Now three researchers conducted another experiment, with over a thousand participants in eight countries: How the Multimedia Communication of Strategy Can Enable More Effective Recall and Learning by Duncan N. Angwin, Stephen Cummings and Urs Daellenbach.
They conducted
a multi-country experiment that tests the effects of different modes of strategy communication on student learning. The results show the learning benefits to students of multimedia presentations of strategy and suggests how strategy professors should further encourage students to draw strategies in class.
A summary and discussion of the results is also provided in the TIM Lecture Series – Communicating Strategy: How Drawing Can Create Better Engagement by Stephen Cummings.
An even shorter summary was published by Krogerus and Tschaeppeler in Das Magazin, who resume:
The presentation explained a strategy proposal. Afterwards, participants were asked to summarise the main elements of the strategy and assess how secure they would feel discussing it with others.
Most importantly: half of them were shown slides with text; the other half received the explanation including illustrations.
The result was astonishing and intriguing:
The audience that enjoyed the visual presentation:
- Remembers twice as many strategy elements
- Understands complex elements better
- Feels less secure discussing the content with others