Integrating the Helix 3D Viewer with a WPF Add-In
This is The Building Coder post number 1800, in its eleventh year of existence.
We celebrate by highlighting the integration of a 3D geometry and model viewer in a Revit add-in with a solution shared by Jesse Mom of Koninklijke BAM Group N.V..
In his implementation, he makes use of several of the interesting possibilities offered by the Revit API and add-in architecture, including the use of IPC for add-in disentanglement from third-party library dependencies and a new custom exporter implementation for OBJ.
This issue was raised in two Revit API discussion forum threads, on a plug-in that displays Revit's 3D window content and using a geometry viewer in a Revit add-in to preview results:
Question: Similar to how Forge or Dynamo can display Revit content in their own window:
- Could a Revit plug-in display a copy of what the Revit current 3D view window is displaying?
- For example: you rotate the model in Revit, the plug-in's 3d view rotates its model view just the same
- Could a plug-in display a 3d view from the 3d views in a project?
- What kind of viewer would be required, or is it more of a Forge thing?
- Could I use Helix toolkit as a viewer, or another 3rd party, or am I way off base here?
Answer: Answers to your questions:
- Yes.
- Yes.
- Yes.
By the way, it looks like Dynamo itself uses Helix and could be a source of sample code.
Question: I'm trying to build a Revit add-in that will generate geometry in Revit.
In my add-in, I would like to integrate an interactive 3D viewer that shows a preview of the geometry that will be generated. Basically, I'm looking for functionality such as the Revit extensions offered by Autodesk, specifically the "Wood Framing Walls" extension. In this extension, you can configure something, and see a preview of what will be generated in Revit:
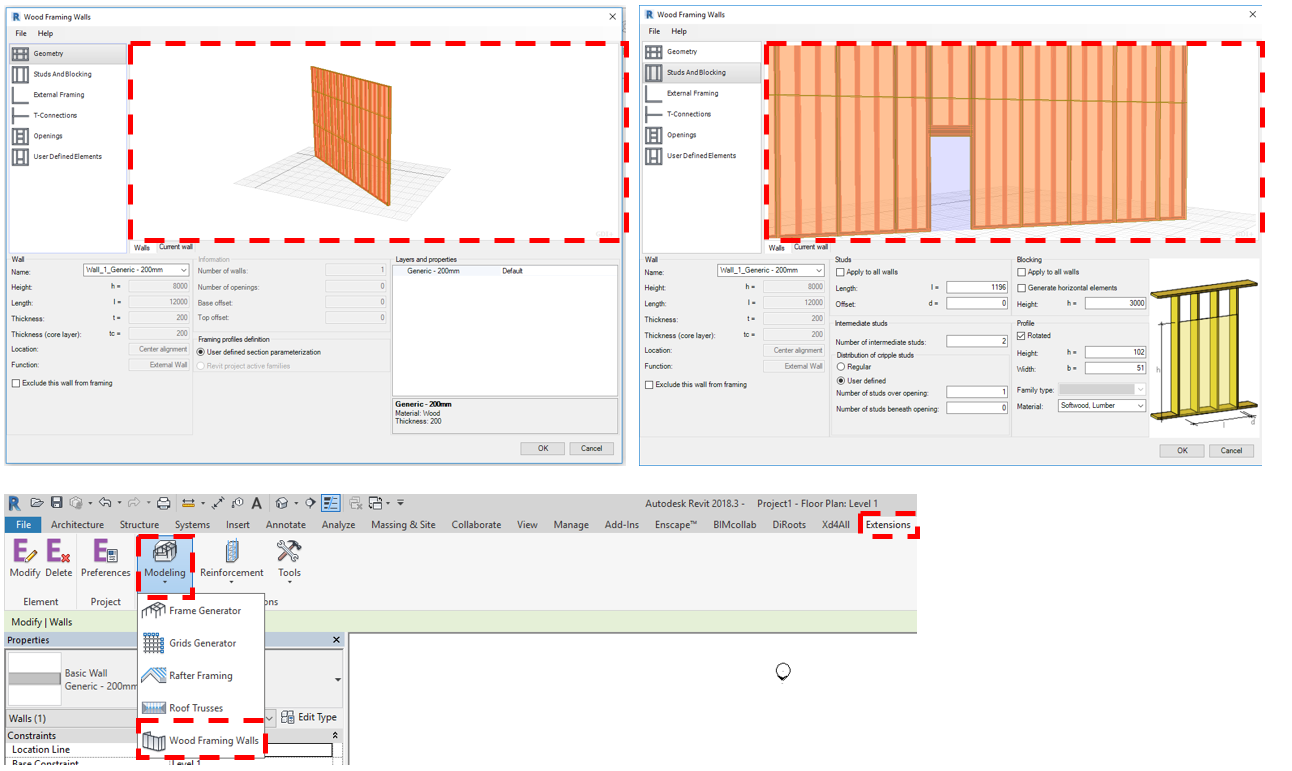
My question: does anyone have suggestions for open source or free 3D geometry viewers that can be included in a Revit addin to preview geometry that has not yet been created in Revit? Specifically, does anyone know whether the viewer used for the Revit extensions has some kind of API or is publicly available somewhere( since I like the look and feel of it)? Or is this something Autodesk can make available? The geometry to preview is simple beam shaped elements and lines, just like the example in the picture.
Answer: Thank you for your very pertinent query.
Implementing a decent interactive 3D viewer is certainly doable, though not completely trivial.
Depending on how much interaction you need with it and how closely you want to tie it in to your add-in specific workflows, a stand-alone viewer might provide an easier way to go?
You could use a minimal stand-alone viewer running on Windows or in your browser and hook that up to your Revit add-in.
Here are two untested options:
They both seem a bit too disconnected from .NET and C#, though.
Here are some pointers to a more .NET related resource:
Here is a detailed discussion of making use of it in WPF context, display 3D model using Window Presentation Foundation.
Quite a while back, I implemented my own simple 2D polygon preview using Windows Forms, the GeoSnoop .NET boundary curve loop visualisation.
That shows how to set up a minimal Windows form for geometric viewing, with no user interaction, no zoom, no pan, only 2D, so no orbit or anything. It might help provide a simple starting point if you wish to DIY.
Some more suggestions, from Rudi @Revitalizer Honke, translated from German for you:
How about using a web browser control embedded in a dockable panel or for to display the 3D model?
Depending on the size of the content to be displayed, you might be able to use a JS library, e.g., x3dom.
You can monitor certain events to determine whether an element has been clicked.
If you use the MS-WebControl, there is the ObjectForScripting.
The document property provides access to the DOM, which includes X3D nodes.
You could also look into CEFsharp.
Or directly WPF3D.
You might encounter performance problems with large models in WPF3D, especially if you don't just want to display a static view, but also rotate it smoothly etc.
If you do not want to display the entire building model, just parts of it, e.g., a roof truss, not yet existing as a BIM element, you could build a temporary solid representation for it using GeometryCreationUtilities and extract mesh facets from that for the X3D or WPF3D IndexedFaceSets.
Response: I figured that the Helix toolkit would be a nice candidate for solving my problem.
I first tried to get the viewer to work standalone, as described in the link you've attached. This worked perfect and it displayed the sample model nicely and with smooth rotation, panning etc.
Then I tried to create a really simple Revit WPF addin with the same functionality (display a simple stl file). It works, but interacting with the viewer in my addin is really slow and laggy, while the stand-alone viewer works perfectly, even with multiple Revit sessions open.
My question: Any suggestions on how to get the same viewer performance in a Revit addin as in a standalone WPF application?
A more general question : Where do these performance differences come from? Does Revit somehow throttle the resources available to the addin?
I've attached both the VS projects and the sample model.stl file in Helix_Toolkit_in_Revit_2017_test.zip, so feel free to check my implementation.
Answer: Congratulations on successfully implementing the two versions of the viewer, and thank you for sharing the interesting results.
Regarding your question on performance:
I see several possibly reasons for the 'laggyness'.
On one hand, the Revit API runs only in a single thread, no multi-threading is supported.
On the other hand, I have repeatedly heard of special WPF related issues interacting with Revit.
Maybe either or both of those aspects are affecting the responsiveness.
One option to resolve that issue would be to decouple the viewer from the Revit API completely, as described in the article on using IPC for disentanglement of CEFSharp from Revit.
How important is it for you to have the viewer tightly integrated with Revit?
Does it have to be an add-in?
Could you use IPC as described above to hook up the stand-alone viewer sufficiently closely with Revit to satisfy your needs?
Response: I wanted to let you know I successfully implemented the Helix toolkit WPF viewer using the suggested decoupling of processes:
The example of IPC for disentanglement of CEFSharp was based on a Windows Forms application, so I had to make some changes to make it work with a WPF Window.
Now that I can launch a viewer from within the Revit context, and can communicate with it from my Revit command/application, the next step is to get geometry from Revit to the viewer. I already successfully tested to generate an OBJ file using your OBJ exporter for Revit 2014 (upgraded to 2018) and display it in the viewer. However, as I was reading, I found your ideas on creating an improved version of your exporter using the custom exporter framework. Is this something you already implemented, or have planned to do?
I will continue to make my addin work with the existing pieces of the puzzle I have so far. An improvement on the OBJ exporter would be a nice-to-have feature, but your existing exporter does the trick. Once I have cooked something up, I'm happy to share my efforts if you're interested.
Again, briefly, my use-case: I want to create an add-in that lets the user generate some Revit ceiling geometry, and adjust the position and composition of this ceiling interactively with some sliders and input fields in my addin. This to-be-created geometry depends on existing wall and room geometry in the Revit project. As such, in my add-in, I want to preview the to-be-created- ceiling geometry, in the context of the relevant Revit geometry. For this I want to import some relevant Revit elements into my viewer to display the context, and then display the to-be-created geometry in that viewer as well. When the user is satisfied, he can click ok, the preview will close, and the add-in will generate Revit objects according to the layout and settings chosen in the viewer.
Answer: I am very glad to hear that you are able to use the OBJ viewer.
Here are some examples of implementing custom exporters.
It is pretty straightforward, actually.
Response: I finally found the time to implement this. I've attached a zip file RevitExternalModelViewer.zip with a working solution. The solution contains 3 projects.
First, it contains a model viewer, which is a very basic implementation of the Helix toolkit viewer, and it has the ability to view OBJ files. This model viewer can be used stand-alone (it compiles as an exe file), or used by a Revit plugin via the Inter Process Communication route you suggested. When used stand-alone, there is a hardcoded filepath in the project; change this to the obj file path of the file you want to view, debug/compile and you're good to go.
Second, I implemented a very basic Revit OBJ exporter using the custom exporter framework.
It's a combination of the XML exporter example by Arnold, and the OBJ exporter by Jeremy.
It doesn't export materials or whatsoever, just meshes.
This obj can both be used as a Revit add-in on its own (it contains a controller class that implements the IExternalCommand) or as a library in one of your own Revit plugins.
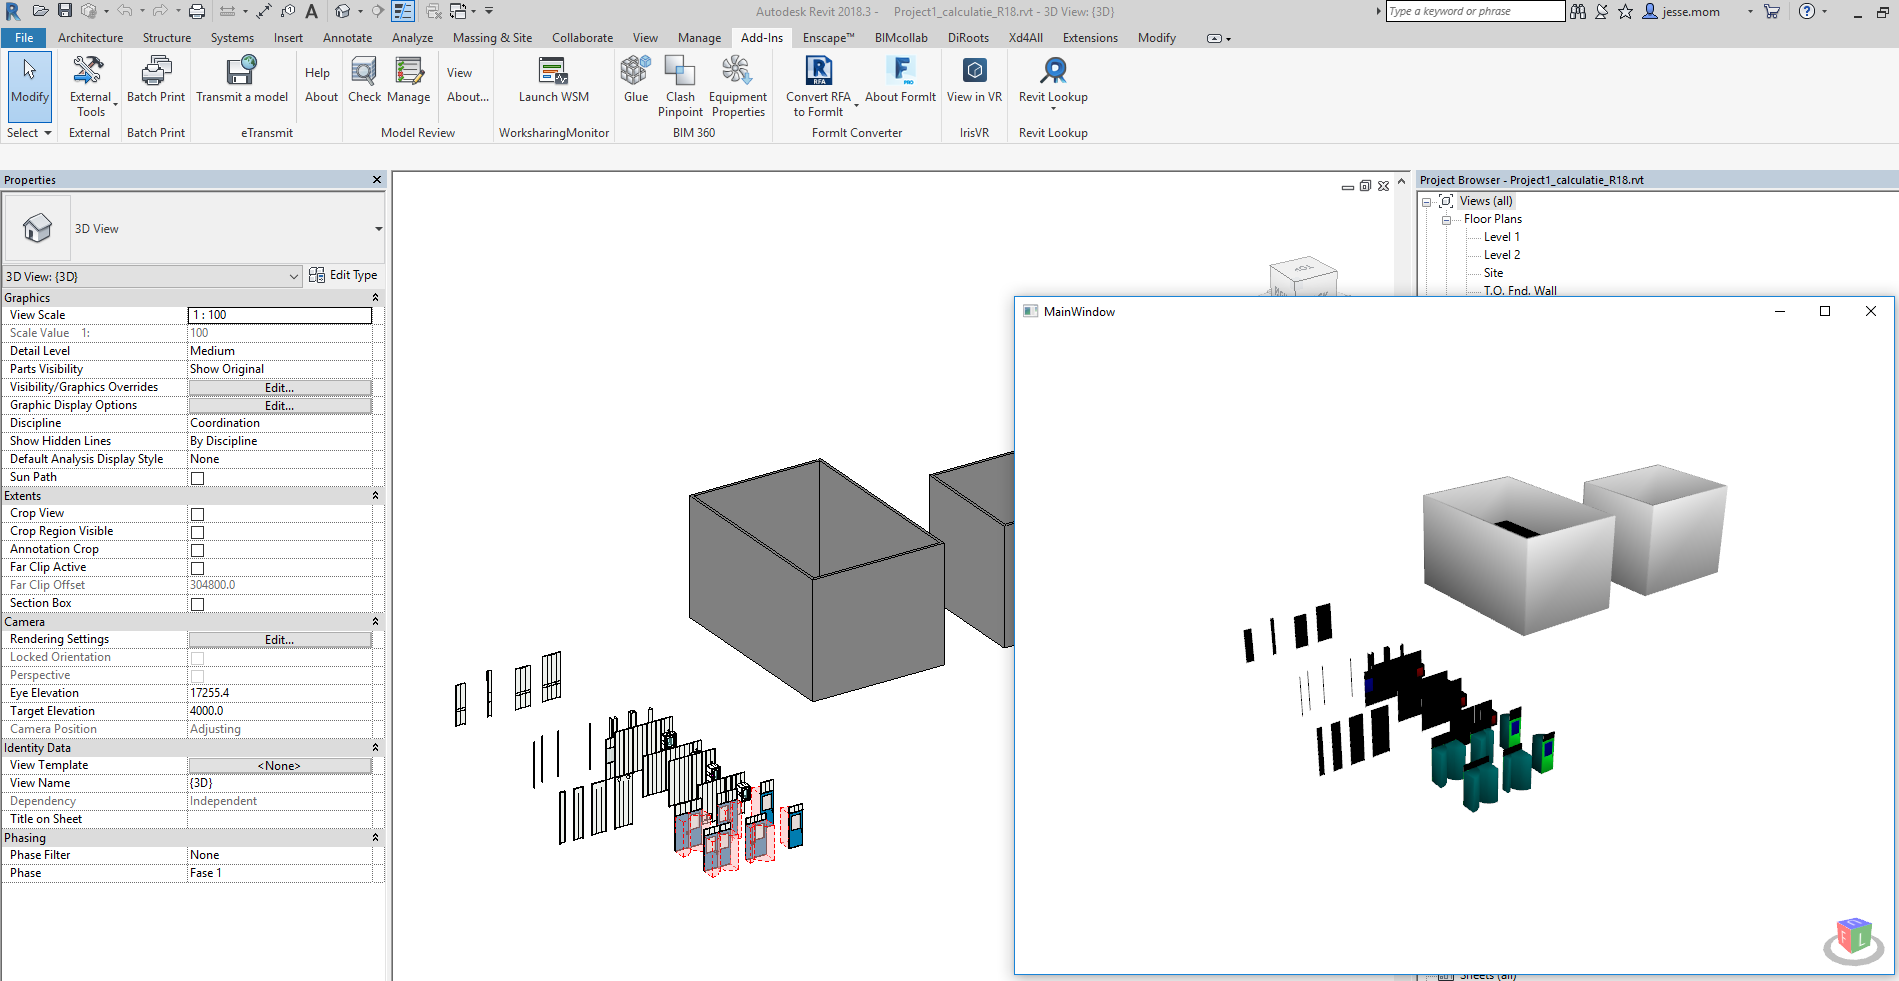
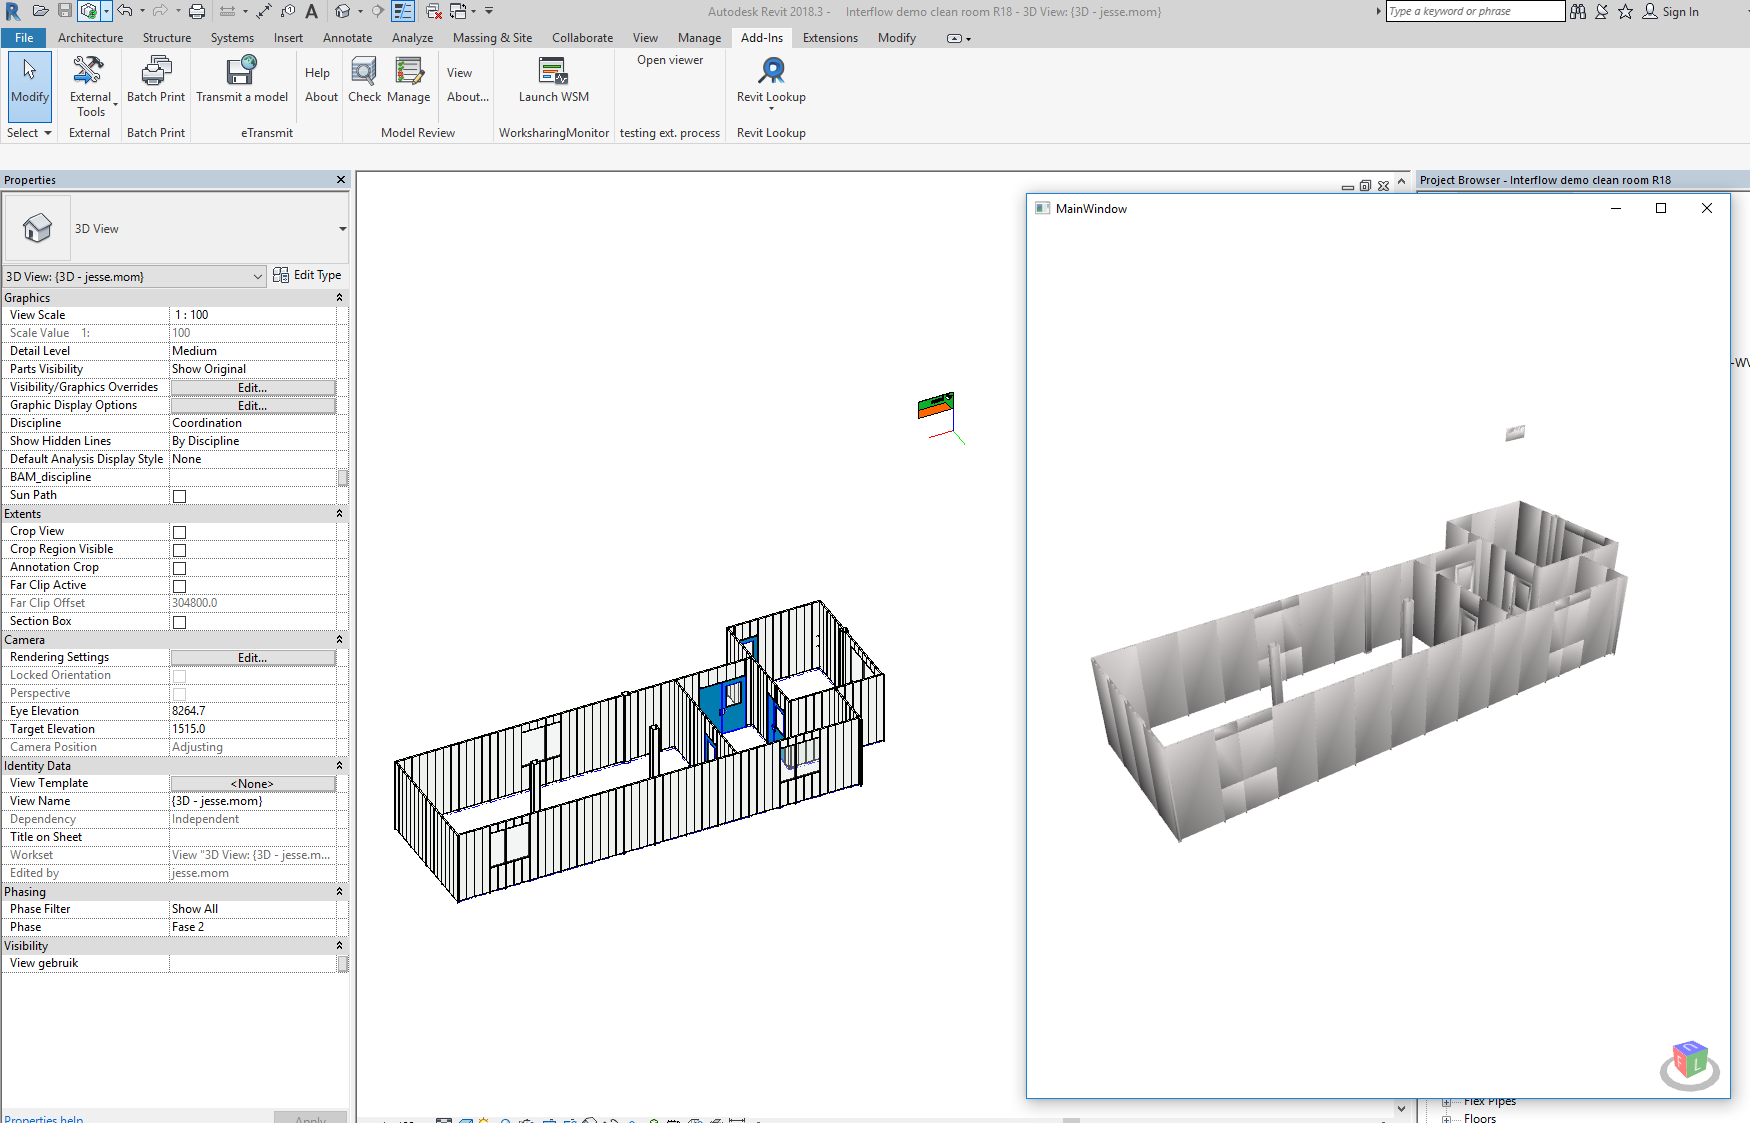
Third, it contains a Revit plugin the brings it all together. This plugin exports the active 3D view to an obj file using the obj exporter (it references the obj exporter project). This obj file is saved to a hardcoded directory, and this same directory is hardcoded into the viewer project. Once the obj file is created, it modelessly starts the viewer, completely disentangled using the IPC disentanglement magic as demonstrated and implemented by Kim Sivonen. To make this work, you have to make sure that the Revit plugin points to the build-location of the exe file of your viewer, and that it has been built.
To test the solution, make sure the Revit plugin controller.cs file (line 98) points to the build-location of the model viewer, compile all projects, make sure the included ADDIN file for the Revit plugin ends up in the right folder and points to the build-location of your project and start the plugin from a 3D view in Revit 2018.
It now looks like this:
Feel free to share or use this solution as a starting point for your own viewer project.
Next steps:
- Support for materials.
- Improve viewer controls (zoom towards current location of the mouse (as in Revit)).
- Implement a viewer UI for controlling the creation of additional geometry.
- Find a way to push back this geometry to Revit.
Ever so many thanks to Jesse for implementing and sharing this very impressive and complete solution!