Automatic Wall Creation
I highlight yet another thread from the Revit API discussion forum, on mathematical translations for automatic wall creation, with an exceedingly elegant solution by Alexander @aignatovich Ignatovich.
Alexander's macro illustrates a number of important concepts and implements the following functionality very succinctly indeed:
- Retrieve all the
cubefamily instances - Retrieve their
heightparameter value - Retrieve their solids making use of the .NET
yieldoperator - Extract their horizontal outline contours using an
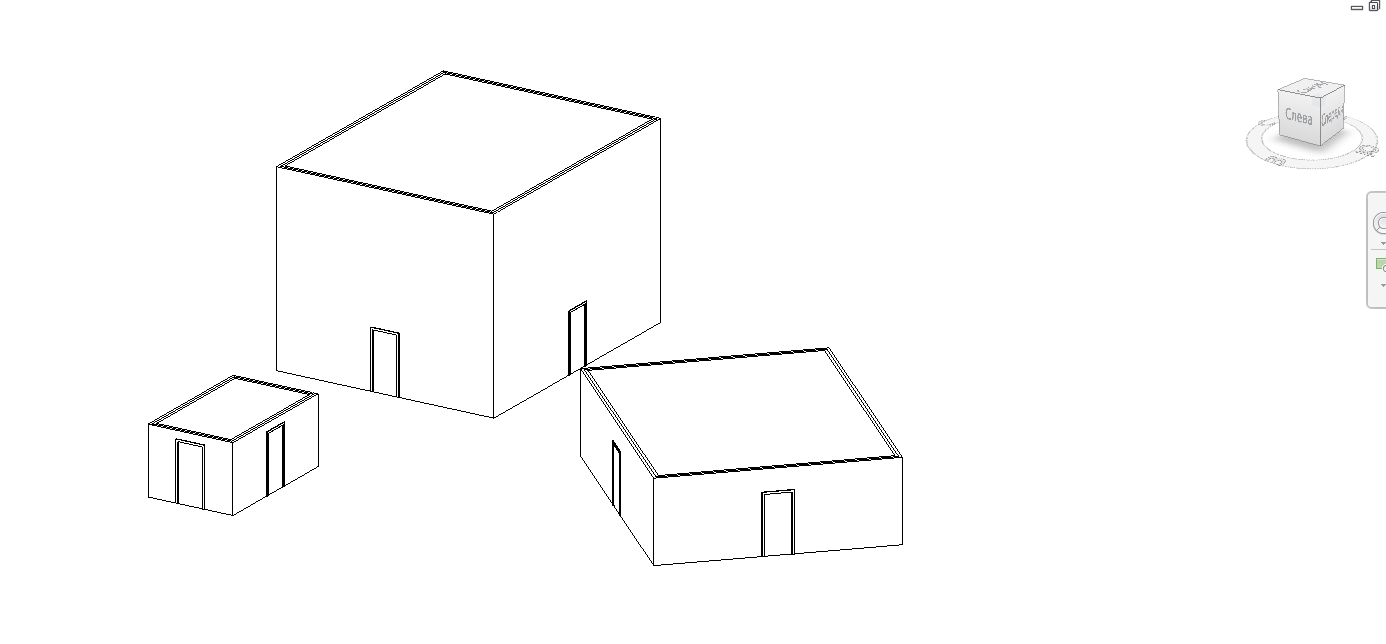
ExtrusionAnalyzer - Create walls along each contour curve segment
- Place a door family instance at the midpoint of each wall
His code is well worth reading in detail!
An absolute must, actually!
Question: I am building an add-in that creates walls and doors inside a custom family that acts somewhat as an empty area if you will.
Since I cannot nest walls within the custom family, I have to create them via the API with (x,y,z) coordinates.
When the user places the custom cube (area) family, the walls get built.
The issue is when the user selects a rotation that is not 0 deg, I do not know the translation of coordinates to assign to the wall start and end points.
I have completed all the trig to determine the angles and it will account for any angle the user selects.
How do I do the Mathematical translations to determine a formula which will help me determine the new start and end points of the walls?
The attached document efortune_trigrevitapi.pdf shows how I determined the angles using the Bounding Box Min and Max along with the insertion point.
Answer: Your 5-page PDF listing dozens of formulas may be unnecessary complicated.
As far as I can tell from your verbal description, your problem is small and simple.
I have a hunch that the solution is smaller and simpler still.
I presume that an easy solution can be found that is valid for all quadrants, without distinction.
A straight vertical wall depends on only two points, p and q, representing the start and end point of the wall.
A cube is inserted into the model, defining a transform T consisting of a rotation by an angle a and a translation by a vector v.
To transform p and q by T, you could first rotate them both around the origin (or whatever axis point you prefer) by a and then translate then by v to wherever they are supposed to end up.
Alternatively, use the real-world coordinates from the cube vertices as they are.
Look at this code and the macro in the attached Revit file autowalls.rvt; maybe it will be useful for you:
using System.Collections.Generic;
using System.Linq;
using Autodesk.Revit.Attributes;
using Autodesk.Revit.DB;
using Autodesk.Revit.DB.Structure;
using Autodesk.Revit.Exceptions;
using Autodesk.Revit.UI;

namespace AutoWallsByCubes
{
  [Transaction( TransactionMode.Manual )]
  public class CreateWallsAutomaticallyCommand
    : IExternalCommand
  {
    public Result Execute(
      ExternalCommandData commandData,
      ref string message,
      ElementSet elements )
    {
      var uiapp = commandData.Application;
      var uidoc = uiapp.ActiveUIDocument;
      var doc = uidoc.Document;

      var cubes = FindCubes( doc );

      using( var transaction = new Transaction( doc ) )
      {
        transaction.Start( "create walls" );

        foreach( var cube in cubes )
        {
          var countours = FindCountors( cube )
            .SelectMany( x => x );

          var height = cube.LookupParameter( "height" )
            .AsDouble();

          foreach( var countour in countours )
          {
            var wall = CreateWall( cube, countour,
              height );

            CreateDoor( wall );
          }
        }
        transaction.Commit();
      }
      return Result.Succeeded;
    }

    private static Wall CreateWall(
      FamilyInstance cube,
      Curve curve,
      double height )
    {
      var doc = cube.Document;

      var wallTypeId = doc.GetDefaultElementTypeId(
        ElementTypeGroup.WallType );

      return Wall.Create( doc, curve.CreateReversed(),
        wallTypeId, cube.LevelId, height, 0, false,
        false );
    }

    private static void CreateDoor( Wall wall )
    {
      var locationCurve = (LocationCurve) wall.Location;

      var position = locationCurve.Curve.Evaluate(
        0.5, true );

      var document = wall.Document;

      var level = (Level) document.GetElement(
        wall.LevelId );

      var symbolId = document.GetDefaultFamilyTypeId(
        new ElementId( BuiltInCategory.OST_Doors ) );

      var symbol = (FamilySymbol) document.GetElement(
        symbolId );

      if( !symbol.IsActive )
        symbol.Activate();

      document.Create.NewFamilyInstance( position, symbol,
        wall, level, StructuralType.NonStructural );
    }

    private static IEnumerable<FamilyInstance> FindCubes(
      Document doc )
    {
      var collector = new FilteredElementCollector( doc );

      return collector
        .OfCategory( BuiltInCategory.OST_GenericModel )
        .OfClass( typeof( FamilyInstance ) )
        .OfType<FamilyInstance>()
        .Where( x => x.Symbol.FamilyName == "cube" );
    }

    private static IEnumerable<CurveLoop> FindCountors(
      FamilyInstance familyInstance )
    {
      return GetSolids( familyInstance )
        .SelectMany( x => GetCountours( x,
          familyInstance ) );
    }

    private static IEnumerable<Solid> GetSolids(
      Element element )
    {
      var geometry = element
        .get_Geometry( new Options {
          ComputeReferences = true,
          IncludeNonVisibleObjects = true } );

      if( geometry == null )
        return Enumerable.Empty<Solid>();

      return GetSolids( geometry )
        .Where( x => x.Volume > 0 );
    }

    private static IEnumerable<Solid> GetSolids(
      IEnumerable<GeometryObject> geometryElement )
    {
      foreach( var geometry in geometryElement )
      {
        var solid = geometry as Solid;
        if( solid != null )
          yield return solid;

        var instance = geometry as GeometryInstance;
        if( instance != null )
          foreach( var instanceSolid in GetSolids(
            instance.GetInstanceGeometry() ) )
              yield return instanceSolid;

        var element = geometry as GeometryElement;
        if( element != null )
          foreach( var elementSolid in GetSolids( element ) )
            yield return elementSolid;
      }
    }

    private static IEnumerable<CurveLoop> GetCountours(
      Solid solid,
      Element element )
    {
      try
      {
        var plane = Plane.CreateByNormalAndOrigin(
          XYZ.BasisZ, element.get_BoundingBox( null ).Min );

        var analyzer = ExtrusionAnalyzer.Create(
          solid, plane, XYZ.BasisZ );

        var face = analyzer.GetExtrusionBase();

        return face.GetEdgesAsCurveLoops();
      }
      catch( Autodesk.Revit.Exceptions
        .InvalidOperationException )
      {
        return Enumerable.Empty<CurveLoop>();
      }
    }
  }
}
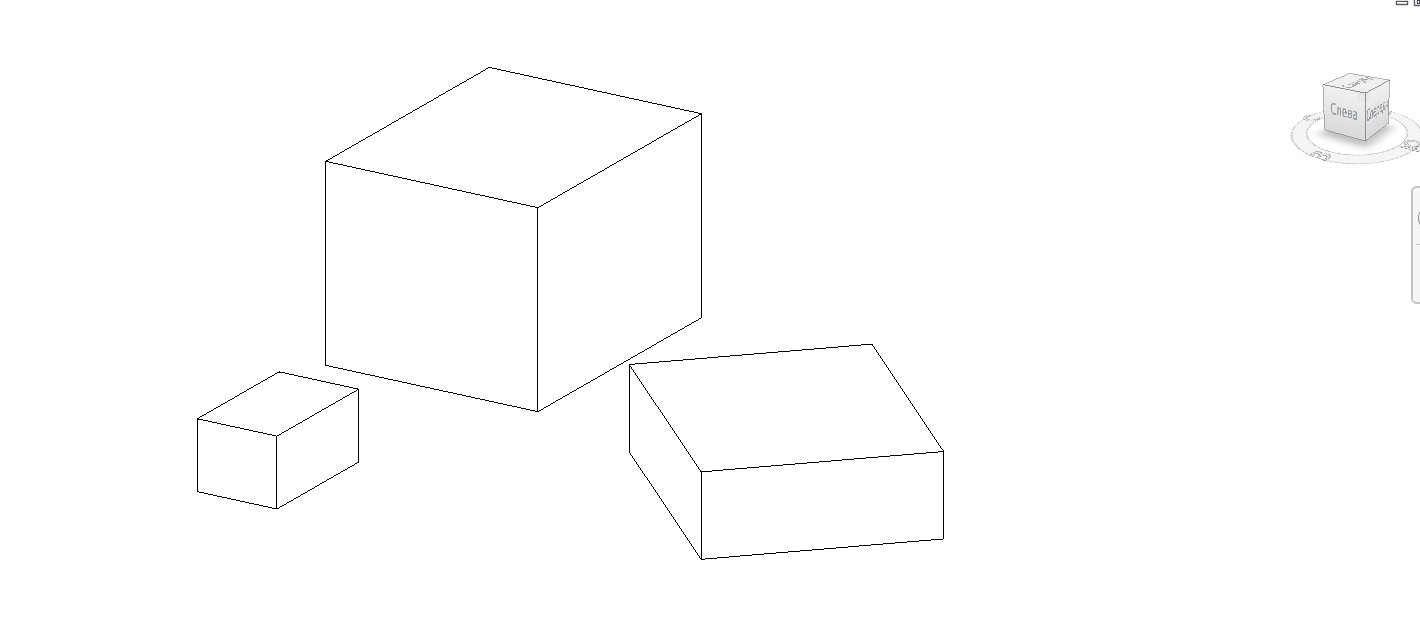
Cube family instances before running command:

Walls and doors added along cube horizontal contours after running command:

If you prefer the other approach, explore the Transform class and related concepts.
You can get the transform of your family instance using the familyInstance.GetTotalTransform method.
Many thanks to Alexander for this beautiful and efficient sample code!