Stacked Ribbon Button Panel Options
Topic: a C# .NET Revit add-in demonstrating use of a split ribbon button to access a secondary command, e.g., option settings.
In the Revit API discussion forum thread on using a StackButton as a PushButton with options, Allan 'aksaks' Seidel recently proposed a neat UI trick, saying:
Perhaps this idea might be usable for others.
The StackButton ribbon control is a stack of different PushButton instances where the last used PushButton remains visible to be used again. That visible button is reflected in the stack button's CurrentButton property. Imagine if the StackButton control always shows the first button in the stack, and the other button(s) are secondary to the first button's purpose.
Using the call-back concept described in The Building Coder suggestion
to roll your own toggle button, you can have the second Pushbutton in a two-button StackButton reset the current button property back to that of the first button. Therefore, this StackButton item always shows and activates the first button's action on its button face, but also has a secondary option to invoke a settings manager activated by the second button.
Set the first button in the button stack to your add-in command of choice. Set the second button in the button stack to show a Windows Forms or WPF window to be the first button's settings manager. Have the settings communicated through the add-in's Properties.Settings. The first button's command reads the current settings prior to acting. The second button's actions reads, sets and saves the settings the first button uses. It ends with a call-back function that resets the StackButton's current button to the first button in the stack. These settings would also persist between Revit sessions.
For example, this is what a second button might invoke:
[Transaction( TransactionMode.Manual )]
class SectionFarClipResetOptions : IExternalCommand
{
  public Result Execute(
    ExternalCommandData commandData,
    ref string message,
    ElementSet elements )
  {
    UIApplication uiapp = commandData.Application;
    UIDocument uidoc = uiapp.ActiveUIDocument;
    Document thisDoc = uidoc.Document;

    FarClipSettingWPF settingWPF = new FarClipSettingWPF( thisDoc );
    settingWPF.ShowDialog();
    AppFarClip.Instance.SetSplitButtonFarClipToTop();
    return Result.Succeeded;
  }
}
This is what the call-back function might be in a hardcoded style:
  public void SetSplitButtonFarClipToTop() {
    IList<PushButton> sbList = sbFarClip.GetItems();
    sbFarClip.CurrentButton = sbList[0];
  }
sbFarClip is a public SplitButton in this case.
Many thanks to Allan for this neat suggestion and sample code.
He provided the SplitButtonOptionConceptVisual Studio solution implementing a full sample Revit add-in demonstrating the concept.
I created the new SplitButtonOptionConcept GitHub repository for it to live in.
His original solution is set up to compile with the Revit 2013 API assemblies and be automatically installed in the post-build event for Revit 2015 and Revit 2016.
I stored that initial version as release 2016.0.0.0.
Next, I migrated and tested it in Revit 2017, tagging that as release 2017.0.0.0.
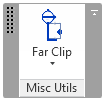
The add-in displays the following ribbon panel:

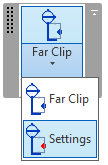
You can either click the main button, which is always displayed at the top as the current option, to trigger the main command, or drop down the rest of the stacked button contents to display the option button:

The current version is release 2017.0.0.2 including some further minor clean-up.
As Allan says, perhaps this idea is usable for others as well.
I plan to use it right away for my Revit add-in complementing Kean Walmsley's entry for Autodesk’s first Global Hackathon: a HoloLens-based tool for navigating low visibility environments, part of his HoloLens project series, including and not limited to:
- Using HoloLens to display diagnostic information for building components
- Scaling our Unity model in HoloLens
- Adding spatial sound to our Unity model in HoloLens
- Displaying your Unity model in 3D using HoloLens
Many thanks again to Allan, have fun yourself, and please wish me and Kean lots of luck, fun and success in our hackathon efforts during the next two days.
Addendum – Simpler Solution
Please do not overlook the much simpler solution to this task provided directly by the Revit API and pointed out in the comment below by Ehsan Iran Nejad:
Or you can just set the
RibbonItem.IsSynchronizedWithCurrentItemtoFalseafter creating theSplitButton. The first button will be fixed and all the other buttons can only be used from the dropdown menu.
Not so fast...
Allan responds to the simpler solution suggestion:
Not so fast. Perhaps that is missing the forest because of the trees. The example is just a two button split button where the second button is the settings button. Consider that split button having three or more buttons where the last button is the settings button and you want the split button to show the last button activated, but never the settings button. The other method no longer works, but the same concepts used in the roll your own method do work. One way, and there may be better ones, takes advantage of the splitbutton's current button value not yet having changed when the newly selected settings button is activated. That name can be saved and then used just before the command return to reset the split button back to what was showing when the used pulled the split button down to select the settings button.