Add-in Migration to Revit 2016 and Updated Wizards
I updated my Visual Studio Revit C# and VB add-in wizards for Revit 2016.
Before presenting them, a quick important note on how to approach resolving issues that you may encounter migrating your existing add-ins:
- Please read What's New in the Revit 2016 API!
- Revit add-in wizards for Revit 2016
- Revit add-in wizard customisation
- Revit add-in wizard usage
- Download and installation
Please Read What's New in the Revit 2016 API!
Every major Revit API release so far enhanced the existing interfaces in various ways.
In order to optimise the developer experience, some of the improvements introduce incompatibilities; for instance, previously deprecated classes and interfaces are removed, and obsolete functionality may be marked as deprecated for removal in a future version.
Whenever you run into an issue migrating your code to newer versions of the API, the first place to look for a solution is in the What's New section of the Revit API help file RevitAPI.chm.
This information is also published in a separate document in the Revit SDK, 'Revit Platform API Changes and Additions.docx'.
To ensure that it is also picked up by web searches, I published it here on The Building Coder, together with the analogue information for previous releases:
- What's New in the Revit 2010 API
- What's New in the Revit 2011 API
- What's New in the Revit 2012 API
- What's New in the Revit 2013 API
- What's New in the Revit 2014 API
- What's New in the Revit 2015 API
- What's New in the Revit 2016 API
I hope this helps you tackle any issues you may run into migrating your add-in to the new release.
Good luck and have fun!
Revit Add-in Wizards for Revit 2016
On the other hand, if you are not migrating an existing Revit add-in, but creating a new one from scratch, the add-in wizards can be of use.
As said, I migrated my Visual Studio Revit add-in wizards to generate skeleton code for Revit 2016.
The 2016 versions generate the same boilerplate snippets as the reliable old Revit 2014 (updated) and Revit 2015 ones did. Simply delete the parts that you do not need.
Since I am still using the pre-release version codenamed Copernicus, the Revit executable folder name targeted by the wizards is 'Revit Copernicus'.
You may have to change that to something appropriate for your system, e.g. 'Revit 2016', 'Revit 2016 Architecture', etc.
Revit Add-in Wizard Customisation
It is important to understand how easy it is to modify the wizards for your own needs, and make copies with variations to support different requirements.
Here is an overview of previous explanations showing how to create your own flavours for various uses:
- Original introduction, benefits, and usage example for C# and VB.
- Personalised minimal C# version for Revit 2011.
- A short additional usage note.
- 64-bit versions for C# and VB.
- Support for the Revit 2012 API for C# and VB.
- Updated C# and VB versions placing the assembly DLL alongside the add-in manifest.
- Revit 2013 C# version including more skeleton code.
- Revit 2013 VB version.
- C# and VB add-in wizards for Revit 2014.
- Wizard update suppressing the processor architecture mismatch warning and referring to Revit Onebox instead of the architectural flavour.
- Wizard generating a multi-version add-in supporting both Revit 2013 and 2014.
- Add-in wizards for Revit 2015.
Revit Add-in Wizard Usage
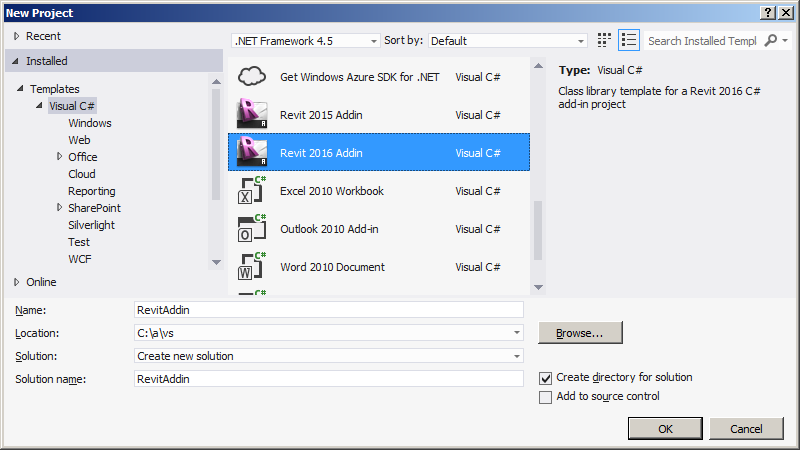
Simply install the wizard zip files you need in the locations specified below, start up or restart Visual Studio, create a new C# or VB Revit add-in project using the wizard default settings.
The wizards fulfil the following tasks for C# and VB, respectively:
- Generate the skeleton source code, Visual Studio solution and add-in manifest.
- On successful build, copy the add-in assembly DLL and add-in manifest to the Revit add-in folder, thus automatically installing it for Revit to pick up and load.
- Define the add-in debugging settings to start up the Revit.exe program.
Therefore, right after the initial single-click add-in creation, you can immediately launch the debugger. The add-in is compiled, Revit is started up, the add-in is loaded, you can select the new external command in the External Tools menu, launch and test it without entering one single further keystroke yourself.
The new command even executes in zero document state, although the default external command skeleton implementation throws an exception trying to access a property on the current UI document, which is null. This is easy to fix in case you need a zero document state external command. You can use this anyway to immediately check that everything is working correctly.
Download and Installation
The proper locations to install the wizards for Visual Studio to pick them up are language dependent.
Copy the zip file of your choice to the matching Visual Studio project template folder in your local file system:
- C# – copy Revit2016AddinWizardCs0.zip to
[My Documents]\Visual Studio 2012\Templates\ProjectTemplates\Visual C# - Visual Basic – copy Revit2016AddinWizardVb0.zip to
[My Documents]\Visual Studio 2012\Templates\ProjectTemplates\Visual Basic
Or, in other words:
  $ cp /a/doc/revit/tbc/zip/Revit2016AddinWizardCs0.zip \
  "/v/C/Users/tammikj/Documents/Visual Studio \
  2012/Templates/ProjectTemplates/Visual C#"

  $ cp /a/doc/revit/tbc/zip/Revit2016AddinWizardVb0.zip \
  "/v/C/Users/tammikj/Documents/Visual Studio \
  2012/Templates/ProjectTemplates/Visual Basic"
I hope you find this useful and look forward to hearing any suggestions for improvements you come up with.
Better still, implement them yourself and let us know where to pick them up :-)