Thin Lines Add-in Using UI Automation
Revit add-in developers have repeatedly requested access to the Thin Lines setting provided in the Revit user interface, leading to Revit API discussion forum threads on view thin lines, exported image line weight (thin line) and rendering setting and a Revit API wish list item CF-192 – As an add-in developer, I need the API ability to detect and modify the "Thin lines" setting, so that the user can automatically get the environment configured in the way they like.
Happily, that wish list item has now been closed off, since this functionality is provided in Revit 2015 R2, as described in the What's New in Revit 2015 R2 overview section on Graphics Settings in Revit.ini:
New in Revit 2015 R2
Architectural Enhancements
- Thin lines: To improve consistency between Revit sessions, when you use the Thin Lines tool, the setting is stored in the Revit.ini file. When you launch Revit, the stored Thin Lines setting is used as the default. See Graphics Settings in Revit.ini.
Graphics Settings in Revit.ini
ThinLinesEnabled
Stores the Thin Lines setting.
- Type = integer
- Valid values: 1 = enable thin lines (default), 0 = disable thin lines
Note: This feature or functionality is available only to students and to Autodesk Maintenance and Desktop Subscription customers for Revit 2015 software releases.
Better still, the thin lines setting provided in the INI file from Revit 2015 R2 onwards is also programmatically accessible:
Revit API Thin Lines Options
The utility class ThinLinesOptions contains settings related to the Thin Lines options displayed in the UI.
The static property:
- ThinLinesOptions.AreThinLinesEnabled
defines if the 'Thin Lines' setting is on or off in this session.
Separate APIs for Revit 2015 and Revit 2015 R2
One little problem remains for the moment: what to do if I do not have Revit 2015 R2 installed?
Or even more relevant: how can I avoid the need to support separate versions of my add-in for Revit 2015 and Revit 2015 R2?
This issue already came up in these discussion forum threads:
ThinLines Add-in – UI Automation Workaround For Pre-R2 Usage
Once again, the cavalry comes to the rescue in the shape of Revitalizer, aka Rudolf Honke of Mensch und Maschine acadGraph, who already contributed lots of tricks towards making use of the .NET UI Automation library (category page) to hack the Revit user interface.
He uses UI Automation to determine the current state of the thin lines button, and PostCommand to invoke the built-in Revit Thin Lines command in case the current setting needs to be changed.
Please note, as always, The Building Coder Disclaimer: in the following, we present a workaround solution not covered by the officially supported Revit API, leading to an experimental implementation suitable only for a personal controlled usage that should not be relied upon for production use.
Implementation History and Ideas
Rudolf says: As usual, I think UIAutomation can be used to achieve that.
I can get the TL state by reading the button’s state, but when I try to set it by invoking that button, it won’t work since I’m still on the button that invokes my own command.
Cannot focus another button at the same time.
Perhaps you could delay the execution of pressing the button by putting it into an Idling event handler.
Hey, I see that there is a 'PostableCommand.ThinLines'
So what about:
        RevitCommandId commandId
          = RevitCommandId.LookupPostableCommandId(
            PostableCommand.ThinLines );

        if( app.CanPostCommand( commandId ) )
        {
          app.PostCommand( commandId );
        }
Rudolf says: As far as I can see, the getter method works as expected.
I think it would be useful to provide an add-in solution that shows how to reference the automation libraries etc.
Rudolf says: Setting the TL using the PostableCommand works very well!
I will combine the getter and setter methods and send you a VS solution.
Rudolf says: Here is a VS project that addresses the ThinLines issues.
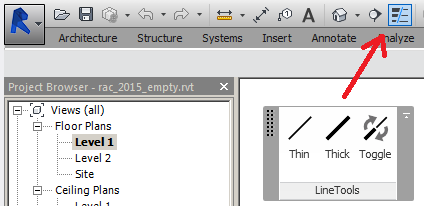
There is a LineTools Tab containing these three buttons, which in fact just get the state of the TL button.

A creative workaround to avoid the Revit API restrictions ('subscription API extensions only').
Two remarks:
- It has to be tested if this will still work if the TL button is removed from Quick Access Toolbar.
- Also, I faced an exception saying 'command cannot be invoked several times' or so when clicking the buttons too fast.
Too fast for Revit.
Perhaps that could be encapsulated in a try/catch handler.
Implementation Notes and Download
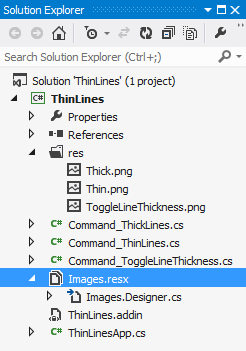
The command ribbon button images are encapsulated in a proper resource file:

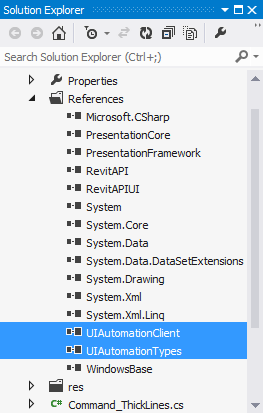
We obviously need references to the various UI Automation libraries:

All three external command implementations for thin lines, thick lines and to toggle line thickness are trivial one-liners, since they simply call back to the functionality and helper functions defined by the main external application class:
using Autodesk.Revit.UI;

namespace ThinLines
{
  [Autodesk.Revit.Attributes.Transaction(
    Autodesk.Revit.Attributes.TransactionMode.ReadOnly )]
  [Autodesk.Revit.Attributes.Regeneration(
    Autodesk.Revit.Attributes.RegenerationOption.Manual )]
  public class Command_ThinLines : IExternalCommand
  {
    public Result Execute(
      ExternalCommandData commandData,
      ref string message,
      Autodesk.Revit.DB.ElementSet elements )
    {
      ThinLinesApp.SetThinLines( commandData.Application, true );
      return Result.Succeeded;
    }
  }
}
The external application implementation demonstrates how to:
- Set up the custom ribbon panel
- Handle the external command ribbon button images
- Use P/Invoke to access and make use of the Windows API functionality defined in User32.dll to find and enumerate specific windows
- Use the Revit API PostCommand method to invoke the built-in Thin Lines command
- Access the Revit Thin Lines button and determine its current state
Sounds cool?
It is!
Here is how:
using Autodesk.Revit.UI;
using System;
using System.Collections.Generic;
using System.Drawing;
using System.Runtime.InteropServices;
using System.Windows;
using System.Windows.Automation;
using System.Windows.Interop;
using System.Windows.Media;
using System.Windows.Media.Imaging;

namespace ThinLines
{
  public class ThinLinesApp : IExternalApplication
  {
    #region Windows API, get from pinvoke.net

    [DllImport( "user32.dll", SetLastError = true )]
    static extern IntPtr FindWindowEx(
      IntPtr hwndParent, IntPtr hwndChildAfter,
      string lpszClass, string lpszWindow );

    [DllImport( "user32.dll" )]
    [return: MarshalAs( UnmanagedType.Bool )]
    public static extern bool EnumChildWindows(
      IntPtr window, EnumWindowProc callback,
      IntPtr i );

    public delegate bool EnumWindowProc(
      IntPtr hWnd, IntPtr parameter );

    public static bool EnumWindow(
      IntPtr handle,
      IntPtr pointer )
    {
      GCHandle gch = GCHandle.FromIntPtr( pointer );
      List<IntPtr> list = gch.Target as List<IntPtr>;
      if( list != null )
      {
        list.Add( handle );
      }
      return true;
    }

    public static List<IntPtr> GetChildWindows(
      IntPtr parent )
    {
      List<IntPtr> result = new List<IntPtr>();
      GCHandle listHandle = GCHandle.Alloc( result );
      try
      {
        EnumWindowProc childProc = new EnumWindowProc(
          EnumWindow );

        EnumChildWindows( parent, childProc,
          GCHandle.ToIntPtr( listHandle ) );
      }
      finally
      {
        if( listHandle.IsAllocated )
          listHandle.Free();
      }
      return result;
    }
    #endregion

    public Result OnShutdown( UIControlledApplication a )
    {
      return Result.Succeeded;
    }

    public Result OnStartup( UIControlledApplication a )
    {
      string tabName = "LineTools";
      string panelName = "LineTools";
      string buttonThinName = "Thin";
      string buttonThickName = "Thick";
      string buttonToggleName = "Toggle";

      try
      {
        List<RibbonPanel> panels = a.GetRibbonPanels(
          tabName );
      }
      catch
      {
        a.CreateRibbonTab( tabName );
      }

      RibbonPanel panelViewExport = a.CreateRibbonPanel(
        tabName, panelName );

      panelViewExport.Name = panelName;
      panelViewExport.Title = panelName;

      PushButtonData buttonThin = new PushButtonData(
        buttonThinName, buttonThinName,
        System.Reflection.Assembly.GetExecutingAssembly().Location,
        typeof( Command_ThinLines ).FullName );

      buttonThin.ToolTip = buttonThinName;
      ImageSource iconThin = GetIconSource( Images.Thin );
      buttonThin.LargeImage = iconThin;
      buttonThin.Image = Thumbnail( iconThin );
      panelViewExport.AddItem( buttonThin );

      PushButtonData buttonThick = new PushButtonData(
        buttonThickName, buttonThickName,
        System.Reflection.Assembly.GetExecutingAssembly().Location,
        typeof( Command_ThickLines ).FullName );

      buttonThick.ToolTip = buttonThickName;
      ImageSource iconThick = GetIconSource( Images.Thick );
      buttonThick.LargeImage = iconThick;
      buttonThick.Image = Thumbnail( iconThick );
      panelViewExport.AddItem( buttonThick );

      PushButtonData buttonToggle = new PushButtonData(
        buttonToggleName, buttonToggleName,
        System.Reflection.Assembly.GetExecutingAssembly().Location,
        typeof( Command_ToggleLineThickness ).FullName );

      buttonToggle.ToolTip = buttonToggleName;
      ImageSource iconToggle = GetIconSource( Images.ToggleLineThickness );
      buttonToggle.LargeImage = iconToggle;
      buttonToggle.Image = Thumbnail( iconToggle );
      panelViewExport.AddItem( buttonToggle );

      return Result.Succeeded;
    }

    public static ImageSource GetIconSource( Bitmap bmp )
    {
      BitmapSource icon
        = Imaging.CreateBitmapSourceFromHBitmap(
        bmp.GetHbitmap(), IntPtr.Zero, Int32Rect.Empty,
        System.Windows.Media.Imaging.BitmapSizeOptions.FromEmptyOptions() );

      return (System.Windows.Media.ImageSource) icon;
    }

    public static ImageSource Thumbnail(
      ImageSource source )
    {
      Rect rect = new Rect( 0, 0, 16, 16 );
      DrawingVisual drawingVisual = new DrawingVisual();

      using( DrawingContext drawingContext
        = drawingVisual.RenderOpen() )
      {
        drawingContext.DrawImage( source, rect );
      }

      RenderTargetBitmap resizedImage
        = new RenderTargetBitmap(
          (int) rect.Width, (int) rect.Height, 96, 96,
          PixelFormats.Default );

      resizedImage.Render( drawingVisual );

      return resizedImage;
    }

    public static AutomationElement GetThinLinesButton()
    {
      IntPtr revitHandle
        = System.Diagnostics.Process.GetCurrentProcess()
          .MainWindowHandle;

      IntPtr outerToolFrame = FindWindowEx( revitHandle,
        IntPtr.Zero, "AdImpApplicationFrame",
        "AdImpApplicationFrame" );

      IntPtr innerToolFrame = GetChildWindows(
        outerToolFrame )[0];

      AutomationElement innerToolFrameElement
        = AutomationElement.FromHandle( innerToolFrame );

      PropertyCondition typeRibbonCondition
        = new PropertyCondition(
          AutomationElement.ControlTypeProperty,
          ControlType.Custom );

      AutomationElement lowestPanel
        = innerToolFrameElement.FindFirst(
          TreeScope.Children, typeRibbonCondition );

      PropertyCondition nameRibbonCondition
        = new PropertyCondition(
          AutomationElement.AutomationIdProperty,
          "ID_THIN_LINES_RibbonItemControl" );

      AndCondition andCondition = new AndCondition(
        typeRibbonCondition, nameRibbonCondition );

      AutomationElement buttonContainer
        = lowestPanel.FindFirst( TreeScope.Children,
          andCondition );

      PropertyCondition typeButtonCondition
        = new PropertyCondition(
          AutomationElement.ControlTypeProperty,
          ControlType.Button );

      PropertyCondition nameButtonCondition
        = new PropertyCondition(
          AutomationElement.AutomationIdProperty,
          "ID_THIN_LINES" );

      AndCondition andConditionButton = new AndCondition(
        typeButtonCondition, nameButtonCondition );

      AutomationElement button = buttonContainer.FindFirst(
        TreeScope.Children, andConditionButton );

      return button;
    }

    public static void SetThinLines(
      UIApplication app,
      bool makeThin )
    {
      bool isAlreadyThin = IsThinLines();

      if( makeThin != isAlreadyThin )
      {
        // Switch TL state by invoking
        // PostableCommand.ThinLines

        RevitCommandId commandId
          = RevitCommandId.LookupPostableCommandId(
            PostableCommand.ThinLines );

        if( app.CanPostCommand( commandId ) )
        {
          app.PostCommand( commandId );
        }
      }
    }

    public static bool IsThinLines()
    {
      AutomationElement button = GetThinLinesButton();

      TogglePattern togglePattern
        = button.GetCurrentPattern(
          TogglePattern.Pattern ) as TogglePattern;

      string state = togglePattern.Current
        .ToggleState.ToString().ToUpper();

      return ( state == "ON" );
    }
  }
}
The complete source code, Visual Studio solution and add-in manifest are provided in the ThinLines GitHub repository, and the version described here is release 2015.0.0.1.
As said, please be aware of The Building Coder Disclaimer before you even dream of making use of this.
Many thanks to Rudi for his research and nice, clean implementation!