Determining Host Document Location of a Linked Element
It is getting rather cold and wet and dreary outside now, so I spent some time answering the following excellently documented developer query on relating the coordinates of a linked file with its host.
Just as I was about to publish it, Kon raised the very same issue in a comment on the recent discussion on accessing individual elements in linked projects: "When I try to relate the 'internal' XYZ LocationPoint of the linked document to the main model, they are 'off', ... How can one relate 2 model's XYZ coordinates accurately, when their 'Internal' 0,0,0 are in different positions ...?"
Here is the first query on the same topic:
Question: I am struggling with linked files in Revit 2014.
I have a wall in a document A that is linked into a project document B.
I read the article on listing linked elements and found it very useful.
However, the method described there returns a list of location points in the linked file itself.
So, lets say I have a linked file with one wall in it. In the linked file, the location of this wall is at 100,100,0.
In my main file, I place it at 300,100,0.
I need to determine the location of this "linked" wall inside my main model. So I want to retrieve the location 300,100,0.
How can I achieve that, please?
As said, this code from the aforementioned article returns the location of the wall within the link, (100,100,0), and that's not the location I need:
  Document d = rvtlink.GetLinkDocument();
  Element e = d.GetElement( id );
  LocationCurve curve = e.Location as LocationCurve;
  XYZ p = curve.Curve.GetEndPoint( 0 );
  XYZ q = curve.Curve.GetEndPoint( 1 );
To completely describe and reproduce the problem, I set up the following test scenario involving two documents, A and B, and two walls, red and blue.
Document A looks like this:
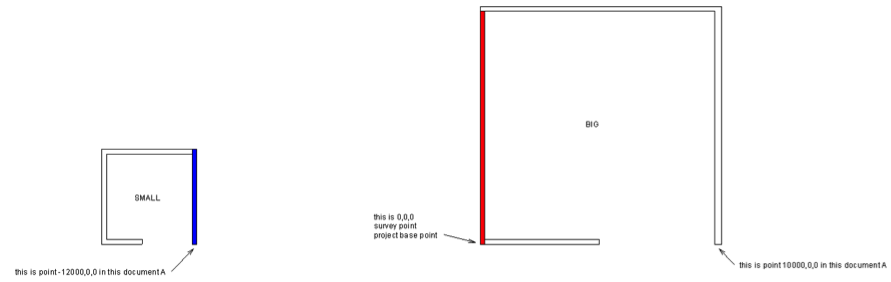
The red wall is situated at the location 0,0,0 in this document, the blue wall at -12000,0,0.
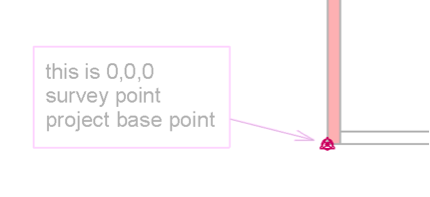
To keep matters simple, that's also where the survey point and project base point lie.
Document B looks like this:
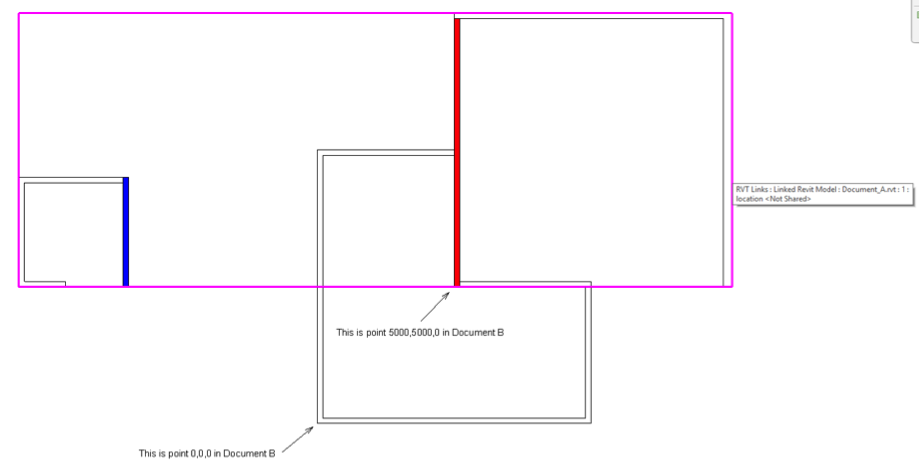
The pink lines show the bounding box of the linked file A in the containing project B.
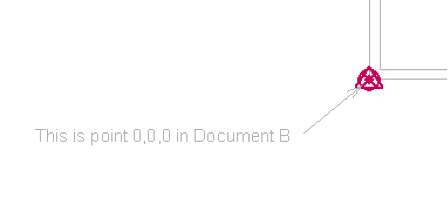
Document B has the 0,0,0 point lying like below.
Document A is linked into document B and is situated so that the 0,0,0 location of document A is placed at document B's location 5000,5000,0.
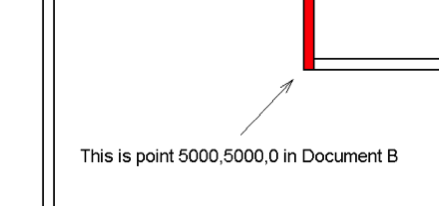
As said, my goal is to retrieve the location of the red wall (from the linked file), but in coordinates related to the 0,0,0 point of document B.
So, I need a routine that tells me that the red wall is situated at location 5000,5000,0 in document B and that the blue wall is situated at -7000, 5000,0.
How can this be done?
Here is my current code attempting to determine this:
  UIApplication uiapp = commandData.Application;
  UIDocument uidoc = uiapp.ActiveUIDocument;
  Document doc = uidoc.Document;
  Selection sel = uidoc.Selection;

  Reference r = sel.PickObject(
    ObjectType.Element,
    new LinkSelectionFilter(),
    "Please pick an import instance" );

  RevitLinkInstance rvtlink = doc.GetElement( r )
    as RevitLinkInstance;

  if( rvtlink == null )
  {
    return Result.Failed;
  }

  // For this example, just focus on
  // the blue and red walls

  var walls = new FilteredElementCollector(
      rvtlink.GetLinkDocument() )
    .OfClass( typeof( Wall ) )
    .Where( c => c.Id.IntegerValue == 179910
      || c.Id.IntegerValue == 179980 );

  foreach( Wall wall in walls )
  {
    // Ask Revit for coordinates; these are
    // related to the linked file (Document A).

    LocationCurve curve = wall.Location
      as LocationCurve;

    XYZ p = curve.Curve.GetEndPoint( 0 );
    XYZ q = curve.Curve.GetEndPoint( 1 );

    if( wall.Id.IntegerValue == 179910 )
    {
      TaskDialog.Show( "The Red wall",
        "The red wall is situated at "
        + PointString( p ) );
    }
    else
    {
      TaskDialog.Show( "The Blue wall",
        "The blue wall is situated at: "
        + PointString( p ) );
    }

    // So, how can I determine where the red and
    // blue walls are in the coordinate system of
    // the document B file ?
  }
  return Result.Succeeded;
How can I achieve the last step, please?
Answer: Easy, actually.
Before getting into details, let me mention that I recently also discussed access to individual elements in linked projects and point out a number of previous related articles there.
RevitLinkInstance is derived from the Instance class, the base class for all instance objects. It provides the methods GetTransform, to retrieve the transform of the instance, and GetTotalTransform that includes the true north transform as well.
As you say, you have the location of your element in the linked file, and all you need to determine is how to transform that to the containing file coordinates.
This can easily be achieved using the location attributes of the RevitLinkInstance to determine its transform, and then apply that to your points.
By the way, let me also point out that you are making your degugging efforts significantly harder by working in millimetres in the user interface, since all the internal database values are stored in imperial feet.
I implemented the following method PointStringMm to display the database units in millimetres to correspond with your description above:
  const double _inch_to_mm = 25.4;
  const double _foot_to_mm = 12 * _inch_to_mm;

  /// <summary>
  /// Return a string for a real number
  /// formatted to two decimal places.
  /// </summary>
  public static string RealString( double a )
  {
    return a.ToString( "0.##" );
  }

  /// <summary>
  /// Return a string for an XYZ point
  /// or vector with its coordinates
  /// converted from feet to millimetres
  /// and formatted to two decimal places.
  /// </summary>
  public static string PointStringMm( XYZ p )
  {
    return string.Format( "({0},{1},{2})",
      RealString( p.X * _foot_to_mm ),
      RealString( p.Y * _foot_to_mm ),
      RealString( p.Z * _foot_to_mm ) );
  }
With that in place and the call to retrieve the link transform added, the code lookes like this:
  // Transformation from linked file to host

  Transform t = rvtlink.GetTotalTransform();

  foreach( Wall wall in walls )
  {
    // Ask Revit for coordinates; these are
    // related to the linked file (Document A).

    LocationCurve curve = wall.Location
      as LocationCurve;

    XYZ p = curve.Curve.GetEndPoint( 0 );
    XYZ q = curve.Curve.GetEndPoint( 1 );

    string title = "The {0} Wall";

    string msg = "The {0} wall is situated at {1} "
      + "in the source document and at {2} in the "
      + "target one.";

    bool red = ( wall.Id.IntegerValue == 179910 );

    TaskDialog.Show(
      string.Format( title, red ? "Red" : "Blue" ),
      string.Format( msg,
        red ? "red" : "blue",
        PointStringMm( q ),
        PointStringMm( t.OfPoint( q ) ) ) );
  }
Running this command in the sample model pops up two dialogue boxes, one for each wall. Here is the one describing the position of the red wall:

Similarly, the one for the blue wall:

I hope this fully answers your question.
Here is LinkedElementLocation.zip containing the full source code, Visual Studio solution and add-in manifest for this external command.
Modifying a Family Category
Before we close for today, here is a note to highlight an important new feature that was added to the Revit 2014 API and answers the following query:
Question: How can I programmatically set the family category having started from a generic model template?
Lacking that functionality, I am forced to I ship various different templates with categories preset.
Answer: As said, that was enabled in Revit 2014. Here is a straight quote from the Revit API help file RevitAPI.chm section on What's New in the Revit 2014 API:
Family category
The property
- FamilyBase.FamilyCategory
can now be set. This allows the category of an family being edited to be changed.