Text File Driven Automatic Placement of Family Instances
My colleague Emmanuel Di Giacomo recently asked me for an application to automatically place Revit family instances in a project at a list of X, Y, Z coordinates read from a text file.
A similar add-in was already published for Revit 2011 at Revit Today.
The user interface is minimal:
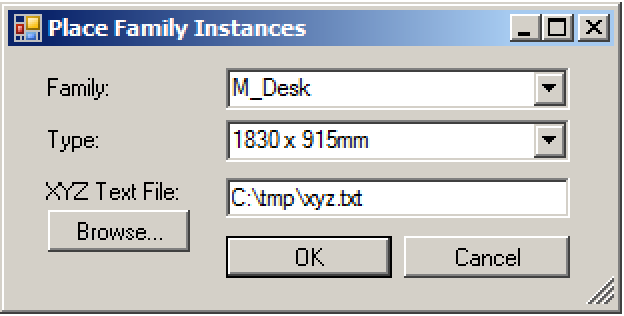
This form enables the following simple and effective workflow to achieve a lot of functionality in very few lines of code, significantly aided and abetted by the combo box DataSource and the regular expression supported real number parsing functionality:
- On loading, list all families whose placement type equals
FamilyPlacementType.OneLevelBased. - On selecting a family, list all its symbols.
- Prompt the user to select an input text file containing a list of X, Y and Z coordinates.
- Helper method to parse a string to extract an XYZ point.
- Parse the input text file.
- External command mainline and form driver – start a transaction and place instances of the selected family type at all the XYZ points.
- Conclusion and download.
- GitHub repository.
On an unrelated topic, we end with some news on BIM 360 Glue.
First, a look at the event handlers and other code implementing the steps above:
1. On Load – List Families
When the form is initially loaded, a filtered element collector retrieves all families in the document.
Since this add-in only supports the simplest form of instance placement and one single overload of the NewFamilyInstance method taking a point, family type and StructuralType argument, we remove all families except the ones whose placement type equals FamilyPlacementType.OneLevelBased:
  private void PlaceInstancesForm_Load(
    object sender,
    EventArgs e )
  {
    List<Family> families = new List<Family>(
      new FilteredElementCollector( _doc )
        .OfClass( typeof( Family ) )
        .Cast<Family>()
        .Where<Family>( f =>
          f.FamilyPlacementType ==
            FamilyPlacementType.OneLevelBased ) );

    cmbFamily.DataSource = families;
    cmbFamily.DisplayMember = "Name";
  }
Note how easily and efficiently we can populate the combo box entries using the DataSource property to extract and display the family names to the user.
2. On Selecting a Family – List its Symbols
Each time the selected family changes, the cmbFamily_SelectedIndexChanged event handler updates the list of family symbols it provides.
They are immediately accessible from the Family.Symbols property.
However, the FamilySymbolSet that it returns cannot immediately be passed into the family type combo box DataSource property; it can be passed in after converting it to a generic List instance:
  private void cmbFamily_SelectedIndexChanged(
    object sender,
    EventArgs e )
  {
    ComboBox cb = sender as ComboBox;

    Debug.Assert( null != cb,
      "expected a combo box" );

    Debug.Assert( cb == cmbFamily,
      "what combo box are you, then?" );

    Family f = cb.SelectedItem as Family;

    FamilySymbolSet symbols = f.Symbols;

    // I have to convert the FamilySymbolSet to a
    // List, or the DataSource assignment will throw
    // an exception saying "Complex DataBinding
    // accepts as a data source either an IList or
    // an IListSource.

    List<FamilySymbol> symbols2
      = new List<FamilySymbol>(
        symbols.Cast<FamilySymbol>() );

    cmbType.DataSource = symbols2;
    cmbType.DisplayMember = "Name";
  }
3. Select an Input Text File
Hmm. Actually, there is absolutely nothing to say about this step. Well, I can mention the methods implementing it.
The Util class provides a method FileSelectTxt to select the input text file:
  /// <summary>
  /// Select a specified file in the given folder.
  /// </summary>
  /// <param name="folder">Initial folder.</param>
  /// <param name="filename">Selected filename on
  /// success.</param>
  /// <returns>Return true if a file was successfully
  /// selected.</returns>
  static bool FileSelect(
    string folder,
    string title,
    string filter,
    out string filename )
  {
    OpenFileDialog dlg = new OpenFileDialog();
    dlg.Title = title;
    dlg.CheckFileExists = true;
    dlg.CheckPathExists = true;
    dlg.InitialDirectory = folder;
    dlg.Filter = filter;
    bool rc = ( DialogResult.OK == dlg.ShowDialog() );
    filename = dlg.FileName;
    return rc;
  }

  /// <summary>
  /// Select a text file in the given folder.
  /// </summary>
  /// <param name="folder">Initial folder.</param>
  /// <param name="filename">Selected filename on
  /// success.</param>
  /// <returns>Return true if a file was successfully
  /// selected.</returns>
  static public bool FileSelectTxt(
    string folder,
    out string filename )
  {
    return FileSelect( folder,
      "Select XYZ coordinate text file or Cancel to Exit",
      "XYZ coordinate text Files (*.txt)|*.txt",
      out filename );
  }
This helper method is called by the browse button click handler, and the selected file path and directory is saved on success:
  private void btnBrowseXyz_Click(
    object sender,
    EventArgs e )
  {
    string filename;

    if( Util.FileSelectTxt( _txt_folder_name,
      out filename ) )
    {
      txtFilename.Text = filename;

      _txt_folder_name = Path.GetDirectoryName(
        filename );
    }
  }
4. Parse a String for an XYZ Point
I use a regular expression to find and extract real numbers from the lines of text parsed from the selected XYZ input file:
  /// <summary>
  /// A regular expression to match a
  /// real number with optional leading sign.
  /// </summary>
  const string _one_real_number_regex
    = @"[-+]?[0-9]*\.?[0-9]+";
Initially, I tried using a more complex regular expression to grab all three XYZ coordinates at once, ignoring all intervening characters of any kind whatsoever:
  /// <summary>
  /// A regular expression to match three occurrences
  /// of a real number with optional leading sign.
  /// We gave up using this, because the greedy .*
  /// gobbles the +- sign away from the Y and Z
  /// coordinates.
  /// </summary>
  const string _xyz_real_number_regex
    = @"(?<X>" + _one_real_number_regex + ")"
    + @".*(?<Y>" + _one_real_number_regex + ")"
    + @".*(?<Z>" + _one_real_number_regex + ")";
This does not work well, however, due to the greedy nature of regular expressions, which gobble up as much as they can as soon as possible, for instance removing the preceding +- sign from the Y and Z coordinates.
Furthermore, this forces the user to always enter exactly three coordinates.
By parsing the real numbers one at a time, I can more easily provide support for either two or three coordinates, assuming a zero default Z value.
I pre-compile the regular expression and use it like this in the GetThreeRealNumbers helper method:
  /// <summary>
  /// Static regular expression for
  /// parsing real numbers.
  /// </summary>
  static Regex _regex = new Regex(
    //_xyz_real_number_regex
    _one_real_number_regex );

  /// <summary>
  /// Read three real numbers from the given string
  /// and return true on success. Parse the string s
  /// for exactly two or three real numbers
  /// representing the XY or XYZ placement
  /// coordinates. Z defaults to 0.
  /// </summary>
  static bool GetThreeRealNumbers(
    string s,
    ref double[] xyz )
  {
    int i = 0; // index in string
    int n = 0; // count real numbers found

    Match m = _regex.Match( s, i );

    // Pure debugging support

    foreach( Group g in m.Groups )
    {
      Debug.Print( g.ToString() );
    }

    // Read all the real numbers we can get
    // and stop if we find too many

    while( 4 > n && m.Success )
    {
      if( 3 > n )
      {
        xyz[n] = double.Parse( m.ToString() );
        i = m.Index + m.Length;
        m = _regex.Match( s, i );

        foreach( Group g in m.Groups )
        {
          Debug.Print( g.ToString() );
        }
      }
      ++n;
    }

    // Add the default Z coordinate in case of need

    if( 2 == n )
    {
      xyz[n++] = 0.0;
    }

    // Return success if we found 2 or 3 real numbers

    return 3 == n;
  }
5. Parse Input Text File
On confirming the selections made, the input file is read and each line is fed to the GetThreeRealNumbers method.
On success, the three real numbers retrieved are used to populate a Revit XYZ point instance and add it to the list.
Lines beginning with a hash characters are considered comments and ignored.
Each non-comment line that is successfully parsed contributes a point instance to the list of family instance placement coordinates; all other lines are simply ignored:
  private void btnOk_Click(
    object sender,
    EventArgs e )
  {
    StreamReader reader = File.OpenText(
      txtFilename.Text );

    string read = reader.ReadToEnd();

    string[] lines = read.Split( '\n' );

    string s;
    double[] xyz = new double[3] { 0, 0, 0 };

    foreach( string line in lines )
    {
      s = line.Trim();

      if( s.StartsWith( "#" ) )
      {
        continue;
      }

      // Parse string s for exactly two or three
      // real numbers representing the XY or XYZ
      // placement coordinates. Z defaults to 0.

      if( GetThreeRealNumbers( s, ref xyz ) )
      {
        XYZ p = new XYZ( xyz[0], xyz[1], xyz[2] );

        if( null == _pts )
        {
          _pts = new List<XYZ>( 1 );
        }
        _pts.Add( p );
      }
    }
  }
This leaves plenty of space for you to shoot yourself in the foot, since no warnings are issued if a line does not parse correctly.
We are lenient and expect you to either make no errors or notice them yourself.
6. External Command Mainline and Form Driver – Place Instances of the Selected Family Type
The external command mainline Execute method performs the following tasks:
- Determine the main Revit application window handle to define the form owner.
- Display and handle the place instances form.
- On confirmation, open and commit a transaction in which instances of the selected family type are placed at all XYZ points read from the input file.
  public Result Execute(
    ExternalCommandData commandData,
    ref string message,
    ElementSet elements )
  {
    IWin32Window revit_window
      = new JtWindowHandle(
        ComponentManager.ApplicationWindow );

    UIApplication uiapp = commandData.Application;
    UIDocument uidoc = uiapp.ActiveUIDocument;
    Document doc = uidoc.Document;

    PlaceInstancesForm f
      = new PlaceInstancesForm( doc );

    if( DialogResult.OK == f.ShowDialog(
      revit_window ) )
    {
      using( Transaction t = new Transaction(
        doc ) )
      {
        t.Start( "Place Instances" );

        Autodesk.Revit.Creation.Document
          creation_doc = doc.Create;

        StructuralType st
          = StructuralType.NonStructural;

        foreach( XYZ p in f.Points )
        {
          creation_doc.NewFamilyInstance(
            p, f.Type, st );
        }

        t.Commit();
      }
    }
    return Result.Succeeded;
  }
Short and sweet, isn't it?
7. Conclusions and Download
This is rather a lot of useful functionality in rather a few lines of code, I think.
I was especially happy to make use of the DataSource property to directly populate a .NET user interface widget from a filtered element collector.
Well, actually, there is now a tiny amount of LINQ code in between the collector and the data source property. The initial version did not check for the family placement type, and the filtered element collector was used to feed it directly.
To see the whole thing in context and try it out for yourself, here is PlaceInstances05.zip containing the full source code, Visual Studio solution and add-in manifest for the PlaceFamilyInstances external command.
Please be aware that it only supports the simplest kind of family placement requiring a single input point.
Support for curve based, face or element hosted families etc. is left as an exercise to the reader.
Many thanks to Emmanuel for suggesting and testing this.
8. The PlaceInstances GitHub Repository
Better than the direct download above, I repeat my exercise from yesterday creating the MoveDuctJoin GitHub repository.
Here is the new PlaceInstances repository, including the direct link to download the latest version or access this first Revit 2014 release, version 2014.0.0.5.
Actually, I already fixed something after starting to write this article, so the latest current release is now version 2014.0.0.6.
9. BIM 360 Glue API Pilot and Updated Samples
Last but not least, I discussed the BIM 360 Glue viewer and REST API and authentication using Python end of last year.
Mikako Harada now published information on the BIM 360 Glue API pilot and updated samples that you definitely should check out if you have any interest in this area.
This of course ties in quite nicely with the chance to win $5000 in the AppHack contest 2.0...