Move Duct Join with Video and GitHub Support
I am always happy to take a look at a real MEP issue, so this case caught my eye and prompted me to sit down and do some actual coding again for a change:
Question: How can I programmatically move the join of two ducts, effectively changing their end points?
I do not want to delete and re-enter them because they will normally be connected at the other end as well.
Answer: In general, when working on programmatic manipulation of duct system geometry, you have two options for driving the desired changes:
- Define the ducts, and let Revit automatically insert the required fittings when you ask them to be connected.
- Define the fittings, and let Revit automatically create the required ducts when you ask them to be connected.
This issue is a little bit different, in that all the required components are already present, and you just want to move them around relatively to another.
I took a look at it and implemented an add-in named MoveDuctJoin defining two separate external commands, because they illustrate the different options so clearly:
- CmdDisconnect – this command just moves one duct connector, so the link to the neighbouring duct is broken, causing a disconnect.
- CmdReconnect – this command moves the fitting between the two ducts. That keeps the system connected.
Mini Demo and Some Video Options
To keep things brief, here is a 25 second video that hopefully explains it all:
By the way, since this is so small and short and sweet, I really wanted to embed it inline, which is most easily achieved by converting it to GIF file format.
Camtasia for Windows supports conversion of MP4 to GIF, but Camtasia for Mac does not.
However, I just uploaded it to the Zamzar online converter and received back the converted GIF file result within a minute or two, so that was that.
Oops. Well, maybe not quite. It took a lot longer than that, and the resulting GIF file is 386 MB in size, whereas the original MP4 was smaller than 1 MB. Maybe I won't post it after all. In fact, I even cancelled the download before it finished.
Instead, I uploaded the video to Screencast.com, to compare it with YouTube, which I used in the past.
Here is the result on Screencast.com:
For comparison purposes, here is the same video hosted on YouTube:
Actually, I find the latter slightly handier, so far.
I wish either of them would scale up the video, or at least pad it in white and not waste all that space with the huge black border around it.
External Command User Interaction
The user interaction of both external commands consists of exactly three clicks:
- Launch the command.
- Click a duct close to the source connector to be relocated.
- Pick another point on the duct close to the target point to move it to.
Just for the sake of completeness, or in case the videos above do not display correctly, here are three screen snapshots showing the original situation and the result of running CmdDisconnect and CmdReconnect on it, respectively:
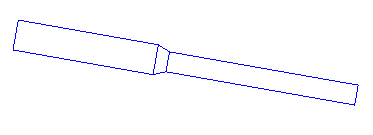
As said, CmdDisconnect just moves the connector of the selected duct, breaking its link to the neighbouring fitting:
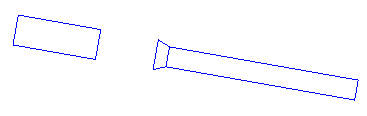
CmdReconnect moves the fitting instead, retaining its links to both neighbouring ducts:

Now let's look at how that is implemented, and the similarities and differences between the two approaches.
CmdDisconnect – Move the Connector
The differences between the two commands are very small, so most of the code is duplicated, I'm afraid.
CmdDisconnect implements the following steps:
- Prompt user to pick duct close to the source connector to be moved.
- Prompt user to pick target point on duct to move it to.
- Determine the connector object closest to first point.
- Project the second point onto the duct centre line.
- Move the connector to the projected target point.
The first four items are reused unchanged for the other command as well.
Only the last item does any real work and thus requires a transaction:
/// <summary>
/// External command to move a duct connector
/// away from its original position along the
/// duct centre line, disconnecting from the
/// neighbour element.
/// </summary>
[Transaction( TransactionMode.Manual )]
public class CmdDisconnect : IExternalCommand
{
  public Result Execute(
    ExternalCommandData commandData,
    ref string message,
    ElementSet elements )
  {
    UIApplication uiapp = commandData.Application;
    UIDocument uidoc = uiapp.ActiveUIDocument;
    Document doc = uidoc.Document;
    Selection sel = uidoc.Selection;
    Duct duct = null;
    XYZ pFrom = null;
    XYZ pTo = null;

    try
    {
      Reference r = sel.PickObject(
        ObjectType.Element,
        new DuctSelectionFilter(),
        "Please pick a duct at the "
        + "connection to move." );

      duct = doc.GetElement( r.ElementId ) as Duct;
      pFrom = r.GlobalPoint;

      r = sel.PickObject(
        ObjectType.Element,
        new DuctSelectionFilter(),
        "Please pick a target point on the "
        + "duct to move the connection to." );

      pTo = r.GlobalPoint;
    }
    catch( Autodesk.Revit.Exceptions
      .OperationCanceledException )
    {
      return Result.Cancelled;
    }

    // Determine connector closest to picked point

    ConnectorSet connectors
      = duct.ConnectorManager.Connectors;

    Connector con = null;
    double d, dmin = double.MaxValue;

    foreach( Connector c in connectors )
    {
      d = pFrom.DistanceTo( c.Origin );

      if( d < dmin )
      {
        dmin = d;
        con = c;
      }
    }

    // Determine target point to move it to

    Transform cs = con.CoordinateSystem;

    Debug.Assert(
      con.Origin.IsAlmostEqualTo( cs.Origin ),
      "expected same origin" );

    Line line = Line.CreateUnbound( cs.Origin, cs.BasisZ );

    IntersectionResult ir = line.Project( pTo );

    pTo = ir.XYZPoint;

    Debug.Assert( line.Distance( pTo ) < 1e-9,
      "expected projected point on line" );

    // Modify document within a transaction

    using( Transaction tx = new Transaction( doc ) )
    {
      tx.Start( "Move Duct Connector" );
      con.Origin = pTo;
      tx.Commit();
    }
    return Result.Succeeded;
  }
}
CmdReconnect – Move the Fitting
CmdReconnect implements the following steps, which include the first four from above unchanged:
- Prompt user to pick duct close to the source connector to be moved.
- Prompt user to pick target point on duct to move it to.
- Determine the connector object closest to first point.
- Project the second point onto the duct centre line.
- Determine translation vector from the source to the projected target point.
- Determine the neighbouring fitting.
- Move the fitting to the projected target point.
We access the neighbouring fitting by first retrieving one of its connectors, which is connected to the duct one closest to the first picked point. The fitting element itself is then provided by the Connector.Owner property.
This is achieved using the GetConnectedConnector method adapted from the TraversalTree.cs module of the TraverseSystem SDK sample:
  /// <summary>
  /// Return the connector
  /// connected to the one given.
  /// </summary>
  static Connector GetConnectedConnector(
    Connector con )
  {
    Connector neighbour = null;

    int ownerId = con.Owner.Id.IntegerValue;

    ConnectorSet refs = con.AllRefs;

    foreach( Connector c in refs )
    {
      // Ignore non-End connectors and
      // connectors on the same element

      if( c.ConnectorType == ConnectorType.End
        && !ownerId.Equals(
          c.Owner.Id.IntegerValue ) )
      {
        neighbour = c;
        break;
      }
    }
    return neighbour;
  }
With that in place, the rest of the command implementation looks like this:
/// <summary>
/// External command to move a duct connector
/// away from its original position along the
/// duct centre line, disconnecting from the
/// neighbour element.
/// </summary>
[Transaction( TransactionMode.Manual )]
public class CmdReconnect : IExternalCommand
{
  public Result Execute(
    ExternalCommandData commandData,
    ref string message,
    ElementSet elements )
  {
    UIApplication uiapp = commandData.Application;
    UIDocument uidoc = uiapp.ActiveUIDocument;
    Document doc = uidoc.Document;
    Selection sel = uidoc.Selection;
    Duct duct = null;
    XYZ pFrom = null;
    XYZ pTo = null;

    try
    {
      Reference r = sel.PickObject(
        ObjectType.Element,
        new DuctSelectionFilter(),
        "Please pick a duct at the "
        + "connection to move." );

      duct = doc.GetElement( r.ElementId ) as Duct;
      pFrom = r.GlobalPoint;

      r = sel.PickObject(
        ObjectType.Element,
        new DuctSelectionFilter(),
        "Please pick a target point on the "
        + "duct to move the connection to." );

      pTo = r.GlobalPoint;
    }
    catch( Autodesk.Revit.Exceptions
      .OperationCanceledException )
    {
      return Result.Cancelled;
    }

    // Determine connector closest to picked point

    ConnectorSet connectors
      = duct.ConnectorManager.Connectors;

    Connector con = null;
    double d, dmin = double.MaxValue;

    foreach( Connector c in connectors )
    {
      d = pFrom.DistanceTo( c.Origin );

      if( d < dmin )
      {
        dmin = d;
        con = c;
      }
    }

    // Determine target point to move it to

    Transform cs = con.CoordinateSystem;

    Debug.Assert(
      con.Origin.IsAlmostEqualTo( cs.Origin ),
      "expected same origin" );

    Line line = Line.CreateUnbound( cs.Origin, cs.BasisZ );

    IntersectionResult ir = line.Project( pTo );

    pTo = ir.XYZPoint;

    Debug.Assert( line.Distance( pTo ) < 1e-9,
      "expected projected point on line" );

    // Determine translation vector

    XYZ v = pTo - pFrom;

    // Determine neighbouring fitting connector

    Connector neighbour
      = GetConnectedConnector( con );

    // Modify document within a transaction

    using( Transaction tx = new Transaction( doc ) )
    {
      tx.Start( "Move Fitting" );

      ElementTransformUtils.MoveElement(
        doc, neighbour.Owner.Id, v );

      tx.Commit();
    }
    return Result.Succeeded;
  }
}
Note the similarities and differences between the two commands, and their different effects.
The MoveDuctJoin GitHub Repository
At this point, I would normally be attaching the complete project including source code, Visual Studio solution and add-in manifest as an archive file.
For the first time, however, I am doing the right thing instead, which means creating a GitHub repository for it and not forgetting to attach a license.
Here are the steps I performed to create and properly populate the MoveDuctJoin GitHub repository:
- Create a new repository on GitHub and initialise it with a readme, license and C# .gitignore file.
- Clone it to the local system:
git clone repository_url
- Add all the add-in source files to it:
git add .
- Commit the changes, optionally preconfiguring your user name and email address:
git commit
- Push the changes back to the server:
/v/C/a/vs/MoveDuctJoin/ $ git push
Username for 'https://github.com': jeremytammik
Password for 'https://jeremytammik@github.com':
Counting objects: 13, done.
Delta compression using up to 8 threads.
Compressing objects: 100% (10/10), done.
Writing objects: 100% (11/11), 5.26 KiB, done.
Total 11 (delta 0), reused 0 (delta 0)
To https://github.com/jeremytammik/MoveDuctJoin
   944fbf8..7eb010f  master -> master
There you are. You now have the MoveDuctJoin repository, including the direct link to download the latest version.
Keeping in mind our future generations, as discussed yesterday on branching and tagging, I also created an official first Revit 2014 release of it, version 2014.0.0.0, in case somebody wants to retrieve that specific release sometime later on.