Sydney Revit API Training and Vacation
My days down under were pretty intense.
I left Switzerland Sunday night and arrived safe and sound in Sydney early Tuesday morning. I took the train from the airport into the town centre and back out again to the Autodesk offices at Macquarie Park in North Sydney.
Three hours later, I was teaching the two-day Revit API training. At the time of writing this, it is Thursday afternoon and I am sitting on the plane back home again. I am on vacation next week.
Here is a rather monstrous blog post presenting some of the issues we discussed during the training, plus a number of other interesting fresh news items that I would like to mention before the break:
- Standard ADN Training Material
- Japanese Revit API question list
- Sydney Revit API training topics
- Purge zero-area rooms and spaces
- Minimal external application defining a ribbon panel
- Pick and extract complex beam edge curve
- Custom tagging and extensible storage
- Cloud-based room editor application
- Autodesk at TED and TED talks on UAV abilities
- Beyond design revamped
- Vacation
I want to get this out the door quickly right now, because I am hopping on the plane back to Europe this afternoon and leaving on vacation next week, so please read this really slowly to make it last as long as possible.
I also want to present you this happy little frog that I met in Ticino, the southern, Italian part of Switzerland, before leaving:

Standard ADN Training Material
As you are hopefully aware, all the standard ADN Revit training material is available and well documented online from the Revit Developer Centre, recently updated for Revit 2014.
It provides the 'My first Revit plugin' and DevTV tutorial videos as well as explicitly documented step-by-step training labs on the three basic topics of Revit element and database fundamentals, UI and the Family API.
Before they were placed on the official site, I discussed my migration of the expanded versions of the step-by-step labs, MEP sample AdnRme and structural labs and link sample plus the update and command-line utility for removing the processor architecture mismatch warning.
Since all participants in my training here already had either good programming knowledge or extensive Revit product usage experience, we were able to cover all the important basics of the Revit API using the participants' specific needs and wishes as a basis for discussion, without sticking to the standard ADN training material.
That made it much more fun, interesting and challenging for me, and also enabled us to remain totally focused on the participants' goals throughout.
Japanese Revit API Question List
By a funny coincidence, the Japanese Developer Support team prepared a two-day Revit API training course this very same week as well.
They came up with the following list of questions and answers to help clarify some central topics up front:
- Extensible Storage
- Is there a limitation on the size of the extensible storage that can be associated with a single element? No.
- Does this feature depend on the Revit version? Yes.
- When did it become available? In Revit 2012.
- Element Id
- Is the element id a persistent identifier like AutoCAD’s handle? Yes and no, see below.
- Is the element id a transient identifier per session? No, it remains valid beyond the session, but may be modified by worksharing and central file sharing regeneration.
- Can developers use it as a key name in an external relational database? The UniqueId is safer, and the only way to go in a worksharing environment.
- Parameters
- Is there any developer use case for shared parameters? How can shared parameters be useful to an add-in? I would avoid shared parameters for pure add-in data storage. Extensible storage is more flexible and better isolated than shared parameters, which are more geared towards end users than add-in applications. A shared parameter may be useful for two reasons: (i) if you make it visible, the Revit property palette provides an automatic user interface for it. (ii) it can be scheduled. If these two reasons are not interesting in your case, extensible storage is probably preferable.
- Is it possible to access a per document parameter outside of Revit without using any API? No.
- Dynamic Model Update
- As far as I understand, dynamic model update is just like a modification operation within DBObject.Modified on AutoCAD .NET API. Is that right? I believe so. The modification added by the dynamic updater is encapsulated into the same transaction as the modification that triggered it.
- Is this persistent between sessions, similar to AutoCAD’s persistent reactor? If the add-in which implements Dynamic Model Update has been loaded into Revit, this begins to work by opening a project file into Revit without any operation. Is that correct understanding or not? Yes.
- Is there a possibility to make an infinite loop? No, this is prevented by Revit.
- Family
- Does the API ability support create/modify of System Families and In-Place Families? Sorry, no to both.
Sydney Revit API Training Topics
Here is a quick overview of some of the topics we ended up discussing in the course of the two-day Revit API training in Sydney:
- Filtered element collector and LINQ
- We implemented sample commands to purge redundant spaces: PurgeRooms, PurgeSpaces.
- We discussed how to determine and list a comparison of all room areas with the areas covered by the furniture and equipment they contain: the cloud-based room editor application provides most of the required functionality for this.
- Simple ribbon with an icon
- We implemented a minimal external application defining a ribbon panel and button to launch our new commend.
- Database Link
- How can Excel update the Revit database? Bi-directional linking of external data to family instances or other Revit elements: look at the FireRating SDK sample in VB, or the C# version provided by the Lab4_3_1_CreateAndBindSharedParam, Lab4_3_2_ExportSharedParamToExcel and Lab4_3_3_ImportSharedParamFromExcel commands in the XtraCs project in the Revit API training labs.
- Prepare model for issue, strip out everything except model: custom exporter.
- Generate floor plans, e.g. large PNG: cloud-based room editor.
- Batching through files
- Import IFC
- Batching, e.g. make changes to font in family libraries: completed by Brett.
- Revit model checking: Revit Model Review.
- Family API: define and use a family:
- Filter for all tags: iterate built-in categories, search for *tag*, feed into LogicalOrFilter: completed by Brett
- Electrical loading and circuit design, non-US rules: UK panel schedule (2009), Schedule API.
- Custom tagging and extensible storage
- DWFx: ExportImage
In fact, we were able to cover so many important topics in such depth and address the participants needs in such detail that I was able to cancel the meeting scheduled with an important large company for the day after the training because all their programming questions had already been answered.
In fact, that cancellation is providing at least part of the time to write this report here now.
Purge all Zero-Area Rooms and Spaces
One of the wishes that a participant brought along from his Revit team back home was a utility to purge unused rooms and spaces.
This proved to be a perfect learning example to practice using RevitLookup and the element lister to explore the Revit database and basic filtered element functionality.
We discussed the requirements for a basic implementation of an external Revit command:
- Visual Studio class project
- References to the Revit API assemblies
- Implement the external command interface, i.e. the Execute method
- Implement the add-in manifest
- Install the add-in
This also provided an opportunity to demonstrate the many helpful features provided by the Visual Studio IDE, such as Intellisense, Ctrl-'.' to add a 'using' statement, 'Implement Interface', and numerous other important time-savers.
All of the steps listed above are completely automated by my Visual Studio Revit add-in wizards.
We ended up with the following command, which selects all rooms in the model with an area that is almost empty and deletes them, reporting whether they have been partially deleted or simply not yet placed:
[Transaction( TransactionMode.Manual )]
public class Command : IExternalCommand
{
  public Result Execute(
    ExternalCommandData commandData,
    ref string message,
    ElementSet elements )
  {
    UIApplication uiapp = commandData.Application;
    UIDocument uidoc = uiapp.ActiveUIDocument;
    Application app = uiapp.Application;
    Document doc = uidoc.Document;

    // Retrieve all room elements with zero area.
    //
    // If you look carefully at the parameters
    // defined on room elements, there may be a way
    // to avoid all the post-processing steps.
    // The area test could probably be replaced by
    // a more effective slow element parameter
    // filter, and maybe the cast and List
    // instantiation can be avoided as well.

    List<ElementId> ids
      = new List<ElementId>(
        new FilteredElementCollector( doc )
          .OfClass( typeof( SpatialElement ) )
          .Where( e => e is Room )
          .Cast<Room>()
          .Where<Room>( r => 1e-9 > r.Area )
          .Select<Element,ElementId>( e => e.Id ) );

    if( 0 < ids.Count() )
    {
      using( Transaction t = new Transaction( doc ) )
      {
        t.Start( "Purge Rooms" );

        int nUnplacedRooms = 0;
        int nRedundantRooms = 0;
        int nElements = 0;

        foreach( ElementId id in ids )
        {
          Debug.Print( doc.GetElement( id ).Name );
          nElements += doc.Delete( id ).Count;

          if( 1 == nElements )
          {
            ++nRedundantRooms;
          }
          else
          {
            ++nUnplacedRooms;
          }
        }

        t.Commit();

        TaskDialog.Show( "Purge Rooms", string.Format(
          "{0} rooms ({1} redundant, {2} unplaced, "
          + "{3} total elements) deleted.",
          nRedundantRooms + nUnplacedRooms,
          nRedundantRooms, nUnplacedRooms,
          nElements ) );
      }
    }
    return Result.Succeeded;
  }
}
Note that this non-trivial selection is implemented in one single statement to instantiate the filtered element collector and post-process its results using LINQ.
Most of the effort is actually reporting the results in a differentiated manner.
This provided a good starting point for understanding filtered element collectors, and a useful little utility to take home as well.
Minimal External Application
We decided to add a custom ribbon tab, panel and button to launch our new command.
This requires an external application and the implementation of its two interface methods, OnStartup and OnShutdown. A skeleton application is set up by the add-in wizards.
Once that is set up, the ribbon widget creation is pretty straightforward:
  public Result OnStartup( UIControlledApplication a )
  {
    string path = Assembly.GetExecutingAssembly()
      .Location;

    string classNamePrefix = "PurgeSpaces.";

    string tabName = "Sydney API Training";

    a.CreateRibbonTab( tabName );

    RibbonPanel panel = a.CreateRibbonPanel(
      tabName, tabName );

    RibbonItem button = panel.AddItem(
      new PushButtonData("Purge Rooms",
      "Purge Rooms", path,
      classNamePrefix + "Command" ) );

    button.ToolTip
      = "Filter for unplaced and deleted rooms";

    return Result.Succeeded;
  }

  public Result OnShutdown( UIControlledApplication a )
  {
    return Result.Succeeded;
  }
Pick and Extract Complex Beam Edge Curve
Brett Burling of BG&E came to the training with some prior API experience, and used his multitasking capabilities to simultaneously effectively code several useful add-ins and actively participate in the group discussions.
One of his samples enables picking and extracting a complex beam edge curve and converting it to a model curve.
It also demonstrates a command implemented in VB.NET, use of the PickObject method to select an edge instead of an entire element, and the transformations required to handle the extraction correctly depending on thether the edge comes from a family instance or some other object:
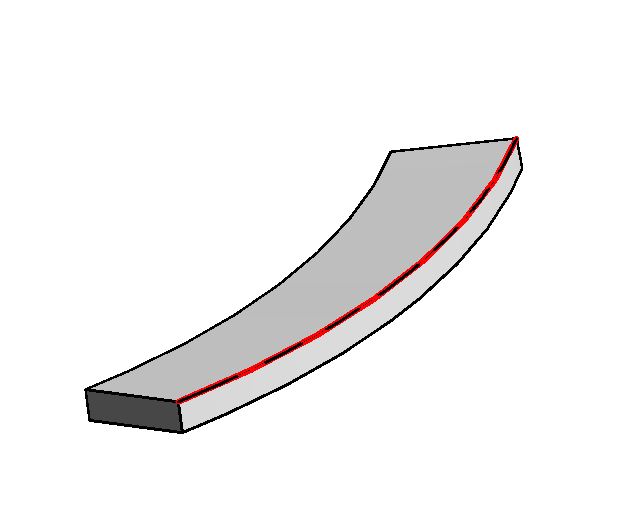
Here is the complete VB source code of the external command implementation achieving this:
#Region "Imported Namespaces"
Imports System
Imports System.Collections.Generic
Imports Autodesk.Revit.ApplicationServices
Imports Autodesk.Revit.Attributes
Imports Autodesk.Revit.DB
Imports Autodesk.Revit.UI
Imports Autodesk.Revit.UI.Selection
#End Region

<Transaction(TransactionMode.Manual)>
Public Class AdskCommand
  Implements IExternalCommand

  Const DisplayName As String = "Extract Edge"

  Public Function Execute(
    ByVal commandData As ExternalCommandData,
    ByRef message As String,
    ByVal elements As ElementSet) _
  As Result Implements IExternalCommand.Execute

    Dim uiapp As UIApplication = commandData.Application
    Dim uidoc As UIDocument = uiapp.ActiveUIDocument
    Dim doc As Document = uidoc.Document
    Dim sel As Selection = uidoc.Selection

    Dim selectedReference As Reference = sel.PickObject(
      ObjectType.Edge, "Select Edge")

    Dim selectedElement As Element = doc.GetElement(
      selectedReference.ElementId)

    Dim selectedEdge As Edge = TryCast(
      selectedElement.GetGeometryObjectFromReference(
        selectedReference), Edge)

    Dim curve As Curve = selectedEdge.AsCurve

    Dim fi As FamilyInstance = TryCast(
      selectedElement, FamilyInstance)

    If fi IsNot Nothing Then
      curve = curve.CreateTransformed(fi.GetTransform)
    End If

    ' Assuming the edge is horizontal

    Dim normal As XYZ = XYZ.BasisZ

    Using rvtTransaction As New Transaction(doc)
      rvtTransaction.Start(DisplayName)

      Dim plane As Plane = doc.Application.Create.NewPlane(normal, curve.GetEndPoint(0))
      Dim sketchPlane As SketchPlane = sketchPlane.Create(doc, plane)
      doc.Create.NewModelCurve(curve, sketchPlane)

      rvtTransaction.Commit()
    End Using

    Return Result.Succeeded
  End Function
End Class
Update from Brett: I thought it might be interesting to also include the code for determining the normal of the curve. Replace Dim normal As XYZ = XYZ.BasisZ by the GetNormal method defined below. This enables the generation of a model line on any edge, not just horizontal ones:
  Function GetNormal(ByVal curve As Curve) As XYZ

    Dim startpoint As XYZ = curve.GetEndPoint(0)
    Dim endpoint As XYZ = curve.GetEndPoint(1)

    If curve.GetType() = GetType(Arc) Then
      Return TryCast(curve, Arc).Normal

    ElseIf curve.GetType() = GetType(Ellipse) Then
      Return TryCast(curve, Ellipse).Normal

    ElseIf curve.GetType() = GetType(Line) Then
      Return startpoint.CrossProduct(endpoint) _
        .Normalize()

    Else

      Dim pointList As IList(Of XYZ) _
        = curve.Tessellate()

      Dim vectorToEndpoint As XYZ _
        = pointList(pointList.Count - 1) _
          - pointList(0)

      Dim lastVector As XYZ = Nothing
      Dim firstNormal As XYZ = Nothing
      Dim nextNormal As XYZ = Nothing

      For i As Integer = 1 To pointList.Count - 2

        Dim nextPoint As XYZ = pointList(i)

        Dim nextVector As XYZ = nextPoint.Subtract(
          startpoint)

        If firstNormal Is Nothing Then
          firstNormal = AbsoluteVector(
            vectorToEndpoint.CrossProduct(
              nextVector).Normalize)
        Else
          nextNormal = AbsoluteVector(
            vectorToEndpoint.CrossProduct(
              nextVector).Normalize)
          If Not IsZero(firstNormal.DistanceTo(
                        nextNormal)) Then
            Return Nothing
          End If
        End If

        lastVector = nextVector
      Next i

      Return vectorToEndpoint.CrossProduct(lastVector) _
        .Normalize()

    End If

  End Function

  Function AbsoluteVector(ByVal vector As XYZ) As XYZ
    Return New XYZ(System.Math.Abs(vector.X),
                   System.Math.Abs(vector.Y),
                   System.Math.Abs(vector.Z))
  End Function

  Public Function IsZero(ByVal number As Double) _
    As Boolean
    Return 0.000000001 > System.Math.Abs(number)
  End Function
Answer: Yes, thank you, very good!
Better still might be to use the Curve.ComputeDerivatives method, so you do not have to differentiate between the different curve types and bail if it is not a simple arc, line or ellipse.
Also please note that the XYZ.Normalize method may possibly remove the need for your personal AbsoluteVector function.
For your convenience, here is PickBeamEdgeCurve.zip including the entire code above, its Visual Studio solution and the add-in manifest.
Custom Tagging and Extensible Storage
One participant was interested in customising the text displayed by a tag. The original thought was to extract some data from the element parameters and reflect them in the text. Changing a tag text does not seem to be straightforward, so we ended up implementing an alternative approach using a TextNote element instead.
Also, we decided it would be more interesting to display some information stored in extensible storage instead of parameter value data.
After the first version was completed, we also wanted to demonstrate storing more complex data in extensible storage, e.g. a list of element ids.
The final result of nailing down this moving target is the following two commands:
- CommandSingle: Select a source element E to display info from, attach a simple integer to it in extensible storage, read back that data from it, create a new TextNote, set its text and attach it to the upper right corner of E's bounding box.
- CommandMulti: Select multiple source elements to display info from, attach a simple integer to each one of them in extensible storage, read back that data from them, create a new TextNote, set its text, attach it to the upper right corner of the first element's bounding box, and store a list of all the source elements' element ids in its extensible storage.
Here is the CommandSingle implementation:
[Transaction( TransactionMode.Manual )]
public class CommandSingle : IExternalCommand
{
  public const string SchemaGuid
    = "5e10a0d2-12bb-428a-a382-b71bcf3e0362";

  public static Schema CreateSchema()
  {
    SchemaBuilder schemaBuilder =
      new SchemaBuilder( new Guid( SchemaGuid ) );

    schemaBuilder.SetSchemaName( "SimpleIntSchema" );

    // Have to define the field name as string and
    // set the type using typeof method

    schemaBuilder.AddSimpleField( "SomeValue",
      typeof( int ) );

    return schemaBuilder.Finish();
  }

  public Result Execute(
    ExternalCommandData commandData,
    ref string message,
    ElementSet elements )
  {
    UIApplication uiapp = commandData.Application;
    UIDocument uidoc = uiapp.ActiveUIDocument;
    Application app = uiapp.Application;

    if( null == uidoc )
    {
      message = "Please run this command in a valid project document.";
      return Result.Failed;
    }

    Document doc = uidoc.Document;

    View view = doc.ActiveView;

    if( null == view
      || ViewType.FloorPlan != view.ViewType )
    {
      message = "Please run this command on a floor plan view.";
      return Result.Failed;
    }

    // Access current selection

    Selection sel = uidoc.Selection;

    int n = sel.Elements.Size;

    Element source = null;

    if( 1 < n )
    {
      message = "Please select at most one element.";
      return Result.Failed;
    }
    else if( 1==n )
    {
      foreach( Element e in sel.Elements )
      {
        source = e;
      }
    }
    else
    {
      try
      {
        Reference r = sel.PickObject(
          ObjectType.Element,
          "Please select source element." );

        source = doc.GetElement( r.ElementId );
      }
      catch( Autodesk.Revit.Exceptions
        .OperationCanceledException )
      {
        return Result.Cancelled;
      }
    }

    // 1. Looking for the schema in the memory

    Schema schema = Schema.Lookup( new Guid(
      SchemaGuid ) );

    // 2. Check if schema exists in the memory or not

    if( schema == null )
    {
      // 3. Create it, if not

      schema = CreateSchema();
    }

    // 4. Create entity of the specific schema

    var entity = new Entity( schema );

    // 5. Set the value for the Field.

    entity.Set( "SomeValue", 888 );

    // 6. Attach entity to the element

    using( Transaction tx = new Transaction( doc ) )
    {
      tx.Start( "Attach Extensible Storage Data to Source Element" );
      source.SetEntity( entity );
      tx.Commit();
    }

    // Read the extensible storage information
    // from the source element to display

    Entity ent = source.GetEntity( schema );

    string s = ent.Get<int>( "SomeValue" ).ToString();

    // Modify document within a transaction

    using( Transaction tx = new Transaction( doc ) )
    {
      tx.Start( "Create Text Note to Display Extensible Storage Data" );

      BoundingBoxXYZ bb = source.get_BoundingBox( view );

      doc.Create.NewTextNote( view, bb.Max,
        XYZ.BasisX, XYZ.BasisY, 0.0,
        TextAlignFlags.TEF_ALIGN_BOTTOM, s );

      tx.Commit();
    }

    return Result.Succeeded;
  }
}
Here is the CommandMulti implementation.
The biggest irritation here is that we have assembled our list of element ids to store in the extensible storage a generic List<ElementId>, and yet the Revit API forces us to convert them from List to IList to fulfill the restrictive expectations of the Entity.Set method:
[Transaction( TransactionMode.Manual )]
public class CommandMulti : IExternalCommand
{
  const string _schema2_guid = "a6b4fec9-a778-4def-9c5e-1faef5b2a65e";

  private Schema CreateSchema2()
  {
    SchemaBuilder schemaBuilder =
      new SchemaBuilder( new Guid( _schema2_guid ) );

    schemaBuilder.SetSchemaName( "ListOfElementIdsSchema" );

    // Have to define the field name as string and
    // set the type using typeof method

    schemaBuilder.AddArrayField( "ListOfElementIds",
      typeof( ElementId ) );

    return schemaBuilder.Finish();
  }

  public Result Execute(
    ExternalCommandData commandData,
    ref string message,
    ElementSet elements )
  {
    UIApplication uiapp = commandData.Application;
    UIDocument uidoc = uiapp.ActiveUIDocument;
    Application app = uiapp.Application;

    if( null == uidoc )
    {
      message = "Please run this command in a valid project document.";
      return Result.Failed;
    }

    Document doc = uidoc.Document;

    View view = doc.ActiveView;

    if( null == view || ViewType.FloorPlan != view.ViewType )
    {
      message = "Please run this command on a floor plan view.";
      return Result.Failed;
    }

    // Access current selection

    Selection sel = uidoc.Selection;

    int n = sel.Elements.Size;

    List<ElementId> ids = null;

    if( 1 <= n )
    {
      foreach( Element e in sel.Elements )
      {
        ids.Add( e.Id );
      }
    }
    else
    {
      try
      {
        IList<Reference> refs = sel.PickObjects(
          ObjectType.Element,
          "Please select source elements." );

        ids = new List<ElementId>( refs.Count );

        ids.AddRange(
          refs.Select<Reference,ElementId>(
            r => r.ElementId ) );
      }
      catch( Autodesk.Revit.Exceptions.OperationCanceledException )
      {
        return Result.Cancelled;
      }
    }

    // 1. Looking for the schema in the memory

    Schema schema = Schema.Lookup( new Guid( CommandSingle.SchemaGuid ) );

    // 2. Check if schema exists in the memory or not

    if( schema == null )
    {
      // 3. Create it, if not

      schema = CommandSingle.CreateSchema();
    }

    // 4. Create entity of the specific schema

    var entity = new Entity( schema );

    // 5. Set the value for the Field.

    entity.Set( "SomeValue", 888 );

    // Create schema to save list of element ids

    Schema schema2 = Schema.Lookup( new Guid( _schema2_guid ) );

    // 2. Check if schema exists in the memory or not

    if( schema2 == null )
    {
      // 3. Create it, if not

      schema2 = CreateSchema2();
    }

    using( Transaction tx = new Transaction( doc ) )
    {
      tx.Start( "Attach Extensible Storage Data to Source Elements" );
      foreach( ElementId id in ids )
      {
        doc.GetElement( id ).SetEntity( entity );
      }
      tx.Commit();
    }

    // Modify document within a transaction

    using( Transaction tx = new Transaction( doc ) )
    {
      tx.Start( "Create Text Note to Display Extensible Storage Data" );

      List<string> data = new List<string>( ids.Count );

      BoundingBoxXYZ bb = null;

      foreach( ElementId id in ids )
      {
        Element e = doc.GetElement( id );
        if( null == bb )
        {
          bb = e.get_BoundingBox( view );
        }

        // Read the extensible storage information
        // from the source element to display

        Entity ent = e.GetEntity( schema );

        data.Add( ent.Get<int>( "SomeValue" ).ToString() );
      }

      string s = string.Join( ",", data.ToArray() );

      TextNote tn = doc.Create.NewTextNote( view, bb.Max,
        XYZ.BasisX, XYZ.BasisY, 0.0,
        TextAlignFlags.TEF_ALIGN_BOTTOM, s );

      // 4. Create entity of the specific schema

      var entity2 = new Entity( schema2 );

      // 5. Set the value for the Field.

      IList<ElementId> ids2 = ids;

      entity2.Set( "ListOfElementIds", ids2 );

      tn.SetEntity( entity2 );

      tx.Commit();
    }

    return Result.Succeeded;
  }
}
Cloud-based Room Editor Application
My round-trip cloud-based 2D room editor provides a lot of useful functionality for all kinds of tasks, including some of the participants immediate wishes, so we took a deeper look at that, especially how the room and furniture plan view geometry is extracted from the BIM, stored in the cloud data repository, and displayed on mobile device using server-side JavaScript and SVG.
I have not yet published the complete full Revit add-in for this, because I was planning to migrate it from Revit 2013 to 2014 and place it on GitHub first.
However, due to time constraints and popular demand, here is an immediate snapshot of version 2013.0.0.8 of the RoomEditorApp for Revit 2013 in its current state. I already discussed a number of its features. Others have been added since, and I'll go into those in detail when I find time to port this to Revit 2014.
Autodesk at TED and TED Talks on UAV Abilities
TED is a non-profit organisation devoted to Ideas Worth Spreading that started out as a conference bringing together people from three worlds: Technology, Entertainment, Design.
Obviously, this is a perfect fit with the mission of Autodesk, and we are participating enthusiastically at TEDGlobal.

Talking about TED, Philip Smith, CAD Systems Manager at Beca and Sydney Revit API training participant, pointed out some amazing TED presentations on the capabilities of UAVs, Robots that fly and cooperate
Definitely worth watching, and an important area for further exploration.
Beyond Design Revamped
Check out the newly revamped Beyond Design construction blog, now covering more topics, including BIM 360 Field.Vacation Time Next Week
This may be my last post for a while.
I am happy we had such a successful and interesting training and were able to create so many useful and instructive little utilities in just two days.
I am sitting in Dubai airport now, travelling back to Switzerland, and going on vacation next week.
I wish you a good time, and we will continue our Revit API adventures in August!