Family API – Nested Type, Instance and Symbol Retrieval
Welcome to the third and final part of the detailed discussion on use of the Family API in the project environment, covering scenario 3 and the remainder from the following list of topics:
- Family editor product functionality
- Key family concepts
- Building your first parametric Revit family
- Slide deck bullets
- Complete slide decks
- Family API topics
- API scenario 1 – load family and place instances
- Checking whether a family is loaded
- Find a database element by type and name
- Loading a family
- Placing family instances
- Accessing the newly placed instances
- API scenario 2 – select and modify instances
- Creating a new family type
- Selecting instances with pre- and post-selection
- Modifying a family instance symbol
- API scenario 3 – instance and symbol retrieval, nested type modification
- Retrieve specific family symbols
- Retrieve specific family instances
- Display available door panel types
- Modify a nested family type
- External application
- Conclusion and download
- Focus!
The product functionality was presented by Steven Campbell in his classes on the key family concepts at the Revit API DevCamp in Moscow, and API scenario 1-2 are covered by the previous posts on loading a family, placing instances, creating a type, selecting and modifying instances.
API Scenario 3 – Instance and Symbol Retrieval, Nested Type Modification
The previous scenario discussed the manual selection of family instances or other elements using either pre- or post-selection. What if you want to automatically select and modify all instances of a specific type?
This time around, the family that we are driving is more complex, consisting of a kitchen cabinet making use of nested families defining different door styles.
For the modification, we pick a modification of the door style, i.e. a modification of a nested type, which is identified by the element id of the corresponding family type.

The third and final sample command in this series demonstrating use of the family API in the project context is CmdKitchenUpdate. It is designed to be launched in a model representing a kitchen design. It determines all applicable door panel types, automatically selects all kitchen cabinets, displays their current door style, prompts for a new one, and sets the selected type to all cabinets.
Retrieving Specific Family Symbols
The first step in this process is to determine all the available and applicable door panel types.
As always, we make use of a filtered element collector. In this case, we need to retrieve family symbols of the generic model category. To identify the door panel types, we post-process the results using a generic LINQ Where method checking for element names beginning with the substring "Door Panel - " like this:
  // Retrieve all door panel types

  List<Element> door_panel_types = new List<Element>(
    new FilteredElementCollector( doc )
      .OfCategory( BuiltInCategory.OST_GenericModel )
      .OfClass( typeof( FamilySymbol ) )
      .Where<Element>( e => e.Name.StartsWith(
        "Door Panel - " ) ) );
Retrieving Specific Family Instances
In order to globally change the casework door panel type, we need to select all kitchen cabinet instances in the database.
Once again, we use a filtered element collector. Filtering for family instances of the casework category provides two obvious quick filters to apply.
I could apply other filters as well, and would do so if working in a large model.
As a final test I check for the presence of the "Door Panel Type" parameter that I wish to set.
In a large model, for optimal efficiency, I could implement this using a parameter filter. In this small model, however, we can get by just post-processing the results instead, like this:
  // Retrieve all cabinet instances
  // with a door panel type parameter:

  IEnumerable<Element> casework
    = new FilteredElementCollector( doc )
      .OfCategory( BuiltInCategory.OST_Casework )
      .OfClass( typeof( FamilyInstance ) )
      .Where<Element>( e =>
        (null != e.get_Parameter(
          "Door Panel Type" )) );
Display Available Door Panel Types
The retrieval of the available door panel types and the casework elements to apply them to from the database actually constitute the main tasks in this command.
The remainder is pretty trivial:
- Display the current door panel type setting, or '*VARIES*', if several are in use.
- Display a list of all available door panel types and prompt the user to select one.
- Apply the selected type to all cabinet elements.
The two display tasks are handled by the following simple .NET form:
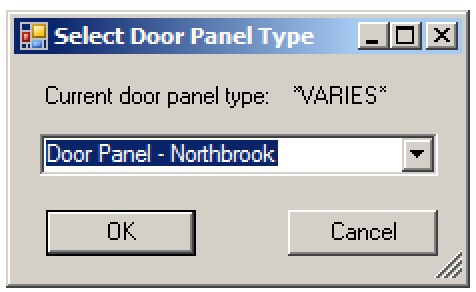
The form stores the list of door panel element types that it receives as an input argument to its constructor as its combo box data source, and displays the Name property of these elements as the combo box selection entries, which leads to an extremely compact and effective implementation.
Furthermore, the selected item can be returned directly as the Revit database element it is:
  public DoorPanelTypeSelectorForm(
    string current_door_panel_type_name,
    IEnumerable<Element> door_panel_types )
  {
    InitializeComponent();
    label2.Text = current_door_panel_type_name;
    comboBox1.DataSource = door_panel_types;
    comboBox1.DisplayMember = "Name";
    comboBox1.SelectedIndex = 0;
  }

  public Element SelectedItem
  {
    get
    {
      return comboBox1.SelectedItem as Element;
    }
  }
Modifying a Nested Family Type
Once the form has been displayed and the user has made her selection, applying the selected door panel type to the cabinet instances is achieved by simply setting the door panel type parameter value to the selected type element id, obviously requiring a transaction:
  // Display form to select new door panel type

  DoorPanelTypeSelectorForm form
    = new DoorPanelTypeSelectorForm(
      current_door_panel_type_name,
      door_panel_types );

  if( System.Windows.Forms.DialogResult.OK
    == form.ShowDialog() )
  {
    FamilySymbol door_panel_type
      = form.SelectedItem as FamilySymbol;

    ElementId id = door_panel_type.Id;

    using( Transaction tx = new Transaction( doc ) )
    {
      tx.Start( "Modify Door Panel Type" );

      foreach( Element e in casework )
      {
        Parameter p = e.get_Parameter(
          "Door Panel Type" );

        p.Set( id );
      }
      tx.Commit();
    }
  }
External Application
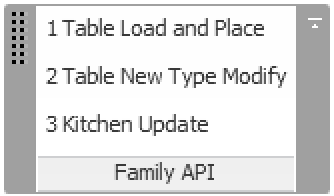
The external application implementation is very simple.
Since we have only three commands to display, we can present them all at once using stacked ribbon buttons:
Here is the complete external application source code:
class App : IExternalApplication
{
  /// <summary>
  /// Add buttons for our three commands
  /// to the ribbon panel.
  /// </summary>
  void PopulatePanel( RibbonPanel p )
  {
    string path = Assembly.GetExecutingAssembly()
      .Location;

    RibbonItemData i1 = new PushButtonData(
        "TableLoadPlace", "1 Table Load and Place",
        path, "FamilyApi.CmdTableLoadPlace" );

    i1.ToolTip = "Load the table family and "
      + "place table instances";

    RibbonItemData i2 = new PushButtonData(
      "TableModify", "2 Table New Type Modify",
      path, "FamilyApi.CmdTableNewTypeModify" );

    i2.ToolTip = "Create new table type and "
      + "modify selected instances";

    RibbonItemData i3 = new PushButtonData(
      "KitchenUpdate", "3 Kitchen Update",
      path, "FamilyApi.CmdKitchenUpdate" );

    i3.ToolTip = "Select and update all "
      + "kitchen cabinets";

    p.AddStackedItems( i1, i2, i3 );
  }

  public Result OnStartup(
    UIControlledApplication a )
  {
    PopulatePanel(
      a.CreateRibbonPanel(
        Util.Caption ) );

    return Result.Succeeded;
  }

  public Result OnShutdown(
    UIControlledApplication a )
  {
    return Result.Succeeded;
  }
}
Conclusion and Download
Ok, I think I finally covered just about everything I have to say about this. Although some points could bear further elaboration...
I am happy with this very pure implementation.
I am a bit surprised that it took three extensive blog posts to cover the material that I presented live in Moscow in less than fifteen minutes. I hope it is useful and appreciated.
For the sake of completeness, here is a slightly updated archive file FamilyApi10.zip containing the complete source code, Visual Studio solution and add-in manifest for this sample, plus the table family RFA and kitchen model RVT to experiment with.
Focus!
Before closing, let me add a pointer to a self-evident aspect of work and time management that we have all heard far too many times and yet bears repeating once again:
A surprisingly simple productivity secret is to identify priorities and then give yourself some time to focus completely on the task at hand for a while, removing all distractions, in particular switching off interruptions such as email and messages for a while.
How many times will I have to continue hearing that message before it finally sinks in?