Correct Detail Component Rotation in Elevation View
My colleague Miroslav Schonauer of Autodesk Consulting ran into and solved a critical issue to fix the unexpected values reported by the Rotation property on detail components in elevation views.
Here are the steps describing the problem and happy resolution in detail, followed by a quick note on my tech summit cloud-based round-trip 2D Revit model editing project:
- Detail component rotation problem 1
- Detail component rotation problem 2
- Workaround description
- Workaround implementation
- Live recording and plans
I was so busy wrapping up the Tech Summit and having internal meetings with colleagues here in the Autodesk Waltham and Manchester offices that I never got around to posting anything in the last two days It is nice to finally take some time and get some fresh information out to you again.
Here is Miro's problem description and solution:
Problem Description 1
I’ve been banging my head against this problem in Revit 2012 that I can reproduce in 2014 as well, both via UI and API. Basically, the Rotation property of LocationPoint for Detail Components in Elevation Views seems to be wrong. It all seems fine in Plan Views, by the way.
For example, if one creates an instance of a 225mm Steel Purlin Detail Item from Arch.Template (top one below), the rotation should be 0, but RevitLookup shows it as 90 degrees. I rotated it by 30 degrees in UI, visually all worked as expected, but the property then reports 93.84 (middle one below, also snapshot provided of RevitLookup) instead of 30. Finally, the bottom instance is rotated by 90 degrees, but the reported value is 120.
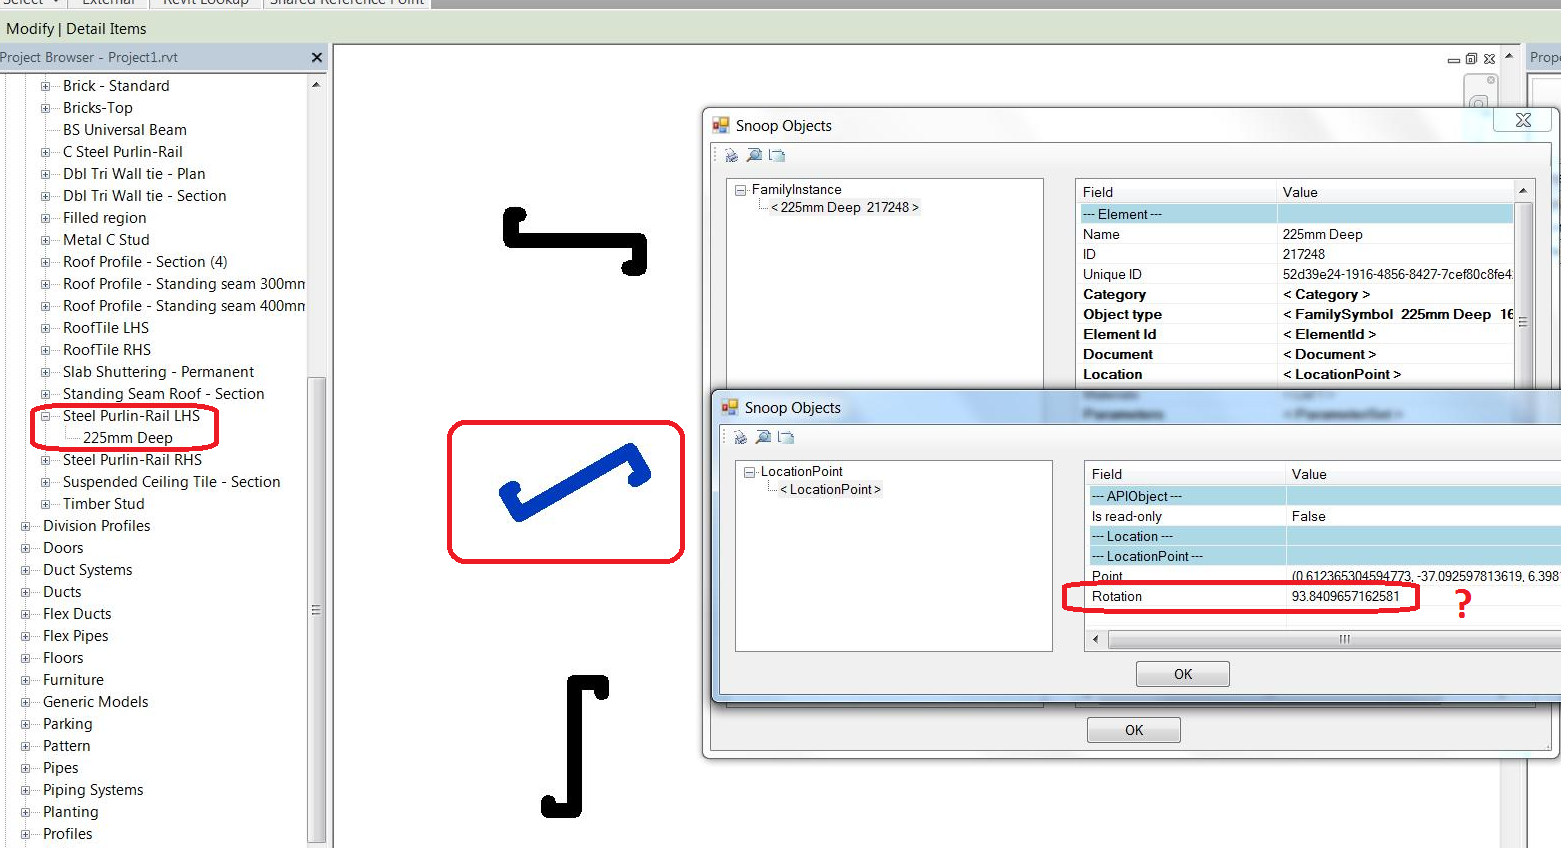
How can I correct the reported value, please?
By experimenting a bit, I’ve concluded that the values reported seem to correspond to the following wrong mapping (in degrees):
| 0 | → | 90 |
| 30 | → | 93.8409 |
| 45 | → | 98.4210 |
| 60 | → | 104.4775 |
| 90 | → | 120 |
| 120 | → | 138.5903 |
| 135 | → | 148.6002 |
| 150 | → | 158.9094 |
| 180 | → | 180 |
By the way, mimicking the actual rotation action in API works fine, just as in UI, e.g. this behaves as expected:
  FamilyInstance fiDetComp = null;

  try
  {
    FamilySymbol fs = doc.get_Element(
      idSymbol ) as FamilySymbol;

    fiDetComp = doc.Create.NewFamilyInstance(
      data.Origin, fs, data.ParentView );

    // Rotate it if needed

    if( Math.Abs( data.Rotation ) > 0.0001 )
    {
      Line axis = app.Create.NewLineBound(
        data.Origin, data.Origin
          + data.ParentView.ViewDirection );

      ElementTransformUtils.RotateElement( doc,
        fiDetComp.Id, axis, data.Rotation );
    }
  }
This produces the correct result, but the Rotation property still reports the wrong value afterwards.
Problem Description 2
I just hit another manifestation of this issue that unfortunately may be a showstopper for the project I am working on.
I cannot believe nobody hit this issue in the last 5-6 years/releases since adding Details Families to the Views (i.e. NewFamilyInstance Method (XYZ, FamilySymbol, View) ) has been supported in API.
It is very easy to reproduce and understand using pure Revit 2014 UI and RevitLookup.
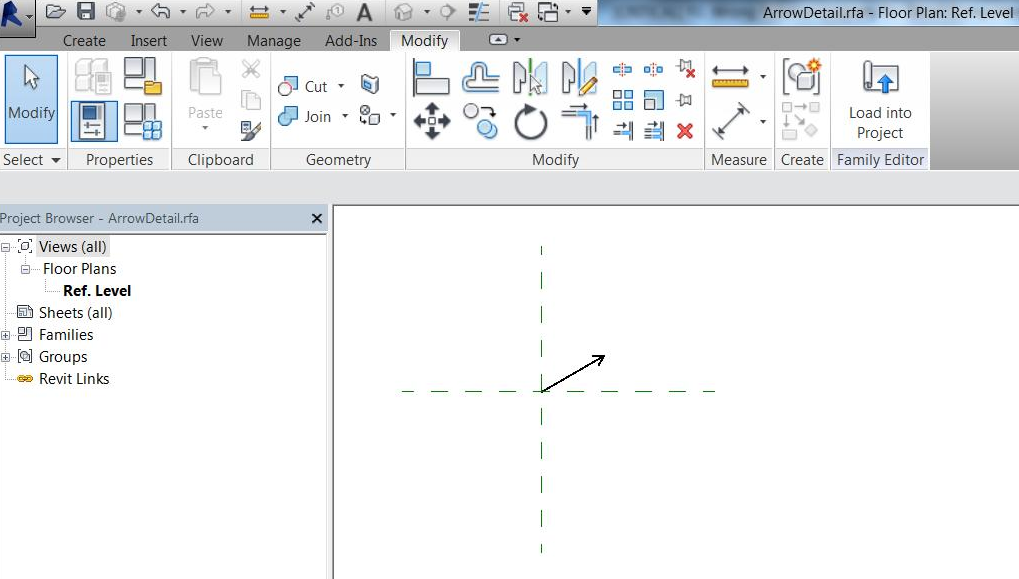
I created a very simple Detail Family from 'Metric Detail Component.rft' template as follows:
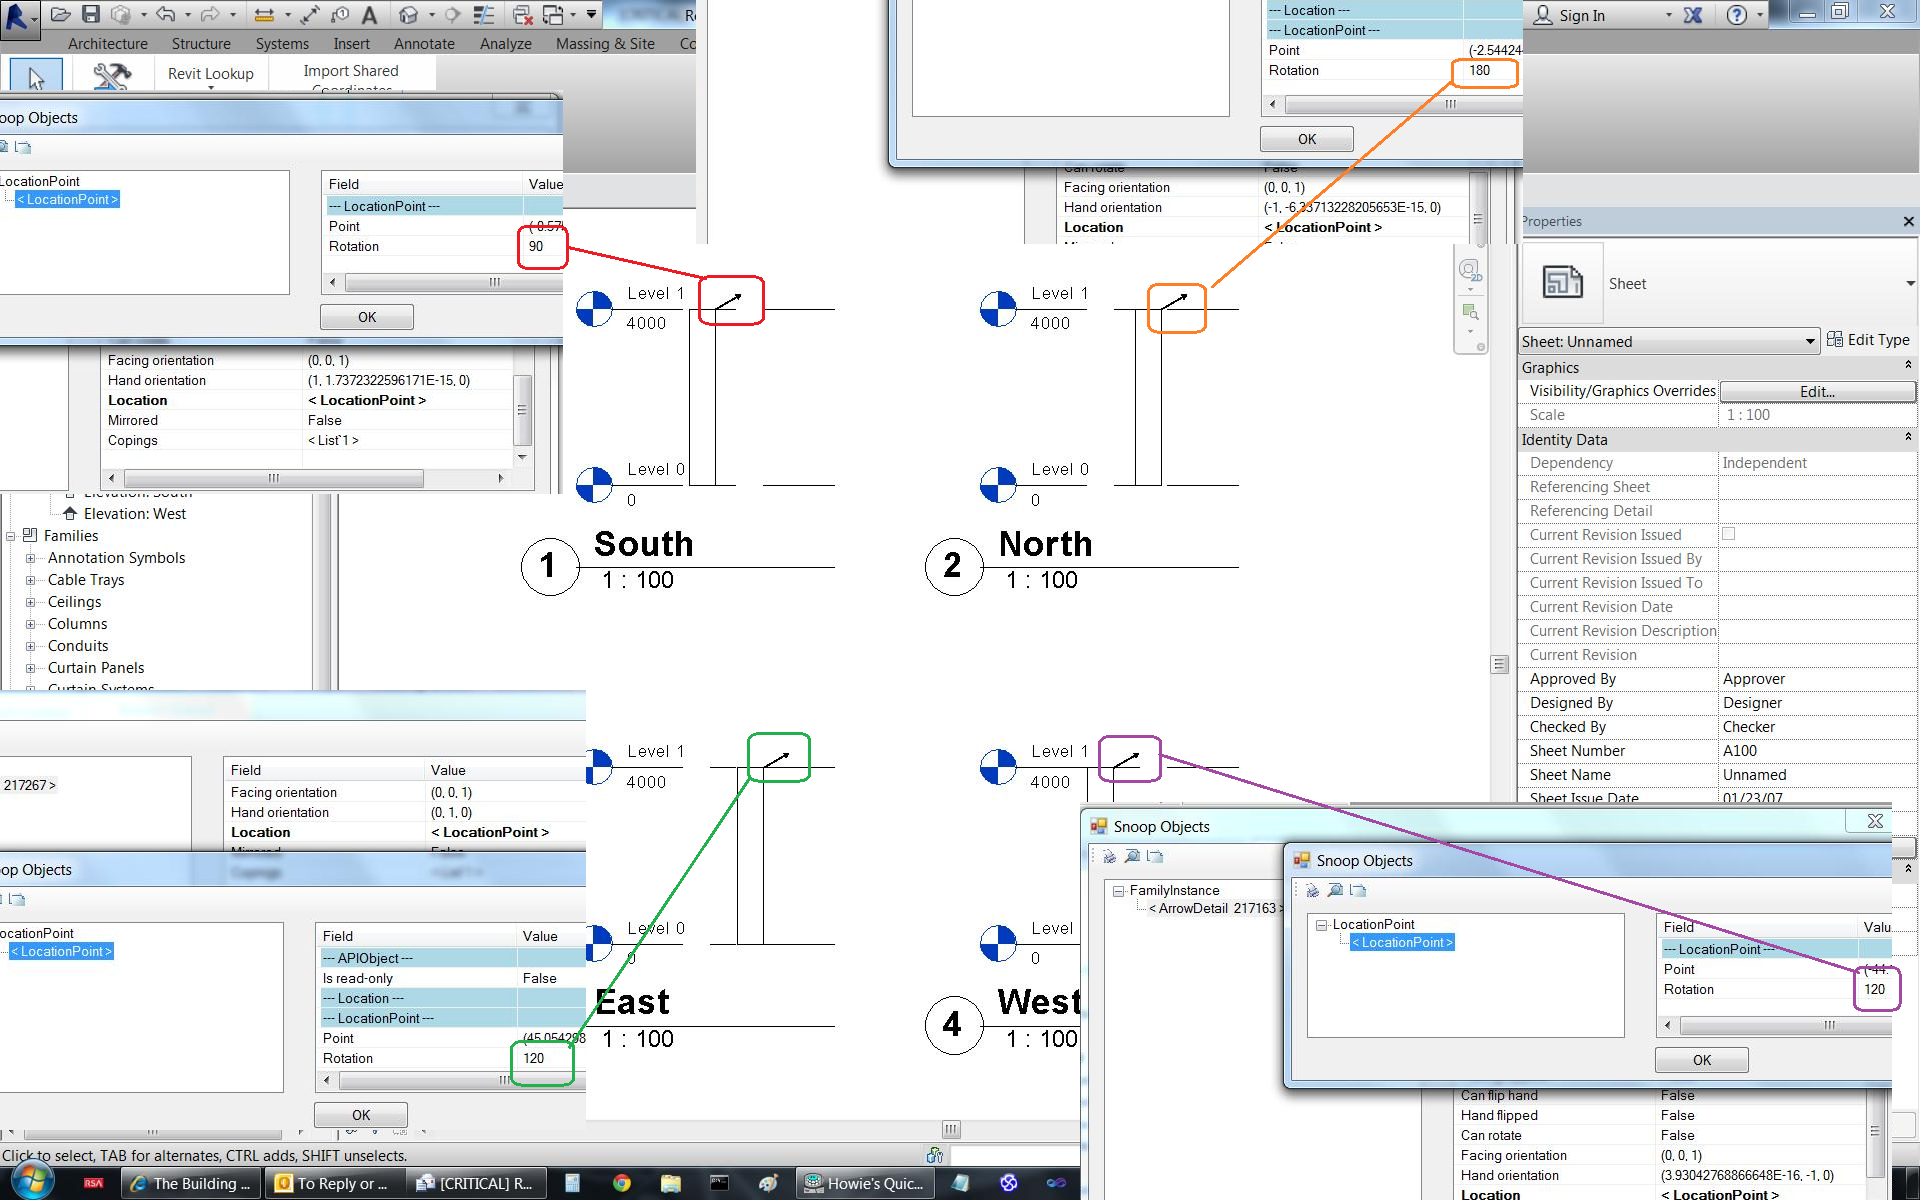
I inserted the same Family Type four times in each of South/North/East/West Views without rotating the instance (i.e. as-is from 'Create Instance' right-click). Each of these family instances looks correct in each view, but the Rotation part of the Location Point, which I would expect to be 0.0 for each case, reports strange results, i.e. 90 degrees for South, 120 for East/West and 180 for North. Just check each of the Arrows in each of the Sheet Views (using 'Activate View' one by one):
The problem is now obviously that when I create family instances programmatically, using something like the following with data.Rotation = 0.0, the results are not as expected, i.e. the instances are weirdly rotated:
  FamilyInstance fiDetComp = null;
  try
  {
    FamilySymbol fs = doc.get_Element(
      idSymbol ) as FamilySymbol;

    fiDetComp = doc.Create.NewFamilyInstance(
      data.Origin, fs, data.ParentView );

    // Rotate it if needed
    if( Math.Abs( data.Rotation ) > 0.0001 )
    {
      Line axis = app.Create.NewLineBound(
        data.Origin, data.Origin
          + data.ParentView.ViewDirection );

      ElementTransformUtils.RotateElement( doc,
        fiDetComp.Id, axis, data.Rotation );
    }
  }
The bottom line is: how can I programmatically know which angle to use in place of data.Rotation in the above code to reliably obtain the expected results? If I use 0.0 as logical to place the component 'unrotated', the result is not as-expected and, even worse, not the same (i.e. rotation is wrong in different manners) in different elevations depending on the view direction of each elevation.
Workaround Description
It seems clear that the Rotation property is not set up properly to deal with items placed outside of the XY plane.
Revit should indeed not be presenting a calculated rotation angle without the corresponding calculated rotation axis that this number comes from.
The fact that sometimes the instance is rotated on placement, but not always, seems to be a second issue to be aware of.
However, more relevantly, here is some good news: you can get what you need working with the result obtained from the FamilyInstance.GetTransform method and computing rotation angles from that.
Here are the routines to help, GetRotationAngleOfInstance and RotateInstance.
GetRotationAngleOfInstance calculates the rotation angle by comparing the transform with the transform generated from the X/Y/Z of the view.
RotateInstance rotates the instance using the view direction – it is hardcoded in this example for testing purposes. You can use the rotation angle difference you calculate and it should work:
public void GetRotationAngleOfInstance()
{
  UIDocument uiDoc = this.ActiveUIDocument;

  Selection selection = uiDoc.Selection;

  foreach( ElementId id in selection.GetElementIds() )
  {
    FamilyInstance fi = uiDoc.Document.GetElement(
      id ) as FamilyInstance;

    Transform trf = fi.GetTransform();

    XYZ viewDirection = uiDoc.ActiveView.ViewDirection;
    XYZ rightDirection = uiDoc.ActiveView.RightDirection;
    XYZ upDirection = uiDoc.ActiveView.UpDirection;

    TaskDialog.Show( "Trf", String.Format(
      "X{0} Y{1} Z{2}\nX{3} Y{4} Z{5}",
      trf.BasisX, trf.BasisY, trf.BasisZ,
      rightDirection, upDirection, viewDirection ) );

    TaskDialog.Show( "Rotation Angle",
      trf.BasisX.AngleOnPlaneTo( rightDirection,
        viewDirection ) * 180 / Math.PI );
  }
}

public void RotateInstance()
{
  UIDocument uiDoc = this.ActiveUIDocument;

  Selection selection = uiDoc.Selection;

  foreach( ElementId id in selection.GetElementIds() )
  {
    FamilyInstance fi = uiDoc.Document.GetElement(
      id ) as FamilyInstance;

    using( Transaction t = new Transaction(
      uiDoc.Document, "Rotate me" ) )
    {
      t.Start();

      LocationPoint lp = fi.Location as LocationPoint;
      XYZ location = lp.Point;
      XYZ direction = uiDoc.ActiveView.ViewDirection;
      Line line = Line.CreateBound( location,
        location - direction );
      lp.Rotate( line, Math.PI / 2.0 );
      t.Commit();
    }
  }
}
Workaround Implementation
I can report that the workaround works very well.
I added one minor adjustment, changing:
  Line line = Line.CreateBound( location,
    location - direction );
I replaced it by this instead:
  Line line = Line.CreateBound( location,
    location + direction );
For convenience, we can also directly use this property:
fi.HandOrientation;
That can replace the following two lines of code:
  Transform trf = fi.GetTransform();

  trf.BasisX;
Here is my implementation code. Some variables/custom classes come from the specific cached context I have set up. Their meaning should be clear from the comments added to them:
  // Loop all cached data
  // NOTE: DetailFaceData is a custom class
  // caching all relevant data about the
  // View / Origin and Rotation
  // to insert each Detail Components into/at.

  foreach( DetailFaceData data in lstDFD )
  {
    // Get Symbol ID.
    // This is the id of the Detail Component
    // FamilySymbol to be inserted

    ElementId idSymbol = GetSymbolId();

    // Insert Symbol

    ElementId idDetComp
      = ElementId.InvalidElementId;

    try
    {
      // 1) Insert with default rotation (should
      // be 0.0, but due to some issues not so -
      // see later)

      using( SubTransaction tr
        = new SubTransaction( doc ) )
      {
        tr.Start();
        FamilySymbol fs = doc.GetElement(
          idSymbol ) as FamilySymbol;

        FamilyInstance fiDetComp = doc.Create
          .NewFamilyInstance( data.Origin, fs,
            data.ParentView );

        idDetComp = fiDetComp.Id;
        tr.Commit();
      }

      // 2) Rotate it if needed
      // IMPORTANT NOTE: The commented 5 lines of
      // code below should be sufficient and fine,
      // but there that rotation is NOT correct
      // for non-planar views :-(.
      // E.g., if using 0 as the rotation, the
      // instance IS weirdly rotated. Luckily, the
      // .Rotate method itself still works fine,
      // so the workaround is to first use the
      // Transform or HandOrientation to "measure
      // the wrongness" and only then to .Rotate
      // it to the desired angle.

      //if (Math.Abs(data.Rotation) > 0.0001)
      //{
      //    Line axis = app.Create.NewLineBound(
      //      data.Origin, data.Origin
      //        + data.ParentView.ViewDirection);
      //    ElementTransformUtils.RotateElement(
      //      doc, fiDetComp. Id, axis, data.Rotation);
      //}

      // 2.1) Use Instance's Transform (or
      // directly HandOrientation) and View Axes
      // to measure which angle (random for non-
      // plan views) Revit has created in step 1)

      using( SubTransaction tr
        = new SubTransaction( doc ) )
      {
        tr.Start();

        FamilyInstance fiDetComp = doc.GetElement(
          idDetComp ) as FamilyInstance;

        XYZ viewDirection = data.ParentView.ViewDirection;
        XYZ rightDirection = data.ParentView.RightDirection;

        double rotActual = fiDetComp.HandOrientation
          .AngleOnPlaneTo( rightDirection,
            viewDirection );

        double rotDelta = data.Rotation - rotActual;

        // 2.2) Use .Rotate to fix the problem

        if( Math.Abs( rotDelta ) > 0.0001 )
        {
          // Either works fine:
          // Option 1:
          Line axis = app.Create.NewLineBound(
            data.Origin, data.Origin
              + data.ParentView.ViewDirection );

          ElementTransformUtils.RotateElement(
            doc, fiDetComp.Id, axis, rotDelta );

          //// Option 2:
          //LocationPoint lp = fiDetComp.Location as LocationPoint;

          //XYZ location = lp.Point;
          //XYZ direction = data.ParentView.ViewDirection;
          //Line axis2 = _App.Create.NewLineBound(location, location + direction);
          //lp.Rotate(axis2, rotDelta);
        }

        tr.Commit();
      }
    }
    catch( Exception ex )
    {
      // log or handle this
      continue;
    }
  }
Very many thanks to Miro for researching this and sharing the solution.
I hope this is of use to others also.
By the way, note that this is the first time ever that Miro provided C# code instead of VB.
What's up, Miro? :-)
Live Recording and Plans
As I already repeated all too often, I presented my cloud-based round-trip 2D Revit model editing project at the Autodesk internal tech summit.
I recorded the session and posted the 30-minute live recording including an additional ten minutes of Q&A at the end.
The 30-minute preview recording that I already posted also remains available, and the content is somewhat different, in case you want the full monty.
Work on this project has not finished yet, of course.
I added a significant number of new features to the Revit add-in that I have not yet discussed.
My plan is to migrate the add-in from Revit 2013 to 2014, post it to GitHub and discuss the new features soon.
Furthermore, the technology implemented has proven effective and reliable so far, and far simpler than any other approach I have seen to achieve similar results, so I should explore where else I can take this.
If you have any suggestions or wishes, please let me know. I might implement whatever you ask for.