External Command Lister and Adding Ribbon Commands
I have been asked a couple of times how you can integrate multiple Revit add-ins from different sources together into a single ribbon panel.
This topic has also been discussed on the web, e.g. towards the end of whether to install to the add-ins tab or make new ribbon tab, and at Autodesk University, where Jose Guia presented CP3766 – Tying All of Your Revit Add-ins into a Pretty Little Ribbon.
Unfortunately, none of these offer any very useful solution, or show or share any code.
I have a very simple approach to suggest, though, which has been around for several years already:
The RvtSamples SDK application reads a text file listing any number of .NET assemblies defining any number of external commands and generates a ribbon panel populated with buttons to launch them all.
Each entry in that file occupies seven lines specifying a group, menu text, description, large image, small image, .NET assembly path and full name of the external command to launch. Here is the first entry in that file:
  Analysis
  EnergyAnalysis Model
  Demonstrates how to use EnergyAnalysisModel API.
  LargeImage:
  Image:
  Z:\...\bin\Debug\EnergyAnalysisModel.dll
  Revit.SDK.Samples.EnergyAnalysisModel.CS.Command
Only the two last lines of the entry are really relevant. Al the rest is decorative, and hopefully informative as well.
In fact, that is the one and only method that I use myself to launch both SDK sample external commands and all The Building Coder sample code.
Furthermore, the text file read by RvtSamples includes support for include files that I implemented back in 2008, similar to the standard C #include pre-processor directive.
The only important information required to populate the RvtSamples text file is the .NET assembly filename of the DLL implementing the external command, and the full external command implementation class name, including its namespace prefix.
Here is the complete EnergyAnalysisModel Revit SDK sample add-in manifest, showing the information corresponding to the lines shown above extracted from RvtSamples.txt:
<?xml version="1.0" encoding="utf-8"?>
<RevitAddIns>
  <AddIn Type="Command">
    <Assembly>Z:\...\bin\Debug\EnergyAnalysisModel.dll</Assembly>
    <ClientId>6f559488-4285-40b7-bfca-043bb69ea0a7</ClientId>
    <FullClassName>Revit.SDK.Samples.EnergyAnalysisModel.CS.Command</FullClassName>
    <Text>EnergyAnalysis Model</Text>
    <Description>Demonstrates how to use EnergyAnalysisModel API.</Description>
    <VisibilityMode>AlwaysVisible</VisibilityMode>
    <VendorId>ADSK</VendorId>
    <VendorDescription>Autodesk, www.autodesk.com</VendorDescription>
  </AddIn>
</RevitAddIns>
As you can see, the content of the Assembly and FullClassName tags correspond exactly to the two last lines specified in the RvtSamples.txt entry.
Where can this information be obtained?
Well, the simplest and most direct source would the add-in manifest, if one is available.
To load an external command on its own, the assembly path and implementation class name are listed in the Assembly and FullClassName add-in manifest tags.
Unfortunately, if the add-in you wish to integrate defines an external application to create a custom panel, it may not list all its command names in the manifest file.
Where can they be obtained from then?
Well, several tools exist which can read .NET assemblies and display their contents.
I talked about Reflector way back in the early days of the blog. It since became commercial. Victor Chekalin mentioned using dotPeek, and my colleague Adam added that he uses the ILSpy .NET decompiler and is perfectly happy with that.
Basically, the information is made accessible via the .NET Reflection namespace functionality.
To make things really simple for you non-programmer guys, I went and implemented a little Revit add-in external command which does nothing but list the full class names of all other external commands defined in any assembly you care to point it at.
It can be run in Revit without even opening a document, in zero document state.
It prompts you to select a DLL file, opens it as a .NET assembly, and uses reflection to determine all the classes defined in it derived from the IExternalCommand interface.
These are listed in a read-only dynamically generated resizable form.
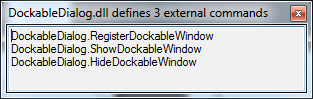
Here is the result of pointing it at the simpler DockableDialog sample I published last week:
The code is very simple.
The ExternalCommandLister class is instantiated with a .NET assembly filename and extracts all external command definitions from it like this:
class ExternalCommandLister
{
  string _assembly_filename;
  string[] _external_commmand_class_names;

  /// <summary>
  /// Display error message
  /// </summary>
  /// <param name="msg">Message to display</param>
  void ErrorMsg( string msg )
  {
    Debug.WriteLine( "External Command Lister: "
      + msg );

    TaskDialog.Show( "External Command Lister",
      msg );
  }

  public ExternalCommandLister(
    string assembly_filename )
  {
    _assembly_filename = assembly_filename;
    _external_commmand_class_names = null;

    if( !File.Exists( assembly_filename ) )
    {
      throw new ArgumentOutOfRangeException(
        "assembly_filename", "file not found" );
    }
    try
    {
      // No need to load the Revit API assemblies,
      // because we are ourselves a Revit API add-in
      // inside of Revit, so they are guaranteed to
      // be present.

      //Assembly revit = Assembly.LoadFrom( "C:/Program Files/Autodesk/Revit Architecture 2014/RevitAPI.dll" );
      //string root = "C:/Program Files/Autodesk Revit Architecture 2014/";
      //Assembly adWindows = Assembly.LoadFrom( root + "AdWindows.dll" );
      //Assembly uiFramework = Assembly.LoadFrom( root + "UIFramework.dll" );
      //Assembly revit = Assembly.LoadFrom( root + "RevitAPI.dll" );

      // Load the selected assembly into
      // the current application domain:

      Assembly asm = Assembly.LoadFrom(
        assembly_filename );

      if( null == asm )
      {
        ErrorMsg( string.Format(
          "Unable to load assembly '{0}'",
          assembly_filename ) );
      }
      else
      {
        IEnumerable<Type> types = asm.GetTypes()
          .Where<Type>( t =>
            null != t.GetInterface(
              "IExternalCommand" ) );

        _external_commmand_class_names = types
          .Select<Type,string>( t => t.FullName )
          .ToArray();
      }
    }
    catch( Exception ex )
    {
      ErrorMsg( string.Format(
        "Exception '{0}' processing assembly '{1}'",
        ex.Message, assembly_filename ) );
    }
  }

  public string AssemblyFilename
  {
    get
    {
      return Path.GetFileName( _assembly_filename );
    }
  }

  public string[] CommandClassnames
  {
    get
    {
      return _external_commmand_class_names;
    }
  }
}
The one single important line is really just
  IEnumerable<Type> types = asm.GetTypes()
    .Where<Type>( t =>
      null != t.GetInterface(
        "IExternalCommand" ) );
It asks the assembly for all the types it defines and extracts the ones derived from IExternalCommand, i.e. the external command implementation classes.
The external command mainline Execute implementation prompts the user to select a DLL file, instantiates an ExternalCommandLister instance, queries the command names and displays them in a form created on the fly like this:
[Transaction( TransactionMode.Manual )]
public class Command : IExternalCommand
{
  /// <summary>
  /// Define the initial .NET assembly folder.
  /// </summary>
  const string _assembly_folder_name
    = "C:\\ProgramData\\Autodesk\\Revit\\Addins\\2014";

  /// <summary>
  /// Select a .NET assembly file in the given folder.
  /// </summary>
  /// <param name="folder">Initial folder.</param>
  /// <param name="filename">Selected filename on success.</param>
  /// <returns>Return true if a file was successfully selected.</returns>
  static bool FileSelect(
    string folder,
    out string filename )
  {
    OpenFileDialog dlg = new OpenFileDialog();
    dlg.Title = "Select .NET Assembly or Cancel to Exit";
    dlg.CheckFileExists = true;
    dlg.CheckPathExists = true;
    dlg.InitialDirectory = folder;
    dlg.Filter = ".NET Assembly DLL Files (*.dll)|*.dll";
    bool rc = ( DialogResult.OK == dlg.ShowDialog() );
    filename = dlg.FileName;
    return rc;
  }

  void DisplayExternalCommands(
    string filename,
    IWin32Window owner )
  {
    ExternalCommandLister lister
      = new ExternalCommandLister( filename );

    string[] a = lister.CommandClassnames;
    int n = a.Length;

    System.Windows.Forms.Form form
      = new System.Windows.Forms.Form();

    form.Size = new Size( 400, 150 );

    form.Text = string.Format(
      "{0} defines {1} external command{2}",
      lister.AssemblyFilename, n,
      ( 1 == n ? "" : "s" ) );

    form.FormBorderStyle
      = FormBorderStyle.SizableToolWindow;

    System.Windows.Forms.TextBox tb
      = new System.Windows.Forms.TextBox();

    tb.Dock = System.Windows.Forms.DockStyle.Fill;
    tb.Location = new System.Drawing.Point( 0, 0 );
    tb.Multiline = true;
    tb.TabIndex = 0;
    tb.WordWrap = false;
    tb.ReadOnly = true;
    tb.Text = string.Join( "\r\n",
      lister.CommandClassnames );

    form.Controls.Add( tb );
    form.ShowDialog( owner );
  }

  public Result Execute(
    ExternalCommandData commandData,
    ref string message,
    ElementSet elements )
  {
    IWin32Window revit_window
      = new JtWindowHandle(
        ComponentManager.ApplicationWindow );

    string filename;

    while( FileSelect(
      _assembly_folder_name,
      out filename ) )
    {
      DisplayExternalCommands( filename,
        revit_window );
    }
    return Result.Succeeded;
  }
}
The reason I implemented this as a Revit command instead of a stand-alone command-line console application was simply to be sure that the Revit API assemblies are already present before I try to load the add-in assemblies.
I implemented such a stand-alone console application in the past that loaded RevitAPI.dll itself, but that was a long time ago. Now the number of Revit API assemblies is larger, and other restrictions may have been added as well.
A complex external command may obviously depend on additional dependencies in addition to the Revit API assemblies. In that case, it might be harder or impossible to simply load it as shown above. One option then might be to load the other add-in into Revit first using its own loading mechanism, and then try to access its assembly data.
Another caveat is the ClientId tag in the external add-in manifest. For the simple add-ins that I create, it is hardly used, except for extensible storage access. It might be important for other applications as well, though.
Here is JtExternalCommandLister.zip containing the complete source code, Visual Studio solution and add-in manifest of this external command.
I hope you find this useful and that it helps resolves discussions such as the one pointed to above.
Addendum by Rudolf Honke of Mensch und Maschine acadGraph GmbH:
If different add-ins create custom ribbon panels in the same tab, whichever one of them arrives last will obviously run into a collision attempting to create a tab that already exists.
Worse still: the Revit API provides no method to query the existence of a specific tab. It may be possible using the .NET UI Automation library.
However, you can always attempt to retrieve a tab with a specific name using GetRibbonPanels(tabName). If the tab does not exist, this method will throw an exception.
The two add-ins could therefore safely add their panels to the same tab using the following approach:
public Autodesk.Revit.UI.Result OnStartup(
  UIControlledApplication application )
{
  string tabName = "TBC";
  string panelName = "TBC";

  try
  {
    List<RibbonPanel> panels = application
      .GetRibbonPanels( tabName );
  }
  catch
  {
    // Tab "TBC" does not yet exist,
    // so create new

    application.CreateRibbonTab( tabName );
  }

  RibbonPanel panel = application
    .CreateRibbonPanel( tabName, panelName );

  // Add your buttons here

  return Result.Succeeded;
}
In principle, this approach may be regarded as bad coding style, because exceptions are and should remain exceptional.
Since there is no other way to obtain the required information in this case, though, one is left no choice.
Actually an alternative might exist using the .NET UIAutomation library, but such an approach may be awfully slow.