Grouping Schedule Headers and How to Do Something
Here is my first real Revit 2014 post, sharing some code friendlily provided by David Robison of Design Master showing how to use the ViewSchedule.GroupHeaders method.
Using the ViewSchedule GroupHeaders Method
Question: I am trying to call ViewSchedule.GroupHeaders, and it keeps throwing an unhandled argument exception saying "Headers could not be grouped. Parameter name: right".
Answer: Yes, this issue has been raised in the past and a few solutions were suggested.
First case
The ViewSchedule.GroupHeaders produces the argument exception mentioned above.
After a schedule is created, however, calling it directly with the same parameters succeeds, so the issue is not related to the arguments provided.
I investigated this issue and found 2 workarounds:
- Activate the new schedule view and then group the header.
- Refresh the new schedule view and then group the header when the schedule is out of data.
It seems that the second workaround is the right way to 'fix' this issue. We have to manually refresh the schedule data if the view is out of data. This behaviour is by design.
Second case
The API cannot get the updated value in Body section if the schedule view is not opened.
Close the schedule view:
- IsCellOverridden returns True;
- ResetCellOverride;
- IsCellOverridden also returns True;
Open the schedule view:
- IsCellOverridden returns True;
- ResetCellOverride;
- IsCellOverridden returns False (as expected);
The workaround is to call viewSchedule.GetTableData again.
The API calls will not work in the body section if the schedule view is closed.
The root cause is that the schedule data (especially the body section) will not be updated if the schedule view is closed.
This is no problem for the user interface, and improves performance because the schedule data is not regenerated. It does cause a problem in the API, though.
Response: I got this to work using the suggestion in first case #1.
I created the schedule, closed the transaction, set the schedule to the ActiveView and then grouped the headers.
I also discovered that the column indexes ignore hidden columns.
Here is a sample external command demonstrating the ViewSchedule.GroupHeaders function. Please note the comments describing some of the steps in more detail:
public Result Execute(
  ExternalCommandData commandData,
  ref string message,
  ElementSet elements )
{
  try
  {
    UIDocument uidoc = commandData.Application
      .ActiveUIDocument;

    Document doc = uidoc.Document;

    // Create the schedule

    Transaction tran = new Transaction( doc );
    tran.Start( "Create schedule" );

    ViewSchedule sampleSchedule
      = ViewSchedule.CreateSchedule( doc, new
        ElementId( BuiltInCategory.OST_Windows ) );

    foreach( ElementId id in
      ViewSchedule.GetAvailableParameters( doc, new
        ElementId( BuiltInCategory.OST_Windows ) ) )
    {
      try
      {
        sampleSchedule.Definition.AddField(
          new SchedulableField(
            ScheduleFieldType.Instance, id ) );
      }
      catch( Exception )
      {
      }
    }
    ScheduleDefinition sampleDefinition
      = sampleSchedule.Definition;

    // Hide two columns in the schedule

    sampleDefinition.GetField( 0 ).IsHidden = true;
    sampleDefinition.GetField( 1 ).IsHidden = true;

    // Commit the schedule. This is important so
    // you can set the active view.

    tran.Commit();

    // Change the active view to the schedule.
    // This is required before the GroupHeaders
    // function will work.

    uidoc.ActiveView = sampleSchedule;

    // Group the last three headers.
    // Hidden fields are not counted in the left
    // and right values, so make sure to account
    // for that.

    tran.Start( "Group headers" );

    int iFieldCount = sampleDefinition
      .GetFieldCount();

    sampleSchedule.GroupHeaders( 0,
      iFieldCount - 5, 0,
      iFieldCount - 3, "Group Header" );

    tran.Commit();

    return Result.Succeeded;
  }
  catch( Exception ex )
  {
    MessageBox.Show( ex.ToString(),
      "Group Headers Sample" );

    return Result.Failed;
  }
}
Here are two important pieces of information I learned:
- You have to set the active view to the schedule before the GroupHeaders method will work.
- The left and right indices do not include hidden columns, so you need to make sure to adjust for those.
For completeness' sake, here is GroupHeadersSampler.zip containing the complete source code, Visual Studio solution and add-in manifest for this command.
Many thanks to David for testing this and sharing the code. Hopefully you are able to make good use of this sample.
Before closing, here is are some thoughts on how to research automating something using the Revit API in general, the kind of suggestions I regularly provide orally and seldom wind up putting down clearly and separately in writing:
How to Research Automating Something
Question: I would like to create a dimension that differs from the normal linear dimension style within the template.
Here is an example of the normal dimension style and the modified variant I would like, with the dimension text sticking out on the side like this instead:
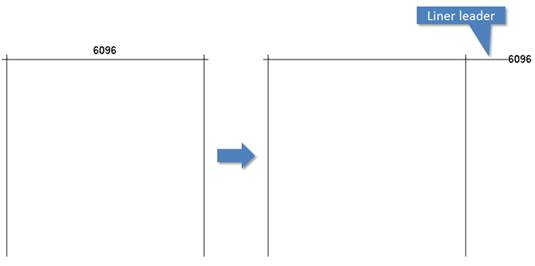
How can I realise this programmatically, please?
Answer: There is a simple standard procedure for exploring this kind of issue.
First of all, determine whether what you wish is possible manually in the user interface.
If not, then it is probably not possible programmatically either.
If yes, then the two models before and after can be compared using RevitLookup, included with the Revit SDK, to analyse the differences.
That might give a hint how to achieve it programmatically.
If no differences can be found, then it is maybe impossible.
In this case, you can apparently achieve your goal manually, so the first hurdle is already taken.
Looking at the NewDimension method and the Dimension class members, I see no obvious input arguments or properties that might affect the dimension in the desired way.
Therefore, the only remaining things to check are the parameters on the dimension object.
You can list those before and after using RevitLookup or the built-in parameter BipChecker and compare.
I hope this helps.
Response: Yes, as you say, I know that it is possible to create this manually.
And yes, the text position and leader information are not shown in the standard UI, nor visible in RevitLookup.
I guess that this specific task cannot be achieved programmatically at this moment, then.
Answer: Sorry about that.
I hope the standard exploration procedure described above will prove useful anyway.