Ribbon Creation Utility
Creating and populating a ribbon panel is not a very complicated matter, although it normally does require instantiating and manipulating quite a number of different cooperating class instances.
Now Victor Chekalin, or Виктор Чекалин, presents a much simpler solution for this using dedicated wrapper classes.
Create Buttons without Effort
As you know, you can create your own buttons or even your own tab in the Revit ribbon to perform a command.
For me, creating button always wasn't easy. Especially I didn't like to pass the assembly location and name of the external Command class to perform when I click the button. Also, the standard API requires me to create an ImageSource for each button image while I have an image stored in the assembly resources.
To avoid these troubles and ease my life I decided to create a utility which helps me to create my Revit ribbon buttons. The utility I created is really useful for me and I want to share it with everybody.
Here are the main features:
- Fluent interface: You can create all your buttons in one single line of code.
- Command name as generic parameter: You don't need to write the command name as text and set the assembly location.
- Images from resource: You can easily use images from resources.
The sample below illustrates all this.
This is the result in the Revit ribbon:
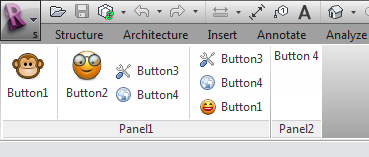
Look at the source code generating it:
  Ribbon ribbon = new Ribbon( a );

  ribbon.Tab( "MyTab" )
    .Panel( "Panel1" )

    .CreateButton( "btn1", "Button1",
      typeof( Command1 ),
      btn => btn
        .SetLargeImage(
          Resources._1348119708_face_monkey_32 )
        .SetSmallImage(
          Resources._1348119708_face_monkey_16 ) )

    .CreateSeparator()

    .CreateButton<Command2>( "btn2", "Button2",
      btn => btn
        .SetLongDescription(
          "This is a description of the button2" )
        .SetLargeImage(
          Resources._1348119643_face_glasses_32 ) )

    .CreateStackedItems( si => si

      .CreateButton<Command3>( "btn3", "Button3",
        btn => btn.SetSmallImage( Resources
          ._1348119594_preferences_system_16 ) )

      .CreateButton<Command4>( "btn4", "Button4",
        btn => btn.SetSmallImage( Resources
          ._1348119621_internet_web_browser_16 ) ) )

    .CreateSeparator()

    .CreateStackedItems( si => si

      .CreateButton<Command3>( "btn3_1", "Button3",
        btn => btn.SetSmallImage( Resources
          ._1348119594_preferences_system_16 ) )

      .CreateButton<Command4>( "btn4_1", "Button4",
        btn => btn.SetSmallImage( Resources
          ._1348119621_internet_web_browser_16 ) )

      .CreateButton<Command1>( "btn1_1", "Button1",
        btn => btn.SetSmallImage( Resources
          ._1348119553_face_smile_big_16 ) ) );
Pretty easy, isn't it?
At first I set the tab, where I want to create my buttons. I can specify my own tab or one of the system tabs, e.g. Autodesk.Revit.UI.Tab.AddIns. If the tab doesn't exist, it will be created. So, you can easily use a tab from a different add-in. You specify a panel to group the buttons on the tab. Next, the most important part, create the buttons. I won't describe how to create the buttons. The code is self-explanatory.
My utility currently supports push button, push button as stacked item and separator.
Here is the compiled assembly.
The source code is available on GitHub. You can also download it as a zip archive file.
It provides the namespaces VCRevitRibbonUtil and VCRevitRibbonUtil.Helpers containing the following classes:
- StackedItem
- Button
- Panel
- Ribbon
- Tab
- Helpers.BitmapSourceConverter
Many thanks to Victor for this neat time and labour saving utility!