Boolean Operations and InstanceVoidCutUtils
I mentioned last week that I plan to take a look at Boolean operation in the family creation context. Before we do so, however, here is an overview of some of the Boolean operation functionality provided by the Revit API and the use of one of the approaches in the project context.
In the past, the Revit API did not offer many possibilities to perform Boolean operations in the project itself.
The standard approach to perform a Boolean operation within a family is to use the Document.CombineElements method. Its use is limited to certain element types.
Another possibility to perform Boolean operation within the family context was provided by the SolidSolidCutUtils class introduced in the Revit 2011 API. It use is demonstrated by the SolidSolidCut SDK sample, which is hardcoded to run in the SolidSolidCut.rfa family sample file. As noted in its readme file, this solid-solid cut operation only works when editing a conceptual mass family.
If you needed a large number of similar but different elements in a project, the solution of choice in Revit 2011 seemed to be to create individual families for each such instance and insert each one into the project, but that places a heavy burden on the project.
The Revit 2012 API introduces two new possibilities for performing Boolean operations, provided by the BooleanOperationsUtils and the InstanceVoidCutUtils classes. It also generalises the SolidSolidCutUtils class so that it can be used in the project context as well as in a family.
First of all, here and now, let's take a look at how to use the new InstanceVoidCutUtils functionality:
Question: Is there any documentation for InstanceVoidCutUtils available? Examples?
Answer: Just like all other classes, methods and properties provided by the Revit SDK, the Revit API help file RevitAPI.chm provides basic documentation on the InstanceVoidCutUtils class and its properties and methods. As it says there, this class provides utility methods for cutting elements by unattached voids in family instances.
As mentioned above, the Revit API now provides several possibilities to perform Boolean operations in the project model:
- BooleanOperationsUtils: this class creates non-element geometry. The generated geometry can be displayed to the user using the AnalysisVisualizationFramework to paint colours on the surfaces created, but it cannot create elements or participate in the saved model in any way. The SDK sample GeometryCreation_BooleanOperation in the GeometryAPI subdirectory of the Samples folder demonstrates its use and implements a handy wrapper class for it.
- InstanceVoidCutUtils: added in the Revit 2012 API. This a powerful method to cut a database element using an unattached void in a family instance. It should be used sparingly, as any void element introduced at the project level will be fully selectable by the user (and modifiable/deletable/etc.). So it's not really appropriate to use this to cut the ends of beams with square blocks, because the blocks can be picked. It may be more useful for fine tuned work like drilling individual holes in members, if the holes cannot be included as a part of the family definition in the first place.
- SolidSolidCutUtils: this class was not documented correctly. It does work in the project environment now in Revit 2012, both in the UI and API. There are limitations about what elements are supported by this utility, and some exploration may be needed.
Now, to answer your question on making use of the InstanceVoidCutUtils class: as in most cases with the Revit API, the first step in to determine how it is done manually.
First of all, you need to create a family to encapsulate the unattached voids you want to use for cutting. A good place to start is to study the Families Guide (still the Revit 2010 version):
In there, you can for instance look at the section Loadable Families Overview > Creating Loadable Families > Creating a Loadable Family > Creating Family Geometry > Creating Solid (3D) Geometry > Cut Geometry.
Once the manual steps are known, one can explore how to reproduce them programmatically.
Here is a sample void cutter family cutter.zip. To use it, you perform steps along the lines of the following pseudo-code:
  Element element;
  FamilySymbol fs;

  // . . .

  PlanarFace planarFace = facesToAttach[i]
    as PlanarFace;

  // . . .

  XYZ xyzOrigin = planarFace.Origin;

  FamilyInstance cuttingInstance
    = _doc.Create.NewFamilyInstance(
      facesToAttach[i], xyzOrigin, vecY, fs );

  Parameter parAngle3 = cuttingInstance
    .get_Parameter( "A3" );

  Utils.ParameterSet( parAngle3, angles[i] );

  InstanceVoidCutUtils.AddInstanceVoidCut(
    _doc, element, cuttingInstance );
As mentioned above, this approach should not be used for applying a modification systematically to a huge number of family instances, but used sparingly it works fine.
Here is a similar snippet of sample pseudo-code for used to create a recess in a wall:
  FamilySymbol polyRecessFamily;
  Wall wall;

  // . . .

  FamilyInstance recessElement
    = _doc.Create.NewFamilyInstance(
      face, pos, XYZ.Zero, polyRecessFamily );

  recessElement.SetParameter( "Countersinking",
    UnitConversion.ToFeet( recess.CounterSinking ) );

  if( InstanceVoidCutUtils.CanBeCutWithVoid( wall ) )
  {
    InstanceVoidCutUtils.AddInstanceVoidCut(
      _doc, wall, recessElement );
  }
You need to ensure that the void cutter family has the 'Cut with Void When Loaded' parameter checked:
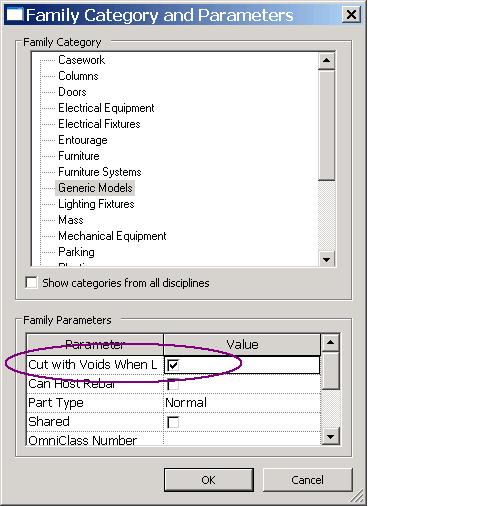
If this is not the case, the void is not an "Unattached" void, and it will throw an exception saying
"The element is not a family instance with an unattached void that can cut. Parameter name: cuttingInstance".
I trust this will help understand the options available and help you get started using the InstanceVoidCutUtils.
Next one coming up: use of the Document.CombineElements method to create the window frame joinery using extruded profiles in a programmatically generated window family.