Editing Elements inside Groups
Today is the last day here with my brother Marcus in Pattaya. We had a look at the Sanctuary of Truth yesterday and I posted some photos from the beach in front of it, which was surprisingly quiet and lonely:

Early tomorrow morning I will be heading off towards Cambodia and Angkor Wat, then spend a day or two in Bangkok, and return back here again to pick up my parked things before heading back to the airport.
I am a bit leery of taking any valuables with me to Cambodia, so the computer will be staying behind and I will remain offline for a week or so. So this is the last post you will see for a couple of days, and I will not be answering comments either for a while.
Returning to the Revit API, I discussed some aspects of Revit element groups in the past, such as how to create and rename a group. Here is another question on the topic of groups that came up repeatedly:
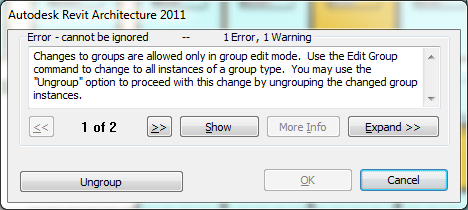
Question: I am having trouble changing parameters of an element inside of a group that occurs in multiple locations in a project. Revit is displays the following error message:

If I were doing this operation outside of the API I would first select the group, click "Edit Group", make the changes, and then click Finish. I'm not sure how to access the "edit group" functionality programmatically. I could ungroup the group, make changes, and then regroup it using the API but that would create new duplicate groups with different names.
Answer: Unfortunately, the workaround you describe is the only way to achieve this at the moment.
You have to ungroup a group before being able to modify elements in it.
The document 'Getting Started with the Revit API.doc' in the Revit SDK provides the following information on this in the Question and Answer section:
Q: When exporting a model containing groups to an external program, the user receives an error at the end of the export:
"Changes to group "Group 1" are allowed only in group edit mode. Use the Edit Group command to make the change to all instances of the group. You may use the "Ungroup" option to proceed with this change by ungrouping the changed group instances."
A: Currently the API does not permit changes to members of groups. You can programmatically ungroup, make the change, regroup and then swap the other instances of the old group to the new group to get the same effect.
By the way, there are a number of other interesting questions addressed in that section as well, so it is well worth having a look at them.
Here is another version of the same question that I discussed in more depth with Henrik Bengtsson of Lindab. This discussion highlights some additional points:
Question: I am trying to move and rotate items inside a group but I cannot get it to work.
The actual problem is not so much to move or rotate the elements within the group as to get rid of the warning dialogue that pops up when something is changed inside an already existing group.
Can you provide a solution for moving and rotating elements within groups and avoiding this dialogue?
Answer: I am sorry to say that you cannot change an element as long as it resides in a group, not even modify their parameters. In a previous case, a customer tried to edit parameter value of many elements included in a group. This failed, especially in large models. The workaround is ungroup the group first, edit the parameters, and then regroup the elements again.
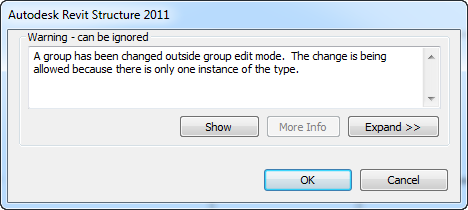
Actually, an element parameter can indeed be edited and its parameter value changed when the element is contained in a group. However, a warning dialog is displayed saying 'A group has been changed outside group edit mode. The change is being allowed because there is only one instance of the type'. If one clicks 'OK', then the elements in group are changed. The only bother is the warning dialog. If you really insist on going this way, the dialogue can probably be suppressed by various means. There are several different possible ways to suppress unwanted dialogues in Revit 2011:
- The old method using the DialogBoxShowing event that was already available in Revit 2010, which can be used to dismiss a dialogue programmatically.
- The comprehensive failure processing API added to the Revit 2011 API, which can do much more than that.
- If all else fails and you just want to get rid of the dialogue box by any means, you can also use the Windows API to detect when it is displayed and dismiss it using my dialogue clicker application.
However, the situation described above is only true and the suppression of the warning message will only work for one single instance of the group. If there are multiple instances, the whole editing operations fails. With large models and lots of groups, one can reportedly crash Revit by attempting to modify parameters of grouped element without ungrouping them first.
So I would suggest trying the same workaround in your case as well: ungroup the group, make the required modifications to the elements, and create a new group of them again.
Response: Excellent work, as always...
The solution using the dialogue event did not work out for me. First of all, the group element selected when the command was executed was left in the model with a yellow colour when the command was finished. Secondly, the dialog pops up before it is closed down by the override method. It isn't completely pretty if that solution is included in an application for customers. If it has been an internal routine it wouldn't have mattered...
The second solution that you mentioned covering the Failure API worked like a rocket. I cannot see any problems with that at all, it just works perfectly. I took me some time to find the right BuiltInFailureID though ;-)
The third option is of course always a possibility but the Failure API wins this match by far!
When it comes to editing groups, there are two types of scenarios for me.
- Change of parameter values in a group which is present in the model only once. This is possible to achieve using the API, but the problem has been the warning dialog. This is now handled with the Failure API.
- Change of parameter values in a group which is present in the model more than once. Since this cannot be committed no matter what, I have handled this scenario before it can occur using our application. If the user tries to edit a group like that, I display a warning dialog if the group.grouptype.size is larger than one.
In my application, I will never encounter a case were the geometry content has to be changed in a group, because any changes in one of the groups causes the group to be deleted, re-created and placed in the model
If the need arises in the future, I can go for the solution you suggested and explode and regroup the items in the element set.
Here is the warning message I get:

It is not exactly the same as the one above, which is a sort of dead end, since the continue button is missing.
Here is some code from my project demonstrating the use of the Failure API and my IFailuresPreprocessor implementation. I have removed unnecessary bits to make it as clear and simple as possible:
Public Function Execute( _
  ByVal commandData As ExternalCommandData, _
  ByRef message As String, _
  ByVal elements As ElementSet) _
  As Result Implements IExternalCommand.Execute

  Dim trans As Transaction = Nothing
  Dim ebRes As Boolean

  Try
    Dim ret As Result = Nothing

    Dim app As Application _
      = commandData.Application.Application

    Dim uidoc As UIDocument = app.ActiveUIDocument
    Dim doc As Document = uidoc.Document

    Dim es As ElementSet = uidoc.Selection.Elements

    trans = New Transaction(doc, "MyCommand")
    trans.Start()

    Dim fhOpt As FailureHandlingOptions _
      = trans.GetFailureHandlingOptions()

    fhOpt.SetFailuresPreprocessor(New clsWallInfoFailure)

    trans.SetFailureHandlingOptions(fhOpt)

    ebRes = ChangeParametersAndSoOn(app, uidoc, doc, es)

    If ebRes = True Then
      trans.Commit()
    Else
      trans.RollBack()
    End If

  Catch ex As Exception
    trans.RollBack()
  Finally
    trans.Dispose()
  End Try
End Function

Public Class clsWallInfoFailure
  Implements IFailuresPreprocessor

  Public Function PreprocessFailures( _
    ByVal failuresAccessor As FailuresAccessor) _
    As FailureProcessingResult _
    Implements IFailuresPreprocessor.PreprocessFailures

    Dim deleteWarning As Boolean

    Try
      Dim flist As List(Of FailureMessageAccessor) _
        = failuresAccessor.GetFailureMessages

      For Each f As FailureMessageAccessor In flist

        Dim fDefId As FailureDefinitionId = f.GetFailureDefinitionId

        Select Case fDefId
          Case BuiltInFailures.GroupFailures.AtomViolationWhenOnePlaceInstance
            deleteWarning = True
        End Select

        If deleteWarning = True Then
          failuresAccessor.DeleteWarning(f)
        End If
      Next

    Catch ex As Exception

    End Try
  End Function
End Class
Comment: One final little comment from Jeremy regarding the coding style using statements such as this:
If ebRes = True Then
I find the following statement more succinct and readable, and actually more correct:
If ebRes Then
Please refer to Kean's post on testing truth for a more in-depth discussion and further comments on this topic.