Modeless Loose Connectors
One of the most enthusiastically received samples I presented at the AEC DevCamp conference has also proved a valuable resource since then, in answering various questions on modeless dialogues and ensuring that the Revit application main window becomes the foreground window in certain situations. It demonstrates how we can combine several ubiquitously useful pieces of functionality that we already discussed in the past to implement a homogenous whole. We create an application which collects information from the Revit model and then displays it in a context that is pretty independent of Revit yet allows very close interaction with the Revit model.
This is the continuation and final instalment on the series on navigating through unconnected connectors in Revit MEP. So far, we covered the following topics:
- Retrieving MEP elements and connectors.
- Determining and hooking up a modeless form with the Revit parent window.
- Populating a data grid view.
After populating and displaying the data grid view, all that remains is to implement the interaction from it with Revit. The challenging aspect of this is the fact that the modeless form is not in a Revit API context, and the Revit API is not asynchronously accessible. As mentioned and as you can see from the last line of the implementation of the Execute method, we can work around that using the Idling event.
In short, the modeless dialogue passes back a pending element id to the command class. In the Idling event handler, the pending element id is picked up and displayed to the user on the Revit graphics screen.
This actually shows that the challenge of driving Revit from outside can now be addressed pretty reliably and seamlessly, while it was not really solvable at all in prior releases.
Here is an overview of the complete functionality of the loose connectors sample:
- Determine unconnected connectors in a Revit MEP model.
- Filter for all MEP elements that can host connectors.
- Iterate over the element connectors and list all unconnected ones
- Display a modeless dialogue as a child window of the Revit main application displaying a list of the loose connectors.
- Determine the main Revit application window handle.
- Display a modeless Windows form and assign Revit as its parent window.
- Drive Revit from outside from the modeless dialogue box using the idling event.
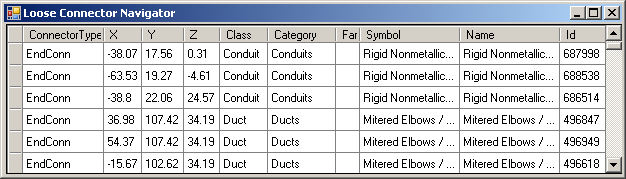
- The modeless form lists all unconnected connectors in a data grid view.
- The user can double click on any one of the listed connectors.
- This selection is relayed to Revit via the Idling event, which causes Revit to switch to an appropriate view and zoom to display and highlight the element hosting the selected connector.
Its implementation was originally triggered by the following question and suggestion from Martin Schmid:
Martin's Proposal
I was wondering if there was a straight forward way to find all 'open' connections via the API?
Is there a generic way to get all 'Connectors' in a model, and then check if they are connected to another connector? Otherwise, I presume one would have to check all object instances that may have an MEP model, and check their Connector Manager for the connectors.
I think a sample that is able to find unconnected connectors (Duct, Pipe, Conduit, and Cable Tray) would be useful, because currently the UI doesn't provide a way to identify, for example, disconnected duct segments or fittings, etc.
A very nice to have additional feature would be to list all the unconnected elements and be able to click on a part to zoom to it in the Revit model, to step through the results. It would be most useful if you could zoom to part, fix the connection, then zoom to the next part. Not sure how practical that is because in many cases you'd have to switch views and the like, unless the 'results' could be modeless.
Additional Loose Connector Sample Features
In addition to the main required functionality, the sample implements a couple of additional ones not directly related to its main functionality and are useful in many generic add-in development areas:
- Write and display a text-based log file.
- Use a simple data container to populate a data grid view with minimal coding effort.
- Use a sortable binding list to add sorting functionality to the data grid view columns.
As you noticed, all these topics that I wanted to dive into makes it almost more work to document than to implement, which is why it has taken me a while to get around to finally completing this overview, and requiring it to be split up into several separate posts to keep them down to a reasonable and manageable size.
Idling Event
I already discussed one example of driving Revit from outside using the idling event to display a continuously updated webcam image on the face of a Revit building element. In that case, the webcam image update event triggered an update in the Revit model. In the current sample, the double click of the user triggers a reaction in Revit, so the interaction seems very snappy. I have yet another sample up my sleeve which also reacts to an external event which can be triggered either by user interaction or programmatically, by detecting when the last modified timestamp of an external file on disk is updated and then automatically importing changes and modifying the Revit model.
In those cases, however, the external event is actually not driving Revit directly. On the contrary, we are making use of the Revit Idling event which is polling, i.e. checking whether a certain flag or signal has been set by the external event, and then reacting to that.
The apparent snappiness of the reaction is due to the fact that the Idling event is triggered very frequently when Revit is not busy with other tasks, possibly hundreds of times per second.
So how can we use the Idling event to really drive Revit from outside, i.e. react immediately to a double click in our external modeless loose connector navigator form and react to that input within Revit through the Revit API?
So far, we discussed how to retrieve the MEP elements and connectors, determine the Revit parent window and attach a form to it, and populate and display the modeless form.
We set up Revit as the parent window of the modeless form, ensuring that it stays on top of Revit when Revit is visible, and also that it is minimised when the user minimises Revit.
Driving Revit From Outside Revisited
Now let's discuss how to drive Revit from the modeless form, which is technically outside of Revit, and does not have synchronous access to the Revit API.
The form is populated with the unconnected connectors, and our intention is for the user to double click on an element to zoom to it in Revit.
The double click event is handled by subscribing to the CellDoubleClick event of the data grid view, which is the only widget displayed by our form.
Once we are within a valid Revit API context, we can zoom to the desired element by calling the UIDocument ShowElements method.
The question is how to get from one to the other.
One possible answer is to post a message saying what to do in the double click event handler, and look out for it and react appropriately in the Idling event handler.
In our case, the message that we post could be a pending element id to display. The pending element id can be stored in a global variable somewhere.
In the Idling event handler, we check the value of the pending element id. If it is zero, we have nothing to do. Otherwise, we can zoom to the respective element, and set it back to zero when we are done.
Delegation
To decouple the two parts even further, we define a delegate method for setting the pending element id, store it in the Command class, and pass a reference to the delegate to the dialogue implementation class. We also simply store the element id as an integer value in this phase, so that the dialogue implementation does not even have to know what a Revit element id is.
Here is the static variable in the external command class implementation holding the pending element id, the delegate method for setting it, and the implementation of the delegate that gets passed over to the modeless form:
/// <summary>
/// Pending element id, element to zoom to
/// next time the Idling event fires.
/// </summary>
static int _pending_element_id;

/// <summary>
/// Set a pending element id to zoom to
/// when the Idling event fires.
/// </summary>
static void SetPendingElementId( int id )
{
  _pending_element_id = id;
}

/// <summary>
/// Delegate to set a pending
/// element id to zoom to.
/// </summary>
public delegate void SetElementId( int id );
You already saw the code instantiating and displaying the modeless form, but may not have noticed that in addition to passing in the Revit widow handle to its Show method, we also passed in a delegate to the SetPendingElementId method in the constructor:
  LooseConnectorNavigator navigator
    = new LooseConnectorNavigator(
      data,
      new SetElementId( SetPendingElementId )  );

  navigator.Show( _hWndRevit );
The LooseConnectorNavigator, derived from the System.Windows.Forms base class Form, stores the delegate in a local variable _set_id:
Command.SetElementId _set_id;

public LooseConnectorNavigator(
  SortableBindingList<ConnectorData> a,
  Command.SetElementId set_id )
{
  InitializeComponent();
  dataGridView1.DataSource = a;
  _set_id = set_id;
}
Right after instantiating and displaying the form, we subscribe to the Idling event and terminate the command. At that point, our access to the Revit API is closed, and the modeless form lives outside of the Revit API context. However, as said, every time the Idling event is triggered, our event handler is called, and we re-enter the Revit API context, giving us a chance to check whether we have a pending element id to display and giving us full access to the Revit API in order to do so.
So let's look at the two event handlers.
Double Click Event Handler
The double click event handler has to determine the element id of the pending element to display. It can do so by retrieving the current row in the data grid view and extracting the appropriate cell contents. The element id of the element hosting the unconnected connector is stored in the last column of the grid view. Here is the implementation of the event handler and its SetElementIdFromRow helper method, which calls _set_id to transmit the pending element id back to the main command and the Idling event handler:
void SetElementIdFromRow(
  int rowIndex,
  bool doubleClick )
{
  //
  // do something on double click,
  // except when on the header:
  //
  if( rowIndex > -1 )
  {
    DataGridViewRow row
      = dataGridView1.Rows[rowIndex];

    int n = row.Cells.Count;

    DataGridViewCell cell = row.Cells[n - 1];

    int id = ( int ) cell.Value;

    _set_id( id );

    Debug.Print(
      "{0} click on row {1} --> element id {2}",
      doubleClick ? "Double" : "Single",
      rowIndex, id );
  }
}

void dataGridView1_CellDoubleClick(
  object sender,
  DataGridViewCellEventArgs e )
{
  SetElementIdFromRow( e.RowIndex, true );
}
Idling Event Handler
In the Idling event handler, we first of all check whether we have anything to do at all. This check should be extremely quick, since the event handler may be called hundreds of times per second if Revit has nothing else to do. If the pending element id is non-zero, we wish to highlight and display it on the Revit screen.
This can be achieved using the ShowElements, which requires access to the active UIdocument and Document, which we can retrieve from the Revit application. We already explained how to access the Revit application from an Idling event handler in the initial discussion of the Idling event, by simply casting the sender argument to an Application instance.
So here is the final resulting implementation of the Revit Idling event handler. As said, whenever the user has selected an element to zoom to in the modeless dialogue, the pending element id is set. The event handler picks it up and zooms to it.
Since we are not modifying the Revit document in any way, there is no need to start a transaction.
void OnIdling( object sender, IdlingEventArgs ea )
{
  int id = _pending_element_id;

  if( 0 != id )
  {
    Application app
      = sender as Application;

    UIApplication uiapp
      = new UIApplication( app );

    UIDocument uidoc
      = uiapp.ActiveUIDocument;

    Document doc
      = uidoc.Document;

    ElementId eid = new ElementId( id );
    Element e = doc.get_Element( eid );

    Debug.Print(
      "Element id {0} requested --> {1}",
      id, new ElementData( e, doc ) );

    // look, mom, no transaction required!

    uidoc.Selection.Elements.Clear();
    uidoc.Selection.Elements.Add( e );
    uidoc.ShowElements( e );

    //LooseConnectorNavigator.Id = 0;
    _pending_element_id = 0;
  }
}
Reaction
The reaction to a double click is surprisingly snappy, if you know what is going on in the background. If you don't know there is nothing to indicate that the modeless form is not an integral part of Revit itself.
I showed the modeless form in the discussion on populating a data grid view:
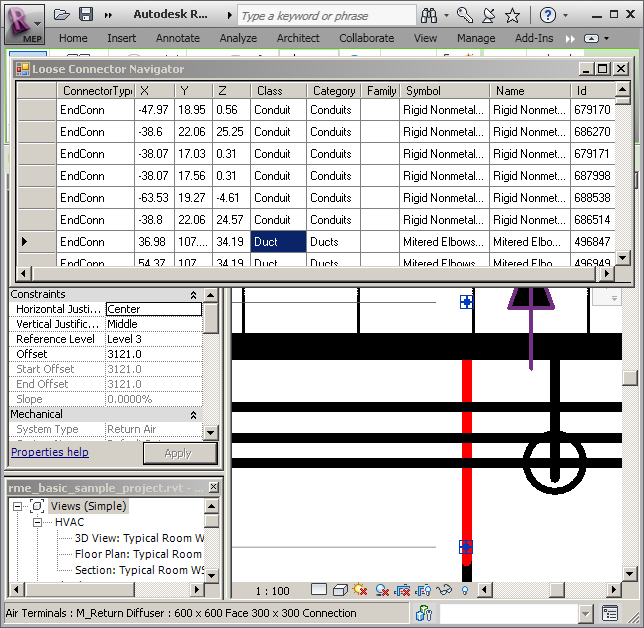
Once a user clicks on one of the unconnected connectors listed in the form, Revit immediately zooms to it. In some cases, if the element is not visible in the current view, Revit will ask whether to search for another suitable view to display it in:

If the current view was suitable or a suitable one was found, the double clicked element is highlighted and zoomed in:
I hope you find this sample useful in your development work. As said, the response at the AEC DevCamp conference in Boston and the Waltham and Munich DevLabs was pretty enthusiastic.
Here is a slightly further cleaned up version of this sample, loose_connectors_6.zip, including the complete source code and Visual Studio solution.