Pre-, Post- and Pick Select
Today is a holiday in Neuchâtel, Ascension Day, and it is raining cats and dogs.
I recently explored an issue with accessing the revision data in a Revit model, and made strong use of my beloved element lister and built-in parameter checker tools. I already discussed their use for various analysis purposes such as exploring element parameters and accessing the title block information of a sheet.
In many cases, such an exploration involves looking at the parameters of an element that is not visible on the screen and therefore cannot be picked interactively. I used to use the standard Revit user interface to select such elements, picking Manage > Inquiry > Select by ID and typing in the element id I am interested in.
Doing this repeatedly, I thought I could save myself a couple of clicks by integrating this into the built-in param4ter checker, or rather into the utility method GetSingleSelectedElementOrPrompt which it uses. The previous version already supported pre- and post-selection, i.e. an element could be selected either before or after launching the command. To implement this, the method simply checks the contents of the current selection set. If exactly one element is selected, that is used, otherwise the user is prompted to select an element on the screen.
I decided to enhance this to allow either on-screen selection or typing in the element id.
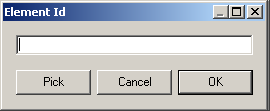
To do so, I first need a dialogue with a text entry field for typing it, so I implemented a new ElementIdForm class with the following graphical user interface:

Its code it pretty trivial, it just maintains a string variable for the typed-in element id and reacts to the clicks on the three buttons. If the pick button is clicked, the element id is set to the empty string and a dialogue result OK is returned, which informs the GetSingleSelectedElementOrPrompt that an interactive pick selection is required.
Here is the code for GetSingleSelectedElementOrPrompt, checking for a single preselected element, displaying the element id form otherwise, and reacting to the result of that:
public static Element
  GetSingleSelectedElementOrPrompt(
    UIDocument uidoc )
{
  Element e = null;
  ElementSet ss = uidoc.Selection.Elements;
  if( 1 == ss.Size )
  {
    ElementSetIterator iter = ss.ForwardIterator();
    iter.MoveNext();
    e = iter.Current as Element;
  }
  else
  {
    string sid;
    DialogResult result = DialogResult.OK;
    while( null == e && DialogResult.OK == result )
    {
      using( ElementIdForm form
        = new ElementIdForm() )
      {
        result = form.ShowDialog();
        sid = form.ElementId;
      }
      if( DialogResult.OK == result )
      {
        if( 0 == sid.Length )
        {
          Reference r = uidoc.Selection.PickObject(
            ObjectType.Element,
            "Please pick an element" );

          e = r.Element;
        }
        else
        {
          ElementId id = new ElementId(
            int.Parse(( sid ) ) );

          e = uidoc.Document.get_Element( id );
          if( null == e )
          {
            ErrorMsg( string.Format(
              "Invalid element id '{0}'.",
              sid ) );
          }
        }
      }
    }
  }
  return e;
}
I added one little enhancement to the parameter values displayed as well. In previous versions, the value sting was displayed in addition to the raw database value. This is especially useful for real-valued data, in which case the value string displays value converted to the current the user selected unit. For element ids, a description of the element including its name and category is displayed in addition to the raw integer value. I now also added code to display the corresponding built-in category name for a negative element id. This may not always be appropriate, but in many cases it is.
Here is the code for determining what the minimum and maximum built-in category enumeration values are:
static int _min_bic = 0;
static int _max_bic = 0;

static void SetMinAndMaxBuiltInCategory()
{
  Array a = Enum.GetValues( typeof( BuiltInCategory ) );
  _max_bic = a.Cast<int>().Max();
  _min_bic = a.Cast<int>().Min();
}
This helper method checks whether a given integer value lies within this range and returns a string displaying the corresponding BuiltInCategory enumeration value:
static string BuiltInCategoryString( int i )
{
  if( 0 == _min_bic )
  {
    SetMinAndMaxBuiltInCategory();
  }
  return (_min_bic < i && i < _max_bic )
    ? " " + ((BuiltInCategory) i).ToString()
    : string.Empty;
}
The code we use to display the additional information for an element id now looks like this:
  string s;
  if( StorageType.ElementId == param.StorageType
    && null != doc )
  {
    ElementId id = param.AsElementId();

    int i = id.IntegerValue;

    if( 0 > i )
    {
      s = i.ToString()
        + BuiltInCategoryString( i );
    }
    else
    {
      Element e = doc.get_Element( id );
      s = ElementDescription( e, true );
    }
  }
For example, let's explore the parameters of a newly added revision element.
I opened a project with a few sheets in it and ran the command Lab2_1_Elements to save all its elements to a file, which I renamed to RevitElementsBeforeRevision.txt. I then added a new revision via View > Revisions > Add > Per Sheet > Apply > OK and listed the elements to a second file RevitElementsAfterRevision.txt. The difference between the two files shows that one single element was added:
C:\tmp\ >diff
  RevitElementsBeforeRevision.txt
  RevitElementsAfterRevision.txt
2720a2721
> Id=129893; Class=Element; Category=Revision; Name=Revisions;
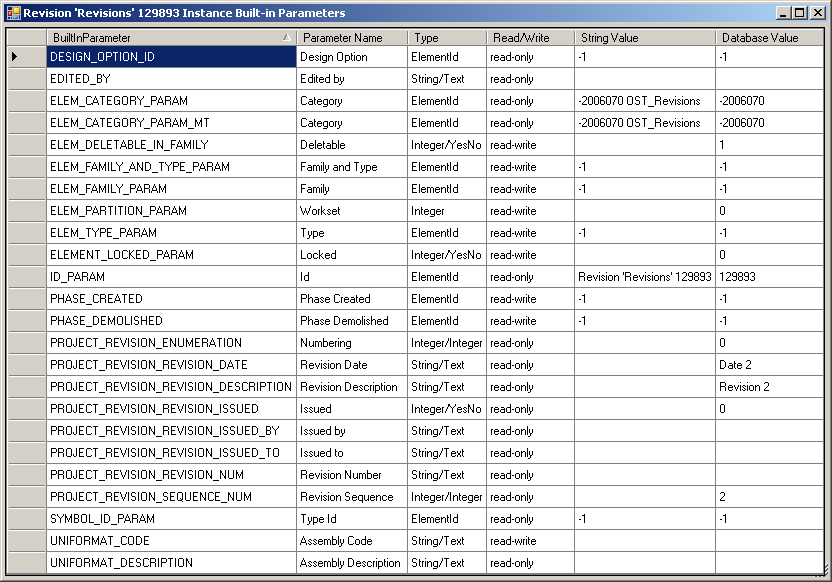
This element cannot be picked on the screen, but I can enter its id 129893 into my new element id entry form to select it for displaying its parameters, which show up like this:

Note that the built-in category enumeration value is now displayed in both raw integer and descriptive string form.
For completeness sake, here is the same data in text format:
Revision 'Revisions' 129893 Instance Built-in Parameters

DESIGN_OPTION_ID                      Design Option        ElementId       read-only  -1                          -1
EDITED_BY                             Edited by            String/Text     read-only
ELEM_CATEGORY_PARAM                   Category             ElementId       read-only  -2006070 OST_Revisions      -2006070
ELEM_CATEGORY_PARAM_MT                Category             ElementId       read-only  -2006070 OST_Revisions      -2006070
ELEM_DELETABLE_IN_FAMILY              Deletable            Integer/YesNo   read-write                             1
ELEM_FAMILY_AND_TYPE_PARAM            Family and Type      ElementId       read-write -1                          -1
ELEM_FAMILY_PARAM                     Family               ElementId       read-write -1                          -1
ELEM_PARTITION_PARAM                  Workset              Integer         read-write                             0
ELEM_TYPE_PARAM                       Type                 ElementId       read-write -1                          -1
ELEMENT_LOCKED_PARAM                  Locked               Integer/YesNo   read-write                             0
ID_PARAM                              Id                   ElementId       read-only  Revision 'Revisions' 129893 129893
PHASE_CREATED                         Phase Created        ElementId       read-write -1                          -1
PHASE_DEMOLISHED                      Phase Demolished     ElementId       read-write -1                          -1
PROJECT_REVISION_ENUMERATION          Numbering            Integer/Integer read-only                              0
PROJECT_REVISION_REVISION_DATE        Revision Date        String/Text     read-only                              Date 2
PROJECT_REVISION_REVISION_DESCRIPTION Revision Description String/Text     read-only                              Revision 2
PROJECT_REVISION_REVISION_ISSUED      Issued               Integer/YesNo   read-only                              0
PROJECT_REVISION_REVISION_ISSUED_BY   Issued by            String/Text     read-only
PROJECT_REVISION_REVISION_ISSUED_TO   Issued to            String/Text     read-only
PROJECT_REVISION_REVISION_NUM         Revision Number      String/Text     read-only
PROJECT_REVISION_SEQUENCE_NUM         Revision Sequence    Integer/Integer read-only                              2
SYMBOL_ID_PARAM                       Type Id              ElementId       read-only  -1                          -1
UNIFORMAT_CODE                        Assembly Code        String/Text     read-write
UNIFORMAT_DESCRIPTION                 Assembly Description String/Text     read-only
To see the truncated lines, copy and paste them to an editor.
I trust you will find these tools as useful as I do.
Here is today's snapshot of my current version of the Revit API introduction labs, including the element lister Lab2_1_Elements and the built-in parameter checker commands described above.