Material Quantity Extraction
This is the tenth and last part of Scott Conover's Autodesk University 2009 class on analysing building geometry.
One common analytical requirement is to extract material quantities of elements in the document. Revit 2010 introduced methods to directly obtain the material volumes and areas computed by Revit for material takeoff schedules:
- Element.Materials – obtains a list of materials within an element.
- Element.GetMaterialVolume – obtains the volume of a particular material in an element.
- Element.GetMaterialArea – obtains the area of a particular material in an element.
The methods apply to categories of elements where Category.HasMaterialQuantities property is true. In practice, this is limited to elements that use compound structure, like walls, roofs, floors, ceilings, a few other basic 3D elements like stairs, plus 3D families where materials can be assigned to geometry of the family, like windows, doors, columns, MEP equipment and fixtures, and generic model families. Note that within these categories there are further restrictions about how material quantities can be extracted. For example, curtain walls and curtain roofs will not report any material quantities themselves; the materials used by these constructs can be extracted from the individual panel elements that make up the curtain system. As a side note from Jeremy, I just wonder whether these methods for querying the material volumes might possibly also be useful for the determination of all model elements.
Note that the volumes and areas computed by Revit may be approximate in some cases. For example, for individual layers within a wall, minor discrepancies might appear between the volumes visible in the model and those shown in the material takeoff schedule. These discrepancies tend to occur when you use the wall sweep tool to add a sweep or a reveal to a wall, or under certain join conditions.
Temporary Element Suppression
These methods allow you to extract the material quantities for an as-modelled Revit project. But what if you need to extract gross material quantities of layered elements like walls, floors, and roofs, where the quantities are extracted before they are cut or modified by other elements?
What is needed to extract gross material quantities is a way to remove elements that cut other elements. In fact, this capability exists in the Revit API, but it may not be obvious: it is the temporary use of the Delete method. When you delete elements that cut other elements, the cut element's geometry is restored to its original state. As another side note from Jeremy, we have already discussed some other interesting and surprising uses of temporary element deletion to determine the association between a tag and the tagged element, the relationship between a wall and its wall footing, or any host and its hosted elements, and the title block of a sheet.
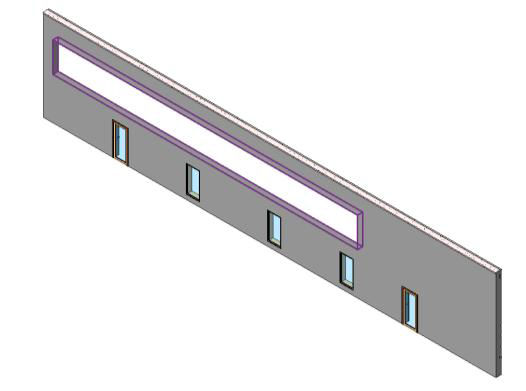
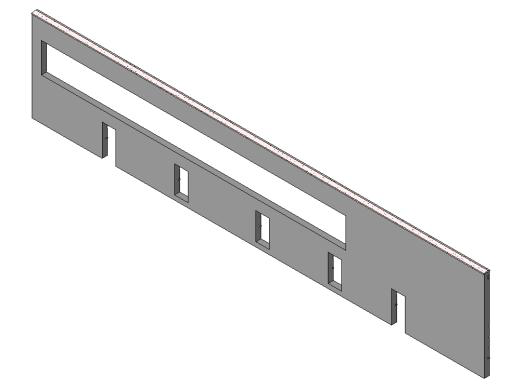
Note that use of the Hide method instead of Delete is not sufficient for this; Hide will remove display of the cutting elements, but the holes left behind are still present. Here is a wall before the hide of cutting elements:
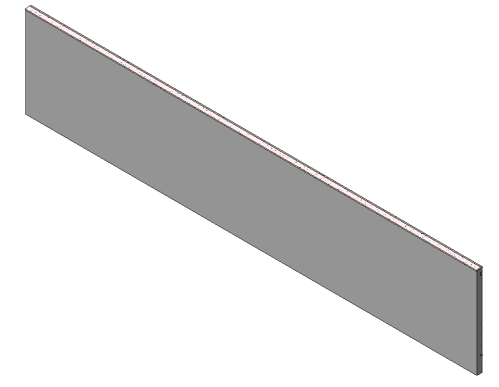
Instead of hide, you will want to make a temporary deletion: this can be done by creating a transaction, executing the deletion, extracting the needed quantities, and then aborting the transaction. Here is the same wall after the cutting elements have been deleted:
Example: Extraction of Gross and Net Material Quantities
In this example, we combine both the material quantity extraction tools and temporary suppression of cutting elements (opening, windows, and doors), to extract both gross and net material quantities.
Please refer to Scott's AU class material for the full source code of this sample project.
The code implementing the material quantity extraction is in the module ElementMaterialQuantities.cs and is very nicely structured. It includes some interesting snippets that are well worth highlighting here. Scott defines a storage class MaterialQuantities for the extracted material quantities and an interface and base class MaterialQuantityCalculator implementing a material quantity calculator for all element types. Its main calculation method is self-explanatory:
public void CalculateMaterialQuantities()
{
  CollectElements();
  CalculateNetMaterialQuantities();
  CalculateGrossMaterialQuantities();
}
Some of its other methods include:
- CalculateMaterialQuantitiesOfElement to calculate and store material quantities for a given element.
- DeleteAllCuttingElements to delete all elements that cut out of target elements, to allow for calculation of gross material quantities.
- CalculateNetMaterialQuantities to calculate net material quantities for the target elements.
- CalculateGrossMaterialQuantities to calculate gross material quantities for the target elements, i.e. material quantities with all openings, doors and windows removed.
The difference between the two latter is worth highlighting:
private void CalculateNetMaterialQuantities()
{
  foreach (Autodesk.Revit.Element e in m_elementsToProcess)
  {
    CalculateMaterialQuantitiesOfElement(e);
  }
}

private void CalculateGrossMaterialQuantities()
{
  m_calculatingGrossQuantities = true;

  m_doc.BeginTransaction();

  DeleteAllCuttingElements();

  foreach (Autodesk.Revit.Element e in m_elementsToProcess)
  {
    CalculateMaterialQuantitiesOfElement(e);
  }

  m_doc.AbortTransaction();
}
Different specialised classes for specific element types such as walls, floors and roofs are derived from the base class and simply differ in their manner of selecting the target elements, which is obviously done using Revit API element filtering.
The command mainline then defines a template method to execute a calculator for one type of Revit element:
private void ExecuteCalculationsWith<T>()
  where T : MaterialQuantityCalculator, new()
{
  T calculator = new T ();
  calculator.SetDocument(m_doc);
  calculator.CalculateMaterialQuantities();
  calculator.ReportResults(m_writer);
}
Using the template method and the individual element handlers, the command mainline is as simple as this:
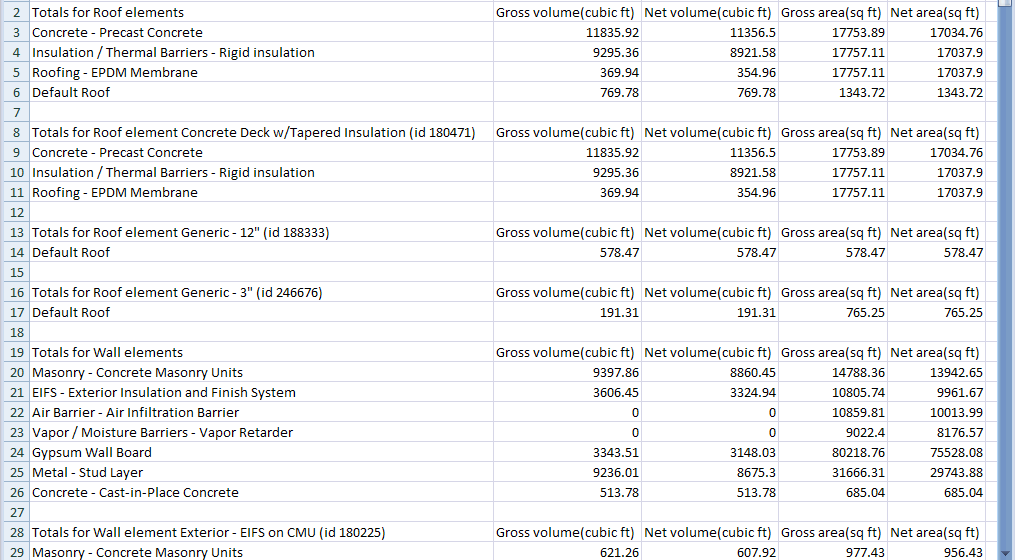
public IExternalCommand.Result Execute(
  Autodesk.Revit.ExternalCommandData revit,
  ref string message,
  Autodesk.Revit.ElementSet elements)
{
  m_app = revit.Application;
  m_doc = m_app.ActiveDocument;

  string filename = "C:/CalculateMaterialQuantities.csv";

  m_writer = new StreamWriter( filename );

  ExecuteCalculationsWith<
    RoofMaterialQuantityCalculator>();

  ExecuteCalculationsWith<
    WallMaterialQuantityCalculator>();

  ExecuteCalculationsWith<
    FloorMaterialQuantityCalculator>();

  m_writer.Close();

  Process.Start( "Excel", filename );

  // This operation doesn't change the model,
  // so return cancelled to cancel the transaction

  return IExternalCommand.Result.Cancelled;
}
This concludes this series based on Scott's AU presentation. Very many thanks to Scott for all the novel and important information and the many powerful examples he provided!
Addendum
On request, I now uploaded Scott's ORIGINAL AU 2009 class handout, AU09_CP222-3_Analyze_Geometry_Revit_API.pdf.
Please also take a look at the article on AsCurveFollowingFace and SortCurvesContiguous; it presents an updated version of Scott Conover's Geometry API handout document from the Autodesk University 2011 class, cp4011_conover.pdf.
Addendum 2
Please also note that the example discussed above is also included in the Revit SDK MaterialQuantities sample.