Spot Elevation Creation on Top of Beam
Here is another interesting solution to discuss in between the series on the Revit API geometry library from Scott Conover's Autodesk University presentation on analysing building geometry. This issue was also raised by Scott and deals with adding a spot elevation to a beam. It contains useful information both about spot elevation creation and using FindReferencesByDirection to find the top of a beam more easily than with get_Geometry.
Question: I am trying to add a spot dimension to the location curve of a beam. However, when I ask the beam location curve for a reference, it returns null. I found the same when I tried to obtain a reference for the location curve of a wall.
Answer: The assumption that a location curve can return a reference is completely incorrect. The location curve of a beam or wall does not represent a referenceable object.
A spot elevation should be created referencing a physical piece of geometry, for instance the top surface of the beam. You can still rely on the location curve to compute the nearest point of the spot elevation.
Below is the source code for a Revit 2010 VSTA macro that places three spot elevations on the top of a beam, at the midpoint and both ends. It defines three methods:
- FindView – Return a view in the document with the given name.
- FindTopMostReference – Return a reference to the topmost face of the given element.
- NewSpotElevation – the macro entry point, creating new spot elevations on the top surface of a beam.
The implementation of FindView is pretty standard:
private View FindView( Document doc, String name )
{
  TypeFilter filter = Create.Filter.NewTypeFilter(
    typeof( View ), true );

  ElementIterator iter = doc.get_Elements( filter );
  View ret = null;

  iter.Reset();
  while( iter.MoveNext() )
  {
    Element e = iter.Current as Element;

    if( e.Name == name )
    {
      ret = e as View;
      break;
    }
  }
  return ret;
}
FindTopMostReference is much more interesting. We define a viewDirection vector pointing straight down, and a point centerOfTopOfBox that is located exactly above the element whose top surface we are targeting. Using FindReferencesByDirection and filtering the resulting intersections to get the closest reference that belongs to the given element guarantees that the top surface is identified.
The entire operation is encapsulated in a transaction. This is used for the creation of a temporary view which can then be discarded afterwards. We thus avoid having to search for an existing 3D view. Remember that a 3D view is needed to use FindReferencesByDirection. The view is created within the transaction so we have a default 3D view to work with, and the transaction is then aborted so as not to keep the view around afterwards.
private Reference FindTopMostReference( Element e )
{
  Document doc = e.Document;

  doc.BeginTransaction();

  XYZ viewDirection = Create.NewXYZ( 0, 0, -1 );

  View3D view3D = doc.Create.NewView3D(
    viewDirection );

  BoundingBoxXYZ elemBoundingBox
    = e.get_BoundingBox( view3D );

  XYZ max = elemBoundingBox.Max;

  XYZ minAtMaxElevation = elemBoundingBox.Min;

  minAtMaxElevation.Z = max.Z;

  XYZ centerOfTopOfBox = minAtMaxElevation
    .Add( max ).Divide( 2 );

  centerOfTopOfBox.Z = centerOfTopOfBox.Z + 10;

  ReferenceArray references
    = doc.FindReferencesByDirection(
      centerOfTopOfBox, viewDirection, view3D );

  double closest = Double.PositiveInfinity;

  Reference ret = null;

  foreach( Reference r in references )
  {
    if( r.Element.Id.Value == e.Id.Value
      && r.ProximityParameter < closest )
    {
      ret = r;
      closest = r.ProximityParameter;
    }
  }
  doc.AbortTransaction();

  return ret;
}
Note how the reference is the face on the top of the element, whereas the target point is evaluated from the location curve parameter. This works even if the location alignment of the beam is along the bottom of the beam; the elevations are still at the top.
This method probably deserves being copied into your personal toolbox right away for reference and future reuse. It looks both generally useful and instructive to me.
Finally, here is the implementation of the NewSpotElevation macro mainline, which performs the following steps:
- Find the view named "West".
- Find the beam family instance with a specific hardcoded element id.
- Use FindTopMostReference to obtain a reference to its top surface.
- Retrieve its location curve.
- Open a transaction to apply changes to the model.
- Step along the location curve to create spot elevations along the top surface at the beginning, midpoint and end of the beam.
- Close the transaction to apply the changes to the model.
Note that this is an application-level macro. Application-level macros are required to manage all their own transactions, whereas document-level macros automatically open a transaction on the active document, just like external commands.
public void NewSpotElevation()
{
  Document doc = ActiveDocument;

  View westView = FindView( doc, "West" );

  // define the hard coded element id of beam:

  ElementId instanceId = Create.NewElementId();

  instanceId.Value = 230298;

  FamilyInstance familyInstance = doc.get_Element(
    ref instanceId ) as FamilyInstance;

  Reference topReference = FindTopMostReference(
    familyInstance );

  LocationCurve lCurve = familyInstance.Location
    as LocationCurve;

  doc.BeginTransaction();

  for( int beamIndex = 0; beamIndex < 3; ++beamIndex )
  {
    XYZ lCurvePnt = lCurve.Curve.Evaluate(
      0.5 * beamIndex, true );

    XYZ bendPnt = lCurvePnt.Add(
      Create.NewXYZ( 0, 1, 4 ) );

    XYZ endPnt = lCurvePnt.Add(
      Create.NewXYZ( 0, 2, 4 ) );

    // NewSpotElevation arguments:
    //
    // View view, Reference reference,
    // XYZ origin, XYZ bend, XYZ end, XYZ refPt,
    // bool hasLeader

    SpotDimension sd = doc.Create.NewSpotElevation(
      westView, topReference, lCurvePnt, bendPnt,
      endPnt, lCurvePnt, true );
  }
  doc.EndTransaction();
}
Scott provided a sample model ForSpotElevation.rvt containing a beam that runs N-S so that the West view shows the three different spot elevations, displaying them even more clearly by putting it at an angle.
Here is the west view of the target beam before running the macro:

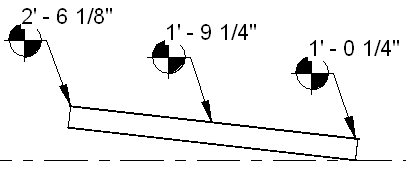
Here are the resulting spot elevations created by the macro on the beam's top surface:
I converted Scott's VSTA macro source code to create a new Building Coder sample external command named CmdNewSpotElevation. Here is version 1.1.0.60 of the complete Building Coder source code and Visual Studio solution including the new command.
Many thanks to Scott for providing this useful and instructive solution!