Modeless Pressure Drop Tool
This weekend I went with a couple of men friends to spend two days together in Arcegno near Locarno. One afternoon we went climbing together in Ponte Brolla at the end of the Maggia Valley. We did some very easy climbs, because some of us were absolute beginners, Jimmy (4b), Ostro (5a), Mekka (4c), and Muckel (5b), wonderful slab climbing on the big, clean, warm sloping rock face. The next day we went on a hike from Aurigeno, a few kilometres up the Maggia Valley, up to Capoli (1001 m), Prada, and Chegg, to beautiful old stone houses on a mountain path with no connection to any road and even a group of tipis and a view out over the Lago Maggiore. Just before boarding the train back into the colder and moister north, I took a very nice long walk along the bank of the lake from Locarno out toward Tenero in order to savour the beautiful clear and sunny Sunday afternoon.
Back home again I return to the Revit API and BIM analysis. One simple BIM exploration required in the MEP HVAC domain is analysis of the pressure drop caused in a ventilation system by the various duct and fitting elements.
What would the ideal user interface for such an analysis tool look like?
One very minimalistic approach would be to hover over or pick the duct or fitting element of interest and see the result immediately displayed, wouldn't it?
This minimalistic interface can actually easily be implemented using the current Revit API, as we demonstrated in our discussion on modeless dialogues. A modeless dialogue is especially useful for interactive exploration of the Revit model, since the dialogue box and the Revit user interface both remain active at the same time.
Joel Karr of CADworks created a very sweet little implementation of just this kind of modeless pressure drop tool with a number of interesting aspects, such as:
- The command loop managing user interaction to select elements and control the modeless dialogue.
- Functionality to determine the pressure drop data from a given Revit element.
- Displaying the data to the user, which can be achieved very simply using an appropriate data container.
Joel shows us how to harness some powerful .NET framework functionality to implement the complete tool with a minimum of coding.
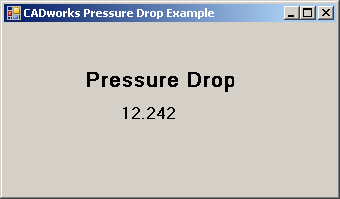
The tool is launched by invoking an external command. This displays a modeless dialogue which initially has no data to display:
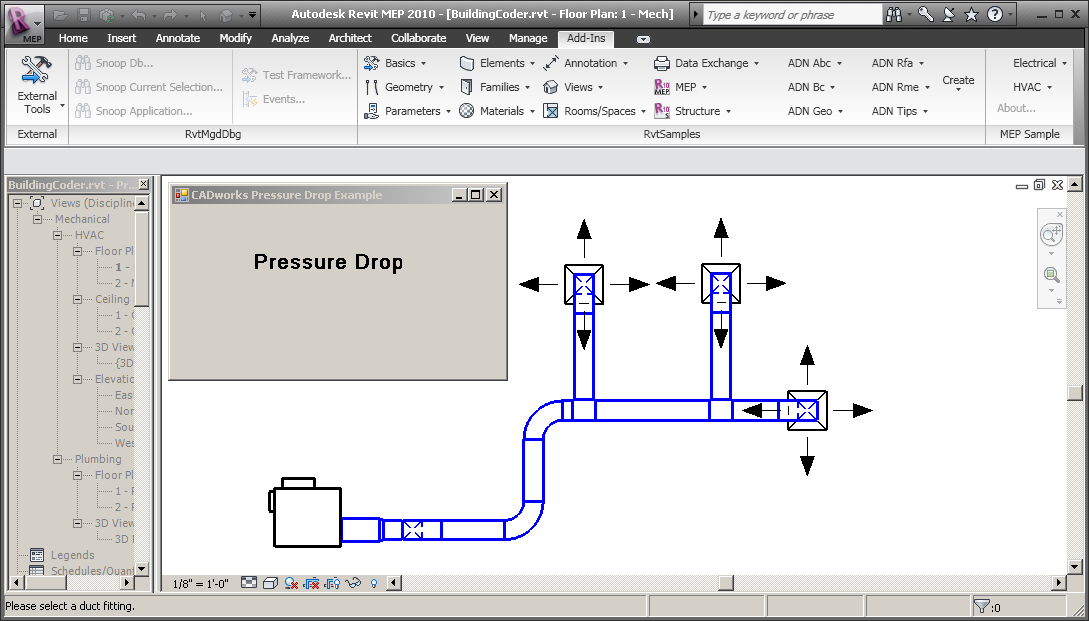
As long as it is running, it prompts the user to select a duct or fitting element. Every time an element is selected, the dialogue updates to reflect the pressure drop in the selected element:
As soon as the form is closed, the command terminates.
You will probably be surprised to see how little code is required to achieve this. It takes much more text to describe it thoroughly in words, though:
- Data container.
- Modeless form.
- Determining the pressure drop.
- Command loop.
- Retrieve Revit window handle.
- Retrieve pressure drop from selected element.
- Displaying the data in the form.
- Caveat.
- Source code.
Let's start by looking at Joel's minimalistic data container class:
Data Container
Here is a note from Joel on implementing his modeless pressure drop tool based on the original modeless dialogue sample:
I changed up your modeless dialogue a little bit to store the selection in a data class. That way when I dispose the form I can dispose the selection and change the using Boolean to false. Then it can exit the while loop of the form.
The data container makes use of the auto-implemented properties which enables a very succinct implementation:
public class Data
{
  public bool UsingWindow { get; set; }
  public bool GetElements { get; set; }
  public double PressureDrop { get; set; }
  public Selection Selection { get; set; }
  public Data()
  {
    UsingWindow = true;
    GetElements = true;
  }
}
The two Boolean member variables are used to control the flow in the main command loop. The other two store the current interactive user selection in Revit and the pressure drop calculated for the currently selected element. It can't get much shorter than that, can it?
Modeless dialogue form
The modeless dialogue used to display the data basically just defines the label to receive the pressure drop value. The only code that needs to be added to the automatically generated Visual Studio designer code is the data container instance member and its initialisation:
public partial class WindowHandleForm : Form
{
  public Data CDWKSData { get; set; }

  public WindowHandleForm(Data data)
  {
    InitializeComponent();

    CDWKSData = data;
  }
}
We will see below how the pressure drop value is retrieved from the Revit database and sent to the label in the form.
Determining the Pressure Drop
Now we come to the central question of querying the Revit element for its pressure drop.
Question: I would like to be able to see the result of Revit's Pressure Drop Calculations for duct fittings. I can choose the ASHRAE Table and the Loss Method but would like to see the result as the Pressure Drop parameter similar to the straight ducts. Is there a way to use the Pressure Drop Calculator through the API? Or is there a way to make this show? Here is the area I would like to see populated:
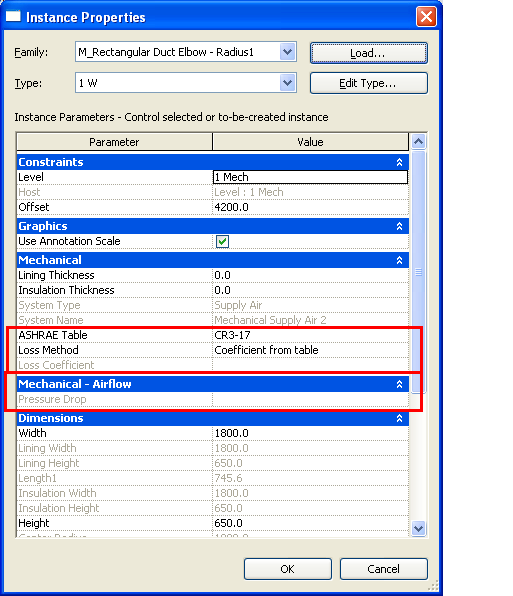
On a duct elbow, I looked at the value of the built-in parameter RBS_PressureDrop, but it is null when it is not filled out through the user interface. The value is not filled in automatically when I view the duct fitting through Revit. I need a method that actually calculates the pressure drop for a fitting. To do this by hand, an engineer can look at the size of the fitting, select the correct ASHRAE table, and then look up the value. Revit does this automatically but does not display the result.
Answer: This data is available from the connectors, not the fitting itself. You can use the Connector.PressureDrop property, which returns the instantaneous pressure drop of a given connector, calculated according to system. This means that to determine the pressure drop of fitting, such as a duct elbow, you need to iterate over its connectors and retrieve the data from them. The pressure drop of the elbow maps to the one of the connectors on this family instance. The Connector.PressureDrop property will not return a null value. Here is a pseudo-code snippet:
double get_pressure_drop(
  FamilyInstance ductElbow )
{
  foreach( Connector c in
    ductElbow.MEPmodel.ConnectorManager.ConnectorSet )
  {
    if( this connector c is the one required )
    {
      break;
    }
  }
  return c.PressureDrop;
}
Command Loop
Now we need to tie together the code accessing the pressure drop data to populate and drive the modeless form. How does this all fit together to provide the useful functionality presented above?
Here is the entire definition of the external command class with the mainline code of its Execute method, including three collapsed code regions which we expand and explore in more detail below:
public class Command : IExternalCommand
{
  static WindowHandle _hWndRevit = null;

  public CmdResult Execute(
    ExternalCommandData commandData,
    ref string message,
    ElementSet elements)
  {
    #region Get Revit Window Handle

    Autodesk.Revit.Application app
      = commandData.Application;

    Document doc = app.ActiveDocument;

    Data data = new Data();
    data.Selection = doc.Selection;

    using( WindowHandleForm f
      = new WindowHandleForm( data ) )
    {
      f.Show( _hWndRevit );

      while( data.UsingWindow )
      {
        if( data.GetElements )
        {
          // Clear Selection and Pressure Drop Value:

          data.Selection.Elements.Clear();
          data.PressureDrop = 0;

          // User Selects an Element:

          data.Selection.StatusbarTip
            = "Please select a duct fitting.";

          data.Selection.PickOne();

          SelElementSet ss = data.Selection.Elements;

          #region Process Selection for Pressure Drop

          #region Send Information to Window Label

        }
      }
    }
    return CmdResult.Succeeded;
  }
}
Note how the Boolean UsingWindow and GetElements member variables of the data container class are used to control the flow and termination of the loop.
Retrieving the Revit Window Handle
The window handle is retrieved and stored in a WindowHandle helper class using the same code as in the initial discussion of the modeless dialogue:
#region Get Revit Window Handle
if (null == _hWndRevit)
{
  Process process
    = Process.GetCurrentProcess();

  IntPtr h = process.MainWindowHandle;

  _hWndRevit = new WindowHandle(h);
}
#endregion // Get Revit Window Handle
Retrieving the Pressure Drop from a Selected Element
Here is the final resulting code to retrieve the pressure drop data from any applicable selected element, be it a duct or a fitting:
#region Process Selection for Pressure Drop

foreach (Element e in ss)
{
  if (e is Duct)
  {
    Duct duct = e as Duct;

    Parameter p
      = duct.ParametersMap.get_Item(
        "Pressure Drop" );

    data.PressureDrop = p.AsDouble();
  }
  else if (e is FamilyInstance
    //&& e.Category.Name == "Duct Fittings"
    && e.Category.Id.Value.Equals(
      (int) BuiltInCategory.OST_DuctFitting ) )
  {
    FamilyInstance fitting = e as FamilyInstance;

    foreach (Connector c in
      fitting.MEPModel.ConnectorManager.Connectors)
    {
      if (c.PressureDrop > data.PressureDrop)
      {
        data.PressureDrop = c.PressureDrop;
      }
    }
  }
}
#endregion
Identifying a duct element is easy, since the Revit API defines a dedicated class for it. In that case, the pressure drop is available directly from the corresponding "Pressure Drop" element parameter.
On the other hand, a fitting is a family instance with a 'Duct Fittings' category, which we obviously identify using the language independent built-in category comparison. If the selection is a fitting we need to loop through its connectors and retrieve the highest pressure drop value from those instead. Multiple branch fittings would need to return a different pressure drop value for each branch.
Displaying the Data in the Form
To display the pressure drop in the modeless form, we simply loop through all the form's controls until we find one named lblPressure, and then set its window text:
#region Send Information to Window Label

foreach( System.Windows.Forms.Control control
  in f.Controls.Find( "lblPressure", true ) )
{
  control.Text = Math.Round(
    data.PressureDrop, 4 ).ToString();
}
#endregion
Caveat
Only use modeless dialogues if you really know what you are doing. In general, modal dialogues are preferable because they are more robust, and easier to understand and implement. Revit is basically treating all external commands as modal, and the API is only partially functional once the command has returned. In this example, the command actually does not return before the modeless form is closed, so that is a non-issue in this case.
Source code
Here is the complete PressureDropTool source code and Visual Studio solution.