2D Polygon Areas and Outer Loop
When I started writing this post I was sitting in McCallan airport in Las Vegas enjoying a delay due to a faulty part added to the already delayed flight back to Europe. By now we have passed through London, G�teborg and Franfurt on the DevDays tour since then. Anyway, I had a chance to explore some more interesting geometrical issues in Revit here. We already discussed determining the profile boundary loop polygons for floor slabs and walls. In most cases, the outermost boundary loop is listed first in the array of edge loops provided by the face element. However, my good friend Thomas Fink of SOFiSTiK just submitted a case in which this is not the case, so we need to determine for ourselves which of the loops is the outer one and which are inner ones associated with holes in the wall or floor. As far as I know, the easiest way to do this is to calculate the area of each polygon. The polygon with the largest area is the outer loop, all others are inner holes. As Thomas pointed out to me, if you know that the shapes of the polygons are very simple and regular, for example rectangular, then you can use the circumference instead of the area to determine which is the largest.
One approach to calculate their areas is to project them onto a two-dimensional plane. Another approach calculates each polygon's plane data in 3D space, i.e. its normal vector and distance from the origin. Using an algorithm which we plan to discuss later, its area can be obtained as a by-product of these calculations.
Determining the area of a two-dimensional polygon is easy. You can determine the clockwise or counter-clockwise winding direction and area of a two-dimensional polygon using the following formula:
area = sign * 0.5 * sumi( xi * ( yi+1 - yi-1 ) )
The indexing needs to loop around the end, so to speak, so that for n polygon vertices numbered from i = 0 to n - 1, you identify p-1 with pn-1. Here is some code making use of this algorithm, ported from my custom C++ classes to C# and the Revit API:
double GetSignedPolygonArea( List<UV> p )
{
  int n = p.Count;
  double sum = p[0].U * ( p[1].V - p[n - 1].V );
  for( int i = 1; i < n - 1; ++i )
  {
    sum += p[i].U * ( p[i + 1].V - p[i - 1].V );
  }
  sum += p[n - 1].U * ( p[0].V - p[n - 2].V );
  return 0.5 * sum;
}
The lines before and after the loop in the middle handle the boundary cases for looping back to the end from the beginning and looping around to the beginning from the end.
Addendum: Here is an incredibly easy and convincing illustrated explanation of how and why this algorithm to find the area of a polygon works.
The polygons we obtain for the floor and wall boundary loops are three dimensional. Since we are assuming that the floor is horizontal, it is trivial to project the three-dimensional points into two-dimensional ones in the XY plane by simply dropping the Z coordinate. This is handled by a series of Flatten methods defined like this:
UV Flatten( XYZ point )
{
  return new UV( point.X, point.Y );
}

List<UV> Flatten( List<XYZ> polygon )
{
  double z = polygon[0].Z;
  List<UV> a = new List<UV>( polygon.Count );
  foreach( XYZ p in polygon )
  {
    Debug.Assert( Util.IsEqual( p.Z, z ),
      "expected horizontal polygon" );
    a.Add( Flatten( p ) );
  }
  return a;
}

List<List<UV>> Flatten( List<List<XYZ>> polygons )
{
  double z = polygons[0][0].Z;
  List<List<UV>> a = new List<List<UV>>( polygons.Count );
  foreach( List<XYZ> polygon in polygons )
  {
    Debug.Assert( Util.IsEqual( polygon[0].Z, z ),
      "expected horizontal polygons" );
    a.Add( Flatten( polygon ) );
  }
  return a;
}
There is probably some more elegant generic method for handling this transformation. Unfortunately I am still working in Visual Studio 2005, so I do not have the latest version of the .NET generics installed.
I implemented a new command CmdSlabBoundaryArea for testing this area calculation. It is very similar to the previous CmdSlabBoundary command, with additional code to calculate the area of each polygonal loop and the maximum area. We repackaged the existing functionality for determining the floor boundary polygons into a separate utility method GetFloorBoundaryPolygons() in the CmdSlabBoundary class in order to reuse it in the new command.
The code assumes that only one floor is picked. If more than one is selected, then the outer loop will only be highlighted for biggest floor slab, since all boundary loops of all floors are collected in one single list before determining the maximum area. Here is the enhanced code for the new command:
List<List<XYZ>> polygons
  = CmdSlabBoundary.GetFloorBoundaryPolygons(
    app, floors );

List<List<UV>> flat_polygons
  = Flatten( polygons );

int i = 0, n = flat_polygons.Count;
double[] areas = new double[n];
double a, maxArea = 0.0;
foreach( List<UV> polygon in flat_polygons )
{
  a = GetSignedPolygonArea( polygon );
  if( Math.Abs( maxArea ) < Math.Abs( a ) )
  {
    maxArea = a;
  }
  areas[i++] = a;
}

Debug.WriteLine( string.Format(
  "{0} boundary loop{1} found.",
  n, Util.PluralSuffix( n ) ) );

for( i = 0; i < n; ++i )
{
  Debug.WriteLine( string.Format(
    "  Loop {0} area is {1} square feet{2}",
    i,
    Util.RealString( areas[i] ),
    ( areas[i].Equals( maxArea )
      ? ", outer loop of largest floor slab"
      : "" ) ) );
}
Here is the same floor that we used at in the previous slab boundary posting, displayed from below after running the slab boundary detection, calculating the loops on the bottom face, and drawing model lines around them, offset downwards by a small amount:
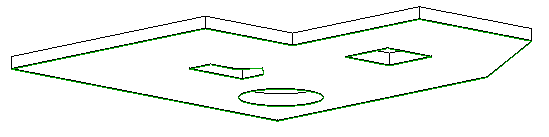
This is the output produced in the debug output window by running this command on that floor:
4 boundary loops found.
  Loop 0 area is -1651.45 square feet, outer loop of largest floor slab
  Loop 1 area is 31.37 square feet
  Loop 2 area is 43.06 square feet
  Loop 3 area is 66.18 square feet
Note that this algorithm only calculates polygon areas, i.e. areas of regions with straight edges. If you need the exact areas taking into account the other types of curved boundary edges, you will have to adapt the algorithm accordingly. Bear in mind that the Revit Face class is also perfectly capable of calculating its area. However, the Face.Area property also estimates the face area by integrating its tessellated edges and will slightly underestimate when the edges are curved, so it is probably using a method similar to the one presented here.
Also note that the opposite winding directions for the outer and inner loops are just as expected. The vertices of the outer face loop are oriented counter clockwise when looking at the solid from outside. Since the edge loops we are examining stem from the bottom face of the slab, we should actually be looking at them from below to obtain the correct vertex ordering. Since our area calculation algorithm is only two-dimensional, it assumes that we are looking down on the XY plane from the positive Z direction, so the winding directions of all loops are reversed.