Two days ago, I implemented an enhancement to the node server REST API of my WebGL viewer and its interactive testing framework suggested by my colleague Cyrille Fauvel.
He also suggested applying a whole host of other best practices to separate content, styles and logic.
I am quite impressed that I succeeded in breaking so many rules implementing such a small project.
I am very happy and find it extremely important to get them corrected early on.
Many thanks to Cyrille for taking such a deep look!
Here are some of the things he pointed out:
I fiddled around quite a bit two weeks ago to find the best way to synchronise my Heroku repository with GitHub.
I was quite happy to get it down to the four lines I listed in my solution to fixing the request entity too large error:
  $ git add server.js
  $ git commit -m "raised body parser limit to 1mb to fix error: request entity too large"
  $ git push git master
  $ git push heroku master
Cyrille pointed out that there is a better way to achieve this with even less effort, officially supported by Heroku:
You know there is a built-in GitHub connection, right? So you do not need to do anything at all. The GitHub RSS feed will tell Heroku to rebuild the site anytime you do a push. This is OK for a repo where you do not need to customise. You obviously cannot use it for anything private, e.g., secret API keys etc.
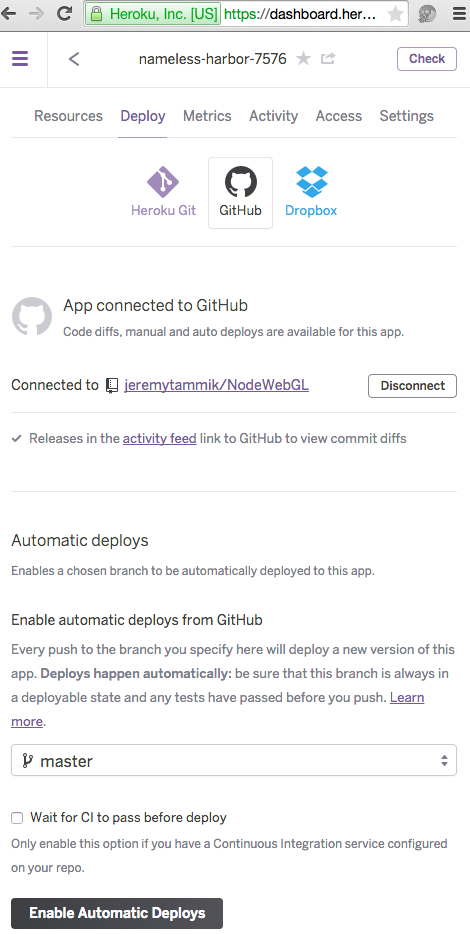
To activate automatic Heroku deploys directly from each GitHub push, go to your Heroku app page, e.g., Heroku apps > app name > Deploy > GitHub > Connect to GitHub:
I went ahead accordingly and specified automatic deployment of the nameless-harbor-7576 Heroku app from the master branch of the
NodeWebGL GitHub repo.
For safety's sake, I also immediately created a second development branch to ensure I have the option of pushing experimental changes to GitHub without triggering a new Heroku deployment every time.
Suggestion: For
transferring data to the view template,
you "added an onload attribute to the body tag to call the start_render JavaScript function."
You are thus mingling the HTML content and the JavaScript logic of your app.
For best practice, you should always strictly separate content, styles and logic, e.g., HTML, CSS and JavaScript.
Eliminate all style definitions and JavaScript code from the HTML.
Always use class attributes referring CSS style instead of explicit style attributes on the HTML elements.
Instead of adding code to the onload attribute to the body tag, define a jquery document ready handler:
$(document).ready (function () { ... }) ;
Suggestion: document.getElementById('p').innerHTML;
is not cross platform.
It will only work in certain browsers, e.g. Chrome.
The jquery method $('#p').text() is more portable.
Implementation of the clean separation of content, styles and logic in a portable manner as suggested by Cyrille requires the use of the jquery JavaScript library.
It provides easy, fast, small, feature-rich support for HTML document traversal, manipulation, event handling, animation, and Ajax that works across a multitude of browsers.
So where do I get it from?
I mean, where does my web page get it from?
To be more precise, each and every one of my web pages will need to retrieve it.
Obviously, it would be nice to serve up this ubiquitous library with maximum efficiency.
Enter CDN, the content delivery network, a large distributed system of servers deployed in multiple data centres to serve content to end-users with high availability and high performance.
I will grab my version of jquery from the Google Hosted Libraries CDN.
In my testing framework HTML, I define a form with the id 'form_0019' and an iframe with 'iframe_0019'.
My initial code was using these non-portable statements to set their action and src attributes, respectively:
  document.getElementById('form_0019').action = apiurl;
  document.getElementById('iframe_0019').src = baseurl;
My first attempt at changing this to become more portable by using jquery looked like this:
  $('#form_0019').action = apiurl;
  $('#iframe_0019').src = baseurl;
This does indeed create an 'action' and a 'src' field, but in the wrong place, having no effect.
I found the proper solution to this by reading the Stack Overflow thread on changing the action of a form with jquery and taking a close look at the contents of the different elements involved in the Chrome JavaScript debugger:
  $('#form_0019').get(0).setAttribute('action', apiurl);
  $('#iframe_0019').get(0).setAttribute('src', baseurl);
Similarly, I had three input fields for the geometry data whose values were being set like this:
  document.getElementById('position').value = arrays['position'].join(', ');
  document.getElementById('normal').value = arrays['normal'].join(', ');
  document.getElementById('indices').value = arrays['indices'].join(', ');
Initially, I tried to use these jquery statements:
  $('#position').value = arrays['position'].join(', ');
  $('#normal').value = arrays['normal'].join(', ');
  $('#indices').value = arrays['indices'].join(', ');
That did not work.
Analogously to above, I need to go one level deeper to get at the HTML element I am after:
  $('#position').get(0).value = arrays['position'].join(', ');
  $('#normal').get(0).value = arrays['normal'].join(', ');
  $('#indices').get(0).value = arrays['indices'].join(', ');
In my initial implementation, I had trouble loading the TWGL JavaScript module twgl-full.min.js into the viewer template, viewer.swig or viewer.handlebars.
Cyrille resolved that by adding a preceding slash:
<script src="/twgl-full.min.js"></script>
Rather trivial.
Much more importantly, though, that means that I can now happily and freely use JavaScript in separate modules throughout the viewer template, as required for further and cleaner separation of content, style and logic.
For instance, we can split out the vertex and fragment shaders into separate modules.
In Cyrille's words:
You cannot really move the shaders, because they are not real JavaScript. They are strings passed into the WebGL framework and interpreted there. Workaround: use ajax to load them. Save each shader script as a JavaScript module and add a reference to it, e.g. like this:
  <script src="/vs.js" id="vs" type="x-shader/x-vertex"></script>
  <script src="/fs.js" id="fs" type="x-shader/x-fragment"></script>
The browser will ignore this initially.
Then, in the viewer.js JavaScript code, $.ajax uses the script tag from the HTML file to know where to put the shader content.
It makes an ajax call to the server and asks it to return the content, which is returned as a string.
You can use that when creating the WebGL program info by passing in the string content instead of the script tag.
The createProgramInfo function takes either the id of the shader script or a string defining the code directly:
  programInfo = twgl.createProgramInfo ( gl,
    [ shadersHolder.vertex, shadersHolder.fragment ]);
Here is the code implementing using ajax to load the shader strings into the shadersHolder dictionary:
var shadersLoaderCount =0 ;
var shadersHolder ={ vertex: '', fragment: '' } ;

function loadShader (shader, type) {
  var $shader =$(shader) ;
  $.ajax ({
    url: $shader [0].src,
    dataType: 'text',
    context: {
      name: $shader [0].id,
      type: type
    },
    complete: processShader
  }) ;
}

function processShader (jqXHR, textStatus) {
  shadersLoaderCount-- ;
  shadersHolder [this.context.type] =jqXHR.responseText ;

  if ( !shadersLoaderCount )
    shadersLoadComplete () ;
}

function shadersLoadComplete () {
  start_render () ;
}

$(document).ready (function () {
  var vertexShaders =$('script[type="x-shader/x-vertex"]') ;
  var fragmentShaders =$('script[type="x-shader/x-fragment"]') ;
  shadersLoaderCount =vertexShaders.length + fragmentShaders.length ;

  loadShader (vertexShaders [0], 'vertex') ;
  loadShader (fragmentShaders [0], 'fragment') ;
}) ;
By the way, what are these shaders for, briefly?
A vertex shader determines the colour of a point. A fragment shader interpolates between points to determine how to render a face. Usually vertex is assigned colour, and fragment is assigned a texture or interpolates the vertex colours. Here we use global Blinn or Phong shaders. You could create separate shaders for different pieces of geometry. In that case, use an approach like this ajax method helps and enables you to use tons of different shaders without having to include them all in the scene.
With all of that in place, the entire implementation looks much nicer and cleaner!
A bunch of new JavaScript modules all live in the public folder:
The Handlebars view template pulling in the jquery and TWGL libraries, the shaders and the main viewer logic from separate JavaScript modules is tremendously much shorter:
<!DOCTYPE html>
<html>
  <head>
    <meta charset="utf8">
    <title>The Building Coder WebGL Viewer</title>
    <style>
      html, body, canvas {
        margin: 0px;
        width: 100%;
        height: 100%;
        overflow: hidden;
      }
      p {
        display: none;
      }
    </style>

    <script src="/jquery-1.3.2.min.js"></script>
    <script src="/twgl-full.min.js"></script>

    <script src="/vs.js" id="vs" type="x-shader/x-vertex"></script>
    <script src="/fs.js" id="fs" type="x-shader/x-fragment"></script>
    <script src="/viewer.js"></script>
  </head>
  <body>
      <p id="p">{{ position}}</p>
      <p id="n">{{normal}}</p>
      <p id="i">{{indices}}</p>
      <canvas id="c"></canvas>
  </body>
</html>
The API request handler is split up into two separate modules for v1 and v2:
The only one of interest to us is v2, which now just exports two functions:
exports.get = function(req, res) {
  res.send('API v2 GET: Here belongs a succinct '
    + 'explanation how to use The Building Coder '
    + 'WebGL Viewer REST API v2...');
}

exports.post = function(req, res) {
  console.log('API v2 POST: ' + JSON.stringify(req.body));
  res.render('viewer', req.body);
}
Finally, the heart of the matter, the mainline node server implementation in server.js now looks like this:
var express = require('express');
var app = express();

app.set('port', (process.env.PORT || 5000));

app.use(express.static(__dirname + '/public'));

app.get('/', function(req, res) {}); // leads to public/index.html

var bodyParser = require('body-parser');
app.use( bodyParser.json({ limit: '1mb' }) );
app.use( bodyParser.urlencoded({ extended: true, limit: '1mb' }) );

app.set('views', __dirname + '/views');

var use_swig_render = false;

if( use_swig_render ) {
  var swig = require('swig');
  app.engine('swig', swig.renderFile);
  app.set('view engine', 'swig');
  swig.setDefaults({ cache: false });
  app.set('view cache', false);
}
else {
  var handlebars = require('express-handlebars');
  app.engine('handlebars', handlebars());
  app.set('view engine', 'handlebars');
}

var apiv1 = require('./routes/apiv1');

app.get('/api/v1', apiv1.get);
app.post('/api/v1', apiv1.post);

var apiv2 = require('./routes/apiv2');

app.get('/api/v2', apiv2.get);
app.post('/api/v2', apiv2.post);

app.listen(app.get('port'), function() {
  console.log('Node WebGL app with '
    + (use_swig_render ? 'swig' : 'handlebars')
    + ' is running at localhost:'
    + app.get('port'));
});
The entire functionality seen by the outside world remains completely unchanged, so the previous API v1 and the enhanced v2 continue to run unaffected and can be exercised from the same unmodified interactive testing framework.
As if that was not enough, I also started updating the interactive online testing framework for this based on Cyrille's suggestions.
I have not gotten around to the cleaner separation of HTML content, CSS styles and JavaScript logic yet, but at least I replaced the non-portable document.getElementById by jquery statements as described above.
Here is the HTML form for testing the current API version v2 GET and POST functionality.
Please load this blog post as an individual post to allow these forms to work correctly. If you are in the main blog view listing multiple posts, they can interfere with previous similar definitions and get confused.
As always, the original non-API-driven version and the API version v1 still work exactly as before; I am enhancing the REST API step by step while preserving complete upward compatibility and keeping the original server running continuously at the same time:
The complete node server implementation is available from the NodeWebGL GitHub repo, and the version discussed here is 0.2.8.
The testing framework is defined right here on this page.
Simply view source or reload the page in the JavaScript debugger to explore it in more depth.